Authentik Part 2: Connecting Apps – Forward Auth & OIDC
Attach services to Authentik: forward auth with Traefik for apps without a login, and OpenID Connect for everything with its own SSO support – all verified.
Table of contents
Authentik is running – now comes the part that justifies the effort: the services behind it. There are exactly two routes, and the choice depends solely on whether the application understands SSO itself.
What are we building?
We attach two services, each the appropriate way:
- Forward auth for an application without its own login. Traefik asks Authentik before every request whether the visitor is signed in. If not, they land on the Authentik login page; if they are, the application receives their identity as HTTP headers.
- OpenID Connect (OIDC) for applications with SSO support – Grafana, Nextcloud, Forgejo, Immich and many others. There you enter client ID, secret and the endpoints, and the app does the rest.
Everything below was carried out with Authentik 2026.8 behind Traefik v3.7 on Debian 13: at the end the test service shows the forwarded identity headers, and the OIDC discovery document returns real endpoints.
Which route for which service?
The decision is almost always clear-cut:
| Service | Supports OIDC? | Route |
|---|---|---|
| Nextcloud, Grafana, Forgejo, Immich, Paperless | yes | OIDC – real accounts, roles from groups |
| Uptime Kuma, Dockge, Netdata, a static dashboard | no | forward auth |
Metrics endpoints, /actuator, internal APIs | irrelevant | forward auth or, simpler: not public (VPN) |
| Services with a mobile app (Immich, Nextcloud) | yes | OIDC only – forward auth breaks the apps (see below) |
In short: OIDC where possible, forward auth where necessary. OIDC gives the application a real user account including roles; forward auth only puts a door in front of it and passes a name through in a header.
Prerequisites
- A running Authentik from part 1, reachable at
https://YOUR_DOMAIN - A Traefik v3 with a
proxynetwork (guide) – we work a lot with middlewares here, the basics are in hardening Traefik - A service to practise on. We use
traefik/whoamibecause it echoes every header it receives – which makes it immediately obvious whether the integration really works
One domain or two?
https://YOUR_DOMAIN/, the protected service at
https://YOUR_DOMAIN/whoami. That is the frugal variant and exactly how it was tested. More common is
the split (auth.YOUR_DOMAIN for Authentik, app.YOUR_DOMAIN for the service) – the steps are
identical, only external_host and the Traefik rules then carry the other hostname.Step by step
1. Access for automation: an API token
Providers and applications can be created entirely through the API – handy, because it makes your work reproducible instead of click-based. For that, Authentik needs a token.
Because you went through the setup wizard in part 1, akadmin already exists. So you create the
token in the interface: Directory → Tokens and App passwords → Create token. Use a
descriptive identifier (api-setup), set the intent to API and the user to akadmin. After
saving, copy the key via the copy icon – it is shown only once.
On a fresh installation it can be automatic
If you set Authentik up from scratch, you can have the account and token created on the very
first start – no wizard needed. The variables belong on the worker service (not on
server) and are only read on the first startup; on an existing installation they have no
effect. Instead of the plaintext password, Authentik now recommends a hash. hash_password does not
take the password as an argument – hash_password YOUR_PASSWORD aborts with
unrecognized arguments – but via a prompt or standard input:
docker compose run --rm server hash_passwordAt the end you get a line starting with pbkdf2_sha256$. It goes into the .env as
AK_BOOTSTRAP_PASSWORD_HASH, the token as AK_BOOTSTRAP_TOKEN (for example from
openssl rand -hex 32). In compose.yaml the worker then looks like this:
  worker:
    environment:
      AUTHENTIK_BOOTSTRAP_PASSWORD_HASH: ${AK_BOOTSTRAP_PASSWORD_HASH}
      AUTHENTIK_BOOTSTRAP_TOKEN: ${AK_BOOTSTRAP_TOKEN}
      AUTHENTIK_BOOTSTRAP_EMAIL: you@YOUR_DOMAIN
The hash contains $ characters: wrap it in single quotes in the .env, and write each $
as $$ when putting it directly into compose.yaml.
Verify the token – no matter which route produced it:
curl -s -H "Authorization: Bearer YOUR_LONG_RANDOM_TOKEN" \
https://YOUR_DOMAIN/api/v3/core/users/me/{"user":{"username":"akadmin", … "is_superuser":true, …}}Warning
.env with
chmod 600, not in a script in your repository – and if you only need it for setup, delete it
afterwards under Directory → Tokens.2. Route A: forward auth for services without a login
The proxy provider is Authentik’s answer to „this app has no user management at all". It comes in
several modes; we use forward_single: one application, one provider.
First the IDs of the two default flows (known from part 1):
API=https://YOUR_DOMAIN/api/v3
TOK="Authorization: Bearer YOUR_LONG_RANDOM_TOKEN"

AUTHZ=$(curl -s -H "$TOK" "$API/flows/instances/?slug=default-provider-authorization-implicit-consent" \
  | python3 -c "import json,sys; print(json.load(sys.stdin)['results'][0]['pk'])")
INVAL=$(curl -s -H "$TOK" "$API/flows/instances/?slug=default-provider-invalidation-flow" \
  | python3 -c "import json,sys; print(json.load(sys.stdin)['results'][0]['pk'])")
Then the provider:
curl -s -X POST -H "$TOK" -H "content-type: application/json" "$API/providers/proxy/" -d "{
  \"name\": \"whoami-forwardauth\",
  \"authorization_flow\": \"$AUTHZ\",
  \"invalidation_flow\": \"$INVAL\",
  \"mode\": \"forward_single\",
  \"external_host\": \"https://YOUR_DOMAIN\"
}"
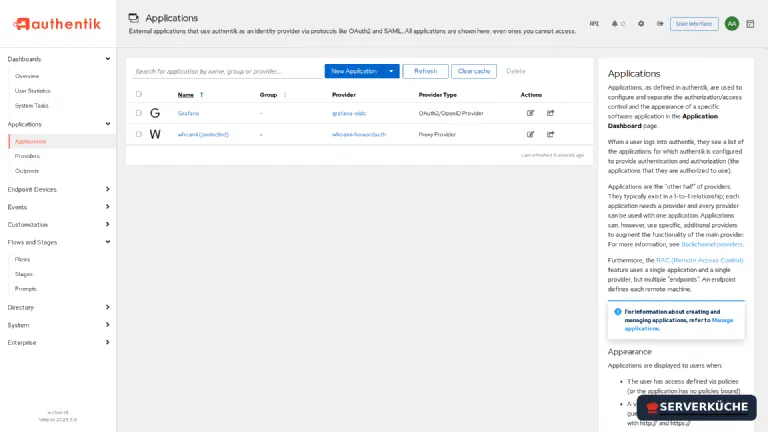
And the application that uses it – it also creates the tile in the user library:
curl -s -X POST -H "$TOK" -H "content-type: application/json" "$API/core/applications/" -d '{
  "name": "whoami (protected)", "slug": "whoami", "provider": 1
}'
The 1 is the pk from the provider call’s response. Both then appear in the overview:
3. Arm the outpost – and the most common trap
A proxy provider does not work alone: an outpost serves it. Authentik ships an embedded outpost that
runs inside the server container – you only have to assign the provider to it:
OUT=$(curl -s -H "$TOK" "$API/outposts/instances/" \
  | python3 -c "import json,sys; print(json.load(sys.stdin)['results'][0]['pk'])")
curl -s -X PATCH -H "$TOK" -H "content-type: application/json" \
"$API/outposts/instances/$OUT/" -d '{"providers": [1]}'Without authentik_host your users land on localhost
The embedded outpost does not know its public address by itself. In the test the authentik_host field
was empty, and an unauthenticated visitor was redirected to
http://localhost/application/o/authorize/… – a dead page for every user. Set it once and the redirect
is correct:
curl -s -X PATCH -H "$TOK" -H "content-type: application/json" \
  "$API/outposts/instances/$OUT/" \
  -d '{"config": {"authentik_host": "https://YOUR_DOMAIN/"}}'
Afterwards the redirect points at https://YOUR_DOMAIN/application/o/authorize/… – measured before and
after. In the interface the same field lives under Applications → Outposts → Edit.
4. Traefik: the forward auth middleware
Now the connection is missing. Traefik asks the outpost before each request – that is what the
forwardauth middleware does. On the protected service:
  whoami:
    image: traefik/whoami:v1.12
    restart: unless-stopped
    networks: [proxy]
    labels:
      - "traefik.enable=true"
      - "traefik.http.routers.whoami.rule=Host(`YOUR_DOMAIN`) && PathPrefix(`/whoami`)"
      - "traefik.http.routers.whoami.entrypoints=websecure"
      - "traefik.http.routers.whoami.tls.certresolver=le"
      - "traefik.http.routers.whoami.middlewares=ak-auth"
      - "traefik.http.services.whoami.loadbalancer.server.port=80"
      - "traefik.http.middlewares.ak-auth.forwardauth.address=http://server:9000/outpost.goauthentik.io/auth/traefik"
      - "traefik.http.middlewares.ak-auth.forwardauth.trustForwardHeader=true"
      - "traefik.http.middlewares.ak-auth.forwardauth.authResponseHeaders=X-authentik-username,X-authentik-groups,X-authentik-email,X-authentik-name,X-authentik-uid"
The three decisive lines:
addresspoints at the outpost – here through the service nameserver(Authentik reaches it under this alias on the Docker network) on the shared Docker network, so without a detour over the internet. The path/outpost.goauthentik.io/auth/traefikis the Traefik-specific check endpoint.trustForwardHeader=truepasses theX-Forwarded-*headers along so Authentik knows the originally requested address and can redirect back correctly.authResponseHeadersis the actual benefit: Traefik copies these headers from Authentik’s response into the request to your application. Without that line the service is protected but has no idea who is there.
5. Verify that it really protects
First without a login – curl is enough:
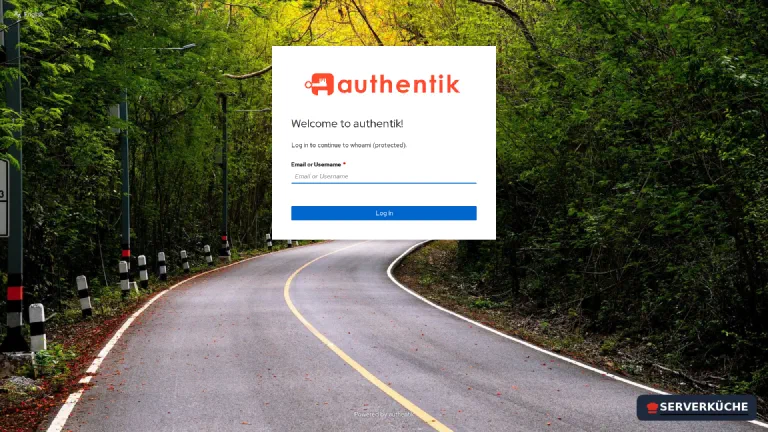
curl -s -o /dev/null -w "%{http_code} → %{redirect_url}\n" https://YOUR_DOMAIN/whoami302 → https://YOUR_DOMAIN/application/o/authorize/?client_id=…&redirect_uri=…%2Foutpost.goauthentik.io%2Fcallback…A 302 to the Authentik login is the desired result. In the browser the login page appears before
the service:
After logging in you are back at /whoami – and the service shows what it receives:
GET /whoami HTTP/1.1
Host: YOUR_DOMAIN
X-Authentik-Email: you@YOUR_DOMAIN
X-Authentik-Groups: authentik Admins
X-Authentik-Name: authentik Default Admin
X-Authentik-Uid: d216e191a6f972c39931a005a7998a68…
X-Authentik-Username: akadmin
X-Forwarded-Proto: https
That is the whole trick: the application has not a single line of login code – and still knows who is
sitting in front of it. Services that support header authentication (Grafana with auth.proxy,
Paperless, Forgejo with reverse-proxy auth) can turn that straight into a session.
Headers are only as safe as their path
X-Authentik-Username, that header must never be able to come from
outside. Hence: the service is reachable exclusively through Traefik (no published port), and the
middleware is attached to every router leading to it. A second router without the middleware is an
open door.6. Know the limits of forward auth
Before you put everything behind forward auth: the mechanism assumes a browser. An unauthenticated
request gets a 302 redirect to a login form – and that is exactly what breaks anything that is not a
browser:
- Mobile apps (Nextcloud, Immich, Audiobookshelf) cannot do anything with the redirect. They see HTML instead of JSON and report „server unreachable". For such services OIDC is the only sensible route – or you exempt the app’s paths deliberately.
- API access and scripts (
curl, backup jobs, webhooks) run into nothing. Wherever a service is addressed by token, that path has to bypass the middleware – or you move the protection to an IP allowlist. - WebDAV and sync clients behave like APIs, with the same outcome.
For such exceptions you create a second router without the auth middleware that serves only the necessary path – and protect it differently, for example with the application’s own token. Example for an API path:
      - "traefik.http.routers.app-api.rule=Host(`YOUR_DOMAIN`) && PathPrefix(`/api`)"
      - "traefik.http.routers.app-api.entrypoints=websecure"
      - "traefik.http.routers.app-api.tls.certresolver=le"
- "traefik.http.routers.app-api.middlewares=rate@file"Warning
/api, not /), and write down why it exists – in six months nobody will remember otherwise.For completeness, the third mode of the proxy provider: forward_domain. With it one outpost
serves all services of a domain (*.YOUR_DOMAIN), and users sign in once for all of them. That is the
more convenient setup from roughly three services onwards, but it requires Authentik and all
applications to live under the same parent domain so the session cookie can be shared. What is tested
here is forward_single – switching only affects the provider’s mode and the cookie domain.
7. Route B: OpenID Connect for services with their own SSO
If the application has an OIDC login, that is the better route: it then keeps real user accounts including roles instead of just seeing a name in a header.
Create the provider – what matters is the redirect URI, which must match the application’s callback address exactly (Grafana as an example):
curl -s -X POST -H "$TOK" -H "content-type: application/json" "$API/providers/oauth2/" -d "{
  \"name\": \"grafana-oidc\",
  \"authorization_flow\": \"$AUTHZ\",
  \"invalidation_flow\": \"$INVAL\",
  \"client_type\": \"confidential\",
  \"redirect_uris\": [{\"matching_mode\": \"strict\", \"url\": \"https://GRAFANA_DOMAIN/login/generic_oauth\"}]
}"
The response contains client_id and client_secret – you need both in the application. Then create an
application pointing at this provider, as above.
Whether everything lines up is revealed by the discovery document. Authentik publishes it per application under its slug:
curl -s https://YOUR_DOMAIN/application/o/grafana/.well-known/openid-configuration \
| python3 -m json.tool | head -12"issuer": "https://YOUR_DOMAIN/application/o/grafana/",
"authorization_endpoint": "https://YOUR_DOMAIN/application/o/authorize/",
"token_endpoint": "https://YOUR_DOMAIN/application/o/token/",
"userinfo_endpoint": "https://YOUR_DOMAIN/application/o/userinfo/",Note: the issuer is application-specific (it contains the slug), while the remaining endpoints are the same for all applications. Exactly these addresses – or the discovery URL itself if the app supports it – go into the application. For Grafana, for instance:
GF_AUTH_GENERIC_OAUTH_ENABLED=true
GF_AUTH_GENERIC_OAUTH_NAME=Authentik
GF_AUTH_GENERIC_OAUTH_CLIENT_ID=YOUR_CLIENT_ID
GF_AUTH_GENERIC_OAUTH_CLIENT_SECRET=YOUR_CLIENT_SECRET
GF_AUTH_GENERIC_OAUTH_SCOPES=openid profile email
GF_AUTH_GENERIC_OAUTH_AUTH_URL=https://YOUR_DOMAIN/application/o/authorize/
GF_AUTH_GENERIC_OAUTH_TOKEN_URL=https://YOUR_DOMAIN/application/o/token/
GF_AUTH_GENERIC_OAUTH_API_URL=https://YOUR_DOMAIN/application/o/userinfo/Groups as roles
role_attribute_path. That lets you steer admin rights centrally through Authentik groups instead of
maintaining them in every app. Which is exactly why part 1 advised attaching permissions to groups
rather than individual users.8. Who may do what? Restricting access
As long as no policy is attached to an application, every signed-in user may use it. For the normal case you bind a group to the application: Applications → your application → policy / group / user bindings, then pick the group.
Only after that does the tile disappear from the user library for everyone else – and access is blocked. The most honest way to verify is with a second test account that is not in the group: it should neither see nor be able to open the application.
When things go wrong
The script aborts while looking up the flows with IndexError: list index out of range. This
only happens right after a fresh installation: /-/health/ready/ already reports 200 while the
worker is still importing the bundled flows. In our test there was only one flow at that moment,
all 15 were there 20 to 30 seconds later. Wait briefly and run it again.
The request redirects to http://localhost/application/o/authorize/…. The embedded outpost does not
know its public address: the authentik_host field is empty. Set it to https://YOUR_DOMAIN/ (step 3) –
before that every user lands on a dead page.
Traefik answers with 500, or no redirect happens at all. Then the middleware cannot reach the
outpost. The address has to be resolvable from Traefik’s point of view – so the container name on
the shared network (http://server:9000/outpost.goauthentik.io/auth/traefik), not localhost. From
the Traefik folder, check with docker compose exec traefik wget -qO- http://server:9000/-/health/live/
whether the connection works.
The service is protected but does not know the user. authResponseHeaders is missing from the
middleware. Without that list Traefik discards the identity headers from Authentik’s response – the login
works, but the application sees nothing.
After signing in you end up in a redirect loop. Usually external_host does not match the address
actually being called (http instead of https, with or without a subdomain). It has to be exactly the URL
users open the service at.
The OIDC login fails with „redirect_uri mismatch". Authentik checks the callback address strictly.
Enter exactly the URI the application sends – for Grafana e.g.
https://GRAFANA_DOMAIN/login/generic_oauth. A missing trailing slash is enough to break it.
All signed-in users get in everywhere. Without a binding to a group an application is open to every authenticated user. Attach a group binding to the application (step 8) and verify with an account that is not in the group.
Your problem is not listed? Search all error messages →
Maintenance & backups
Spot-check after every Authentik update. An update can change flows and providers; the integrations
themselves are robust, but the quick test is worth it: curl on the protected path must still return
302, and the discovery document must show your endpoints. Two commands that keep a login from being
silently broken for weeks.
Client secrets belong in the password manager. They live in the application (environment variables) and in Authentik. If one is regenerated, the other side has to follow – note down which app uses which secret when you create it, otherwise you will be searching in both systems later.
The database matters even more now. Providers, applications and group bindings all live in
PostgreSQL. The pg_dump from part 1 is no longer a
nice-to-have: without it you rebuild every integration after an outage. Back it up daily with
Restic.
Keep the emergency exit open. Every service behind forward auth is only as reachable as Authentik.
Keep a local account in important applications – and put no tools behind SSO that you need for
repairs; that applies especially to Dockge and similar management
interfaces. Monitoring on /-/health/ready/ notices the outage
before your users do.
Tidy up tokens. The bootstrap token from step 1 is an admin access without a second factor. Once the setup is in place, delete it under Directory → Tokens – and create a dedicated token with limited rights for later automation.
Send feedback: feedback@serverkueche.de
You might also like