CrowdSec: modern, collaborative intrusion prevention
Set up CrowdSec with the Traefik bouncer: detect attacks from the access logs, block attackers with a 403 and benefit from the community blocklist.
Table of contents
Fail2ban blocks brute force on your SSH access – but what about the scanners that probe your web apps for holes all day long? CrowdSec closes exactly this gap: it detects attacks in Traefik’s access logs and bans the attackers before they even reach your applications.
What are we building?
By the end, a CrowdSec agent runs alongside your Traefik, reading along with the access logs, detecting suspicious behavior based on scenarios (port scans, path probing, known CVE exploitation, login brute force) and putting attacker IPs on a block list. A bouncer – here as a Traefik plugin – enforces these decisions: a banned IP only gets 403 Forbidden at every one of your apps. Tested with CrowdSec v1.8.1, the Traefik bouncer plugin v1.7.1 and Traefik v3.7.
This is how the parts interlock:
- Agent + Local API (LAPI): reads the logs, evaluates them against the scenarios and manages the active bans (“decisions”). That’s the container we set up.
- Bouncer: asks the LAPI on every request “is this IP banned?” and blocks if yes. The Traefik bouncer runs as a plugin directly in the reverse proxy – no additional container.
- Community blocklist: CrowdSec reports (anonymized) detected attacks to the central network and gets a blocklist fed by all users back in return. IPs that were already flagged as malicious elsewhere are then banned at your place from the start. That’s the “collaborative” in the title.
CrowdSec instead of fail2ban – or in addition?
Prerequisites
- A running reverse proxy with Traefik (the
proxynetwork and the resolverlecome from there) with at least one app behind it. - Fail2ban for SSH protection – CrowdSec handles the HTTP layer here, not SSH.
- Basic knowledge of Docker Compose and a hardened server with an active firewall.
VPS 2000 G12.5
8 vCores · 16 GB RAM · 256 GB SSD
from €26.92/month
CrowdSec runs with a few hundred MB alongside your existing app stack – the VPS 2000 has enough reserve for that.
💶 1 month free:
Single use, valid for VPS 2000 G12.5. Redeem in the cart →
💶 €5.95 voucher for new netcup customers: always valid · not for domains or VPS Lite
Step by step
Step 1: Enable Traefik’s access logs
CrowdSec can only detect what it sees – and it sees attacks via Traefik’s access logs. They’re off by default. Open the compose.yaml of your Traefik (from the Traefik tutorial, folder ~/traefik) and add these three lines to the command block:
      - "--accesslog=true"
      - "--accesslog.filepath=/var/log/traefik/access.log"
      - "--accesslog.format=json"
The JSON format is important – the CrowdSec parsers expect it that way. So that both Traefik (writing) and CrowdSec (reading) can reach the same file, you put it on a fixed host path. Add to Traefik’s volumes block:
- /var/log/traefik:/var/log/traefikCreate the directory on the host and restart Traefik:
sudo mkdir -p /var/log/traefik
cd ~/traefik && docker compose up -d
Call one of your apps once and check that lines arrive:
tail -n 2 /var/log/traefik/access.logYou should see JSON lines with "ClientHost", "RequestPath" and "DownstreamStatus". If the file stays empty, the path in the volume is wrong, or simply no request has come in yet.
Don’t skip this check: in step 2, CrowdSec only picks up files that already exist at startup. If the access.log is missing at that moment, it reports No matching files for pattern /var/log/traefik/access.log while booting and won’t read the file later either – then only a restart of the container helps.
Step 2: Set up the CrowdSec container
CrowdSec gets its own folder. First generate a bouncer key – the Traefik bouncer later authenticates with it at the LAPI:
mkdir -p ~/crowdsec && cd ~/crowdsec
openssl rand -hex 32
Copy the output; it’s used in two places shortly. Create the acquisition – it tells CrowdSec which file with which log type to read:
# ~/crowdsec/acquis.yaml
filenames:
  - /var/log/traefik/access.log
labels:
  type: traefik
Now the compose.yaml. Replace YOUR_BOUNCER_KEY with the generated key:
services:
  crowdsec:
    image: crowdsecurity/crowdsec:v1.8.1
    container_name: crowdsec
    environment:
      COLLECTIONS: "crowdsecurity/traefik"
      BOUNCER_KEY_TRAEFIK: "YOUR_BOUNCER_KEY"
      GID: "1000"
    volumes:
      - ./acquis.yaml:/etc/crowdsec/acquis.d/traefik.yaml:ro
      - /var/log/traefik:/var/log/traefik:ro
      - crowdsec-db:/var/lib/crowdsec/data/
      - crowdsec-config:/etc/crowdsec/
    networks: [proxy]
    restart: unless-stopped

volumes:
  crowdsec-db:
  crowdsec-config:

networks:
  proxy:
    external: true
What matters here:
COLLECTIONS: crowdsecurity/traefikinstalls the matching collection of parsers and scenarios for Traefik logs on the first start (including the HTTP base scenarios).BOUNCER_KEY_TRAEFIKregisters a bouncer namedTRAEFIKwith your key right at startup – that saves the detour viacscli bouncers add.GID: "1000"runs the CrowdSec process under this group.1000is the usual default for the first user; if Traefik runs as root, theaccess.logis usually world-readable and the GID doesn’t matter anyway. If it’s set more tightly, check withls -l /var/log/traefik/access.logand enter the GID of the file’s group.- The log is mounted read-only (
:ro). CrowdSec is on theproxynetwork so the Traefik bouncer can reach the LAPI atcrowdsec:8080later.
Start the container and check that everything takes effect:
docker compose up -d
docker exec crowdsec cscli collections list
The Traefik collection and the HTTP scenarios should appear as enabled:
 Name                                 📦 Status   Version
 crowdsecurity/base-http-scenarios    ✔️  enabled  1.4
 crowdsecurity/http-cve               ✔️  enabled  3.0
 crowdsecurity/linux                  ✔️  enabled  0.4
 crowdsecurity/sshd                   ✔️  enabled  0.9
 crowdsecurity/traefik                ✔️  enabled  0.2
 crowdsecurity/whitelist-good-actors  ✔️  enabled  0.4
You didn’t ask for linux, sshd and whitelist-good-actors – the image brings them along by default. sshd runs empty as long as you don’t add an SSH log to the acquisition (that’s still fail2ban’s job here); whitelist-good-actors prevents well-known good bots such as the Googlebot from being banned.
Check that the community blocklist is active – it costs nothing and is half the benefit of CrowdSec:
docker exec crowdsec cscli capi statusYou can successfully interact with Central API (CAPI)
Sharing signals is enabled
Pulling community blocklist is enabled
Pulling blocklists from the console is enabledPulling community blocklist is enabled confirms that you receive the collective block list of the CrowdSec community – attackers that stood out elsewhere are already banned at your place before they even try.
The community blocklist starts out empty
capi/community-blocklist : received 0 new entries (expected if you just installed crowdsec), and cscli decisions list reports No active decisions. CrowdSec pulls the list periodically in the background after that, so the first entries show up with a delay. That’s normal and not a configuration error.Step 3: Add the Traefik bouncer
Now the part that enforces the bans. The bouncer is a Traefik plugin and consists of two additions to your Traefik: load the plugin and define a middleware that acts on all apps.
Load the plugin by adding to the command block of ~/traefik/compose.yaml:
      - "--experimental.plugins.bouncer.modulename=github.com/maxlerebourg/crowdsec-bouncer-traefik-plugin"
      - "--experimental.plugins.bouncer.version=v1.7.1"
      - "--entrypoints.websecure.http.middlewares=crowdsec@file"
The last line attaches the bouncer middleware globally to the websecure entrypoint – so every HTTPS request to every app runs through the bouncer, without you touching each app individually.
Don't overwrite existing entrypoint middlewares
--entrypoints.websecure.http.middlewares is single-valued: if you’ve already set middlewares on this entrypoint in the Traefik setup (e.g. security headers), a second flag overwrites the existing value – then your previous middlewares silently drop out. So don’t set a second flag, but extend the existing value comma-separated, e.g. --entrypoints.websecure.http.middlewares=sec-headers@docker,crowdsec@file. Only if no middleware is attached to this entrypoint so far do you add the flag anew as above.The @file suffix tells Traefik where the middleware comes from: from the file provider, i.e. from a YAML file instead of container labels. The Traefik setup from the Traefik tutorial gets by without that provider – so you switch it on now with two more lines in the command block:
      - "--providers.file.directory=/dynamic"
      - "--providers.file.watch=true"
And mount the directory it reads from into the volumes block:
- ./dynamic:/dynamic:ro--providers.file.watch=true pays off especially here: with it, Traefik picks up changes to the middleware file without a restart – in our test a changed bouncer configuration took effect after a few seconds.
No second file-provider flag
filename and directory at the same time. If your provider points to a directory, the file below simply goes in there; if it points to a single filename file, you write the http.middlewares block into that one.Create the middleware (path adapted to your file provider):
# ~/traefik/dynamic/crowdsec.yaml
http:
  middlewares:
    crowdsec:
      plugin:
        bouncer:
          enabled: true
          crowdsecMode: stream
          crowdsecLapiScheme: http
          crowdsecLapiHost: crowdsec:8080
          crowdsecLapiKey: "YOUR_BOUNCER_KEY"
crowdsecLapiKey is the same key as in step 2 – the bouncer identifies itself with it at the LAPI. With crowdsecMode: stream the bouncer pulls the block list completely in advance at a fixed interval and answers every request from the local cache – the mode recommended by the plugin, because it doesn’t load the LAPI on every request.
Restart Traefik so it downloads the plugin and loads the middleware:
cd ~/traefik && docker compose up -d
docker compose logs -f traefik
The log must show no ERR about the plugin or the middleware (Traefik v3 logs only errors at the default level – a quiet output is the good sign). Check from the CrowdSec side that the bouncer has connected:
docker exec crowdsec cscli bouncers list Name IP Address Valid Last API pull Type Version Auth Type
TRAEFIK 172.18.0.4 ✔️ 2026-08-06T23:37:45Z Crowdsec-Bouncer-Traefik-Plugin v1.7.1 api-keyA set Last API pull proves: the plugin talks to the LAPI. The Version column reports the plugin version back – a convenient way to check after an update that Traefik really loaded the new build and not a cached old one.
Start CrowdSec first, then restart Traefik
403 – until the next pull succeeds. In our test that window lasted just under a minute; during that time the Traefik log says crowdsecQuery:unreachable. If the crowdsec container is already running, on the other hand, a Traefik restart goes through without a single failed request. So stick to the order of this tutorial: CrowdSec first (step 2), Traefik after.Step 4: Arm it and test the ban
Call one of your apps – it should respond perfectly normally:
curl -4 -s -o /dev/null -w "%{http_code}\n" https://YOUR_APP.YOUR_DOMAIN/200Now you test-ban an IP by hand and see whether the bouncer locks it out. Take your own public IPv4 (curl -4 -s https://ifconfig.me). The -4 matters, here and in the test requests: without a flag, curl on a connection with IPv6 uses the IPv6 address, and the ban and the test request can easily end up on different address families – the ban works, but your test still sees 200.
docker exec crowdsec cscli decisions add --ip YOUR_TEST_IP --duration 5m --reason "test"New bans don't take effect immediately
decisions add and the first 403). That’s no bug but intended (less load on the LAPI). In stream mode the delay comes from the pull interval (updateIntervalSeconds, default 60 seconds), in live mode from the per-IP cache of each decision (defaultDecisionSeconds, default 60 seconds). In real operation this is irrelevant; when testing you have to wait briefly. Whoever wants to reduce the reaction time lowers the respective value – i.e. updateIntervalSeconds (stream) or defaultDecisionSeconds (live) – in the middleware, instead of switching modes.After the wait, the banned IP only gets:
curl -4 -s -o /dev/null -w "%{http_code}\n" https://YOUR_APP.YOUR_DOMAIN/403Lift the test ban again:
docker exec crowdsec cscli decisions delete --ip YOUR_TEST_IPStep 5: Let it detect real attacks
The actual point: CrowdSec bans on its own, without you writing rules. As soon as a scanner probes your domain for paths (many 404 in a short time), the scenario crowdsecurity/http-probing kicks in. This is what an automatically detected ban looks like:
docker exec crowdsec cscli alerts list ID value reason country as decisions
3 Ip:162.142.125.29 crowdsecurity/http-probing US 398324 CENSYS-ARIN-01 ban:1
2 Ip:162.142.125.29 crowdsecurity/http-wordpress-scan US 398324 CENSYS-ARIN-01 ban:1docker exec crowdsec cscli decisions list ID Source Scope:Value Reason Action Country AS Events
3 crowdsec Ip:162.142.125.29 crowdsecurity/http-probing ban US 398324 CENSYS-ARIN-01 11Two things are instructive here. First, CrowdSec automatically enriches the ban with country and provider (AS) – this IP belongs to the address range of the internet-wide scanner Censys, and it triggered two scenarios at once: general path probing and the WordPress variant of it. Second, an IP can have several alerts but only one active decision – cscli decisions list reports the second one as duplicated entries skipped.
Besides the self-detected attacks, bans with the source lists:crowdsecurity/... appear here over time – that’s the community blocklist: IPs that already stood out negatively worldwide, you block before they hit you the first time.
Why local tests don't trigger anything
crowdsecurity/whitelists, which discards all private IP ranges (RFC 1918) – cscli metrics then shows them under Lines whitelisted. So a test from localhost or from the Docker network always comes to nothing; only traffic from a public IP reaches the scenarios at all.Whoever prefers to see the bans graphically instead of in cscli tables enrolls the instance for free in the CrowdSec console (the enroll command is in “Maintenance & backups”). There the same decisions appear presented nicely:
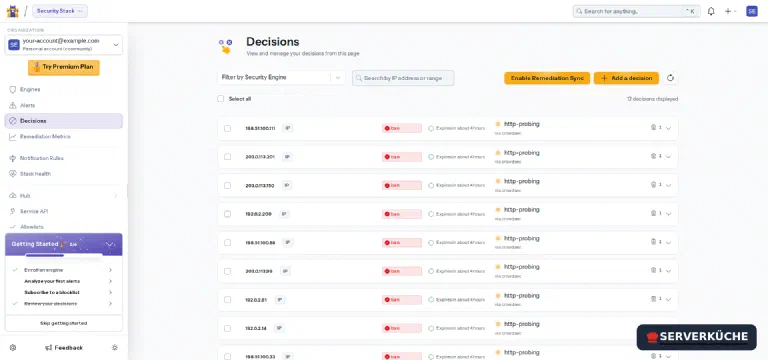
The HTTP scenarios installed with the Traefik collection cover what real scanners try all day: probing non-existent paths (http-probing), searching for sensitive files and backdoors, path traversal and SQL injection/XSS probes, suspicious user agents of known scanners, as well as the exploitation of known CVEs (from the collection crowdsecurity/http-cve). Which scenarios are active is shown by docker exec crowdsec cscli scenarios list.
One notch sharper: AppSec (WAF)
Whether CrowdSec reads your logs at all is shown by the metrics overview. A bare cscli metrics now dumps a dozen tables – so ask for the acquisition specifically:
docker exec crowdsec cscli metrics show acquisition| Source | Lines read | Lines parsed | Lines unparsed | Lines poured to bucket | Lines whitelisted |
| file:/var/log/traefik/access.log | 40 | 40 | - | - | 40 |Lines read and Lines parsed being equally high means CrowdSec reads the file and understands the JSON. That Lines whitelisted also sits at 40 here is down to the test – the requests came from the Docker network (see the box above). If the line is missing entirely, no log is arriving: cscli omits empty tables, so you don’t see Lines read: 0 but no acquisition line at all – then back to step 1.
Step 6: Don’t lock yourself out
A false alarm against your own maintenance IP is annoying. Enter your fixed IP as trusted in the middleware – the bouncer then doesn’t even check it. Add to ~/traefik/dynamic/crowdsec.yaml under bouncer::
          clientTrustedIPs:
            - "YOUR_FIXED_IP/32"
With --providers.file.watch=true (step 3) Traefik picks the change up without a restart. Verified: an IP entered as trusted keeps getting 200 even with an active ban – the bouncer doesn’t even query the block list for it.
If you did lock yourself out, one command lifts the ban immediately – and in an emergency you can always reach the server via the VNC console in the SCP:
docker exec crowdsec cscli decisions delete --ip YOUR_IP   # one IP
docker exec crowdsec cscli decisions delete --all           # all bans
When things go wrong
A freshly set ban doesn’t take effect, the IP keeps getting 200. The bouncer caches the
decisions and, in stream mode, pulls new ones only after the pull interval (up to ~60 seconds). Wait
briefly. Whoever wants to reduce the reaction time lowers updateIntervalSeconds in the middleware
(step 3).
cscli metrics show acquisition shows no line for the log file. CrowdSec isn’t reading the
logs – and because cscli omits empty tables, the line is missing entirely instead of showing
Lines read: 0. Most common cause: the container started before the access.log existed; then
docker logs crowdsec contains the line
No matching files for pattern /var/log/traefik/access.log, and CrowdSec won’t pick the file up
by itself later – cd ~/crowdsec && docker compose restart fixes it. Otherwise check
that Traefik really writes to /var/log/traefik/access.log (step 1), that both containers mount
the same host path, and that the acquis.yaml names exactly this path.
After restarting Traefik every app returns 403 – including for you. The bouncer couldn’t
reach the LAPI at startup and then blocks in doubt instead of letting traffic through unprotected.
The Traefik log says crowdsecQuery:unreachable with the URL
http://crowdsec:8080/v1/decisions/stream. Check with docker ps that the crowdsec container is
Up – as soon as the next pull succeeds (up to ~60 seconds), requests go through again on their
own. That’s safe, but makes CrowdSec a critical component: if the container isn’t running, your
site is affected. restart: unless-stopped (set above) brings it back automatically after a server
reboot.
CrowdSec bans lots of harmless or no real visitors – the detected IP is always your CDN’s. If a
CDN like Cloudflare sits in front of Traefik, Traefik only sees its IP. Then have the real
client IP read from the X-Forwarded-For header: fill forwardedHeadersTrustedIPs in the
middleware with the CDN networks – otherwise you end up banning the CDN. Directly at netcup (without
a CDN) there’s nothing to do here.
docker compose up -d on Traefik reports a plugin error. Traefik downloads the plugin from the
net on startup. Check that the server may go out (the netcup
firewall only blocks SMTP outbound, UFW nothing) and that
modulename and version are exactly right.
CrowdSec bans nothing even though the attacks are in access.log – or it bans 172.18.0.1. Then Traefik never sees the real source address in the first place. This happens with IPv6 visitors when the proxy network was created without IPv6: Docker pushes the connection through a helper process and replaces the source address with the bridge gateway’s. Every IPv6 request then carries the same 172.x.x.x in access.log, and a ban on that either hits nobody or everybody. Recreate the network with --ipv6; the instructions are in Reverse proxy with Traefik.
Your problem is not listed? Search all error messages →
Maintenance & backups
Keep scenarios current. CrowdSec’s strength is maintained detection rules – pull them regularly:
docker exec crowdsec cscli hub update && docker exec crowdsec cscli hub upgrade. You bump the image (crowdsecurity/crowdsec) and the plugin version (v1.7.1) deliberately; read the release notes on major versions. After a plugin update, theVersioncolumn incscli bouncers listtells you whether Traefik really loaded the new build. CrowdSec develops briskly – a good candidate for regular version checks.Rotate the access log. Traefik’s
/var/log/traefik/access.logotherwise grows unbounded. Set up a logrotate rule – mandatorily withcopytruncate: this variant copies the file away and empties the original in place, instead of renaming it and creating a new one. Only this way does CrowdSec’s tail keep the file access (with rename/create it would lose the handle and read nothing anymore). Create/etc/logrotate.d/traefik:Ausgabe/var/log/traefik/access.log { daily rotate 7 compress missingok notifempty copytruncate }After the truncate, CrowdSec reads on perfectly normally from the file that’s growing again – a restart of the container isn’t needed.
fail2ban stays. Don’t remove fail2ban – it continues to protect your SSH access at the host level, while CrowdSec covers the web apps. Two tools, two responsibilities.
Backups. What you must back up is above all your configuration: the folder
~/crowdsec(compose.yaml,acquis.yaml) and~/traefik/dynamic/crowdsec.yamlwith the bouncer key. Include them in your Restic backup. The block lists themselves are ephemeral and rebuild on their own – no backup needed.Optional: the CrowdSec dashboard. Whoever wants to see the attacks graphically enrolls the instance for free in the CrowdSec console (
docker exec crowdsec cscli console enroll YOUR_ENROLL_KEY). The community blocklist runs without enrollment too.Integrate it into your monitoring.
cscli metricsgives you numbers for the terminal; for continuous observation, CrowdSec provides a Prometheus endpoint (enable it in the config underprometheus:) that you can hang on your Grafana stack. Then you see bans by origin and scenario at a glance: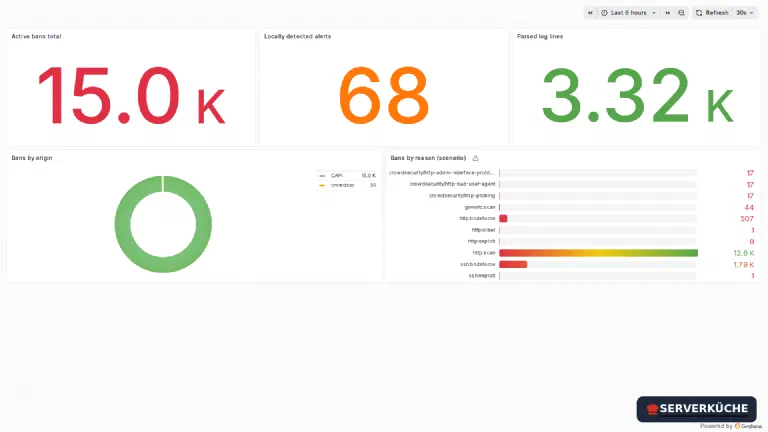
CrowdSec in Grafana: active bans by origin and scenario, fed from the Prometheus endpoint Honest about the effort: After setup, CrowdSec runs largely on its own. Plan a
hub upgradeand a look atcscli metricsand the container version once a month.
Last updated: Oct 19, 2026
Send feedback: feedback@serverkueche.de
You might also like