First steps with a netcup VPS
Just ordered a netcup VPS? Log in via SSH, install updates, create a sudo user and test it – the safe groundwork on Debian 13, step by step in 30 minutes.
Table of contents
You’ve ordered your first netcup server – congratulations! Before we fire up the kitchen, let’s set the system up cleanly.
What are we building?
By the end of this tutorial, your VPS runs a current Debian 13 with all
security updates, and you work with your own user with sudo rights instead of
permanently as root. That’s the foundation for all the other recipes in the
Serverküche – from hardening SSH to your first application.
Tip
Prerequisites
- An ordered netcup server with the credentials from your customer account
- A terminal on your machine (Linux/macOS) or an SSH client like PuTTY (Windows)
Not sure which server size you even need? The server calculator estimates the RAM and CPU you’ll need for your planned services and suggests a matching netcup plan. How the plans differ – VPS, VPS Lite or root server – is covered in the server comparison.
VPS 1000 G12.5
4 vCores · 8 GB RAM · 128 GB SSD
from €14.50/month
A good start for most self-hosting projects.
💶 1 month free:
Single use, valid for VPS 1000 G12.5. Redeem in the cart →
💶 €5.95 voucher for new netcup customers: always valid · not for domains or VPS Lite
Step by step
Step 1: Log in via SSH
Log in with your server’s IP address as root. You’ll find the IP and the
password in the credentials from your customer account:
ssh root@YOUR_SERVER_IPOn the very first login, SSH asks whether you want to trust the server:
The authenticity of host 'YOUR_SERVER_IP (YOUR_SERVER_IP)' can't be established.
ED25519 key fingerprint is SHA256:...
This key is not known by any other names.
Are you sure you want to continue connecting (yes/no/[fingerprint])?
Answer yes – your machine remembers the server from now on. After that you land
on a prompt like root@v2200123456789012345:~#: netcup assigns a v plus a long
number as the hostname, so yours will look different.
Step 2: Update the system
Freshly delivered images are rarely up to date. So the first thing to do is fetch all updates – security updates in particular should never wait:
apt update && apt upgrade -yapt update fetches the current package lists, apt upgrade -y installs all
available updates without prompting. Debian 13 ships apt 3 for this: instead of
the long package list of earlier versions you get the affected packages in columns
and a terse summary below them:
Upgrading:
  bsdutils  libblkid1  liblastlog2-2  libmount1  libsmartcols1  libuuid1  login  mount  util-linux

Summary:
  Upgrading: 9, Installing: 0, Removing: 0, Not Upgrading: 0
  Download size: 2223 kB
  Space needed: 33.8 kB / 239 GB available
How many packages pile up on your machine depends on how old the delivered image is
– the line that matters is Summary:, which tells you at a glance what gets
upgraded, installed and removed.
Warning
reboot) so the changes take effect. On
a fresh Debian there’s no automation for this yet – the safest bet is a reboot
right after the first big update. Debian does not create the marker file
/var/run/reboot-required (which indicates a pending reboot) on kernel updates by
default – the hook that creates it only arrives with the package from
automatic updates.Step 3: Create a sudo user
Don’t work as root permanently: a typo with full rights can wreck the entire
system, and having your own user is the prerequisite for
disabling root login completely later. Create a
user – we’ll call it koch (“cook”) here, but you can pick any name:
adduser kochFirst adduser asks twice for the new user’s password, then for a few optional
details. You can skip all of them with Enter and confirm with Y at the end:
New password:
Retype new password:
passwd: password updated successfully
Changing the user information for koch
Enter the new value, or press ENTER for the default
	Full Name []:
	Room Number []:
	Work Phone []:
	Home Phone []:
	Other []:
Is the information correct? [Y/n] Y
After that, give the user sudo rights:
usermod -aG sudo kochOn success, usermod prints nothing at all. So check which groups the user is in
now:
groups kochkoch : koch sudo usersWhat matters is sudo in that list – only then may the user run commands with root
rights. Debian adds the users group on its own. For what users, groups and
permissions mean in detail, see
Understanding Linux Users, Groups & File Permissions.
Step 4: Test the new user
Check in a new terminal session (keep the root session open!) that login and sudo work:
ssh koch@YOUR_SERVER_IP
sudo whoami
After entering your password, sudo whoami should return root. From now on you
continue working with this user.
When things go wrong
ssh: connect to host … port 22: Connection timed out. Usually the IP was
mistyped or the server isn’t fully provisioned yet. Check the IP in your customer
account and whether the server is shown as “online” there. Wait a few minutes
after ordering.
Permission denied, please try again on root login. Wrong password – often a
copy-paste issue with invisible trailing spaces, or a different keyboard layout.
Copy the password without surrounding spaces directly from the credentials.
WARNING: REMOTE HOST IDENTIFICATION HAS CHANGED!. The server was reinstalled
and has a new host key – SSH rightly raises the alarm. If you reinstalled it,
remove the old entry with ssh-keygen -R YOUR_SERVER_IP and reconnect. If you
didn’t reinstall, investigate before you connect.
sudo: command not found as the new user. On minimal images the package is
sometimes missing. Install it as root: apt install sudo. Then check that the
user is in the group: groups koch must contain sudo – otherwise repeat step 3
and log out and back in once.
Your problem is not listed? Search all error messages →
Maintenance & backups
- Updates: You should schedule
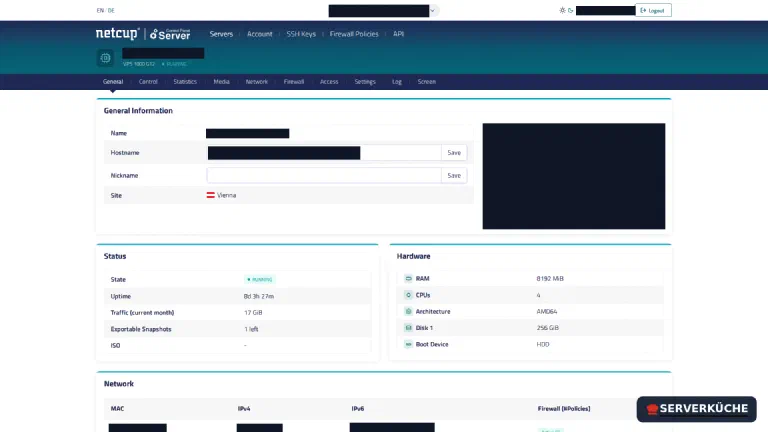
sudo apt update && sudo apt upgradeat least weekly – or automate security updates withunattended-upgrades. - Snapshots: Create a snapshot in the netcup Server Control Panel (SCP) before bigger changes. It’s your safety line while you don’t have a proper backup strategy yet – but a snapshot does not replace a backup outside the server.
- Credentials: Keep the root password safe (password manager). Via the VNC console in the SCP you can still reach the server even when SSH is stuck.
You’ll find both in the server overview of the SCP: the VNC console is under the “Screen” tab (called “Bildschirm” if your panel is set to German), and the remaining snapshot quota is shown in the status block.
Last updated: Oct 16, 2026
Send feedback: feedback@serverkueche.de
What's next?


You might also like