Hardening & optimizing Nextcloud: clear every warning (part 2)
Get your Nextcloud admin overview green: set up HSTS headers, email sending, enforced two-factor auth and brute-force protection with real IPs.
Table of contents
Your Nextcloud is running – but the admin overview shows yellow warnings, there’s no working email and no second factor protects your accounts. In this second part we turn “running” into “cleanly secured and snappy”: hardening and optimizing the installation, and we clear every warning until the overview is green.
What are we building?
By the end, the security & setup overview of your Nextcloud shows no more warnings. Concretely, we build on the Nextcloud installation from part 1 and add: the missing HSTS security header via Traefik, a configured maintenance window, working email sending (for password resets and notifications), enforced two-factor authentication and brute-force protection that sees the real attacker IPs – the basis for Fail2ban.
Everything is tested against Nextcloud 34.0.5 behind Traefik v3.7 on Debian 13 with PHP 8.5. This is legwork, but exactly the legwork missing in 90% of all Nextcloud guides – and it makes the difference between “somehow online” and “properly operated”.
Prerequisites
- A running Nextcloud set up as in
self-hosting Nextcloud (part 1): classic
nextcloudimage behind Traefik, with MariaDB, Redis and a cron sidecar. The container names from part 1 (nc-app,nc-db,nc-redis,nc-cron) and the Compose folder~/nextcloudare the basis here. - SSH access to the server and the command-line tool
occ– we call it as in part 1 in the app container:docker exec -u www-data nc-app php occ <command>. - A Traefik reverse proxy with the
proxynetwork and the resolverleas in the tutorial reverse proxy with Traefik – we attach the security headers as a Traefik middleware.
Keeping occ in hand
occ is Nextcloud’s admin tool. Because the containers in part 1 got fixed names
(container_name), you address the app container directly – no matter which directory you’re
in:
docker exec -u www-data nc-app php occ statusYou should see installed: true and your version. We won’t abbreviate this prefix
(docker exec -u www-data nc-app php occ …) in the following – so you can copy every command
directly. Only the few docker compose … commands (like the container restart in step 3) you
still run from the ~/nextcloud folder.
Step by step
Step 1: Read the admin overview as a stock-take
Log in as administrator and open Administration → Overview. At the top is the “Security & setup warnings” section. Right after a standard installation it looks like this:
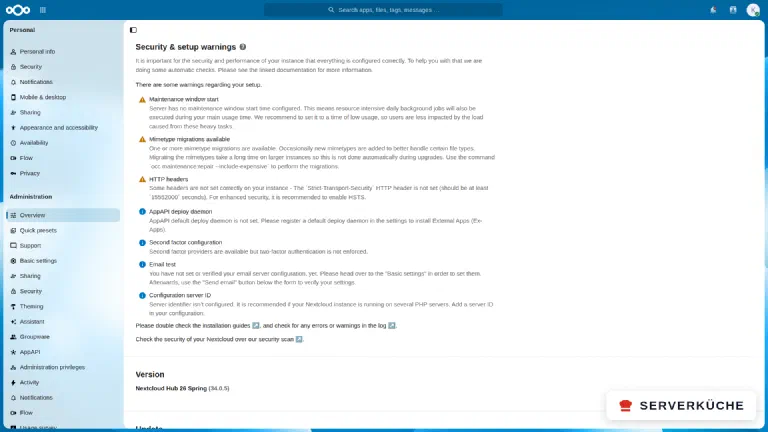
Nextcloud distinguishes three levels: yellow warnings (⚠, you should fix), blue notices (ℹ, usually optional) and silently passed checks. On our fresh instance there are three warnings and a few notices:
- ⚠ Maintenance window start is not set (step 2)
- ⚠ MIME-type migrations available (step 2)
- ⚠ HTTP headers – the
Strict-Transport-Securityheader is missing (step 3) - ℹ Email test – no mail server configured yet (step 4)
- ℹ Two-factor configuration – 2FA is available but not enforced (step 5)
You also get the same report on the command line – handy to check progress in between without clicking through the web interface:
docker exec -u www-data nc-app php occ setupchecksThe command outputs each check with ✓, ⚠ or ✗. We now work through exactly this list from top to bottom.
Step 2: Fix the two quick warnings
Two warnings are done with one command each.
Set the maintenance window. Nextcloud runs compute-intensive cleanup jobs once daily
(previews, activities, calendar repeats). Without a defined time window they run at some
point – even in the middle of the day. Set a start time when hardly anyone works. The value
is a full hour in UTC; 1 sets the start to 01:00 UTC – the check afterwards reports the
window from 1:00 to 7:00 UTC:
docker exec -u www-data nc-app php occ config:system:set maintenance_window_start --type=integer --value=1To verify, the setup check afterwards confirms:
✓ Maintenance window start: Maintenance window to execute heavy background jobs is between 1:00 UTC and 7:00 UTCRun MIME-type migrations. Occasionally Nextcloud learns new file types (e.g. for better icons and previews). This migration does not run automatically on updates because it can take a while on large instances. On a fresh cloud it’s done in seconds:
docker exec -u www-data nc-app php occ maintenance:repair --include-expensiveYou see a list of repair steps performed (including Repair mime types). Afterwards the check
reports Mimetype migrations available: None. Two fewer warnings.
And the blue notices?
Step 3: Set the HSTS security header via Traefik
The third warning is the most important: the Strict-Transport-Security header (HSTS) is
missing. It instructs the browser to address this domain exclusively over HTTPS – even
when someone types http:// or an attacker tries to redirect the connection. Without HSTS, a
small time window for downgrade attacks stays open.
Because our Nextcloud sits behind Traefik, we set the header in the proxy, not in
Nextcloud – that’s where it belongs, since Traefik terminates the TLS. In the compose.yaml
of your Nextcloud (from part 1), add the middleware nc-secure and attach it to the router.
Concretely, two places change in the labels block of nc-app.
First, extend the router line with nc-secure:
- "traefik.http.routers.nc.middlewares=nc-dav,nc-secure"Second, define the header middleware (right by the other nc-app labels):
      - "traefik.http.middlewares.nc-secure.headers.stsSeconds=15552000"
      - "traefik.http.middlewares.nc-secure.headers.stsIncludeSubdomains=true"
stsSeconds=15552000 is 180 days – the minimum value Nextcloud requires. Apply the change and
reload only the app container:
docker compose up -d nc-appAfter a few seconds, check from your own machine that the header is really delivered:
curl -sS -I https://cloud.YOUR_DOMAIN/ | grep -i strict-transportYou should see exactly this:
strict-transport-security: max-age=15552000; includeSubDomainsIn the admin overview the HTTP-header warning thus turns green: “Your server is correctly
configured to send security headers.” The remaining headers (X-Content-Type-Options,
X-Frame-Options, Referrer-Policy …) Nextcloud delivers itself – only HSTS had to come from
the proxy.
preload is a one-way street
stsIncludeSubdomains=true extends the HTTPS requirement to all subdomains of
cloud.YOUR_DOMAIN (not to siblings like www.YOUR_DOMAIN – the header always applies only
to the host that delivers it). Deliberately not set is stsPreload=true: with it you’d
signal that you want the domain entered into the browsers'
HSTS preload list – and such an entry can only be undone with
weeks of lead time. If you ever deliberately want that: the preload list only accepts
max-age ≥ 31536000 (1 year) – with the 15552000 above the flag would be ineffective anyway.
Only set preload when really every service under the domain permanently speaks HTTPS; the
header is fully functional without it.Step 4: Set up email sending
Without working mail sending, Nextcloud can send no password resets, no share notifications and no security warnings – and the “Email test” notice stays. We catch up on that.
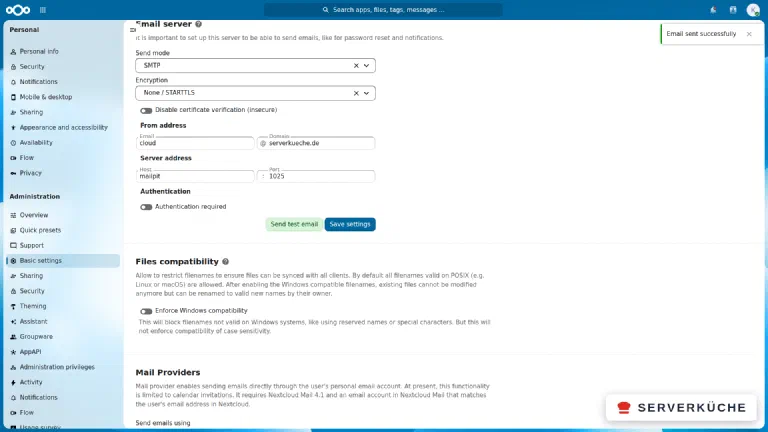
Open Administration → Basic settings and scroll to the “Email server” section. Enter your mail provider’s credentials:
- Send mode:
SMTP - Encryption:
SSL/TLS(port 465) orSTARTTLS(port 587) – never unencrypted - From address: e.g.
cloud@YOUR_DOMAIN - Server address: host and port of your provider
- Authentication: enable and store username/password
At the top, under Personal information, enter an email address for your admin account (the test mail goes there). Then click “Send test email”. If the mail arrives, Nextcloud confirms it with a green message:
App password instead of account password
Step 5: Enforce two-factor authentication
A stolen password is the most common way accounts get taken over. A second factor (a time-based code from an authenticator app, TOTP) makes the password alone worthless. Nextcloud already brings the matching provider – we just have to enable it and make it mandatory.
First enable the TOTP app (it’s included):
docker exec -u www-data nc-app php occ app:enable twofactor_totpOn current images it is active out of the box, in which case the command only answers:
twofactor_totp already enabledThat’s not an error – “available” simply isn’t “mandatory” yet. That’s exactly why the overview keeps showing the notice until we switch on the requirement in a moment.
Each user then sets up their second factor themselves – under Personal settings → Security → “TOTP (Authenticator app)”. On enabling, Nextcloud shows a QR code you scan with an app like Aegis, andOTP or Google Authenticator. Additionally, the app “Two-Factor Backup Codes” is recommended – the one-time codes save you if the phone is lost.
So that nobody “forgets” the safeguard, you enforce 2FA for the administrators. On the web you find that under Administration → Security → “Enforce two-factor authentication”, on the command line it works like this:
docker exec -u www-data nc-app php occ twofactorauth:enforce --on --group=admin
Don't lock yourself out
docker exec -u www-data nc-app php occ twofactorauth:enforce --off. A
single stuck factor you remove with … php occ twofactorauth:disable USER totp.Step 6: Brute-force protection with real IPs – basis for Fail2ban
Nextcloud throttles failed logins out of the box: after several failed attempts it delays
further requests from the same IP. But this protection stands and falls with Nextcloud
seeing the real client IP – and not the internal IP of Traefik. That’s exactly what the
TRUSTED_PROXIES setting from part 1 does.
Whether it works you see under Administration → Security in the “brute-force allow list” box (in the screenshot above). There stands your current, correctly recognized public IP:
Your current IP address is detected as "YOUR_IP". This address is not currently throttled.If a 172.x.x.x address from the Docker network appears there instead, TRUSTED_PROXIES
isn’t taking effect – then the brute-force protection would lump all users together and, in
doubt, ban Traefik itself. In that case, back to part 1, step 2/3.
Hard bans with Fail2ban. The built-in throttling only delays; whoever wants to really ban
attackers combines Nextcloud with Fail2ban. Nextcloud logs
every failed attempt in the JSON log – and thanks to TRUSTED_PROXIES with the real IP:
{"level":2,"time":"2026-07-18T08:14:05+00:00","remoteAddr":"203.0.113.47","user":"--","app":"no app in context","method":"POST","url":"/login","message":"Login failed: USER (Remote IP: 203.0.113.47)"}This log lives in the Nextcloud volume. You find the path on the host like this:
docker inspect -f '{{ range .Mounts }}{{ if eq .Destination "/var/www/html" }}{{ .Source }}{{ end }}{{ end }}' nc-appBelow it is the file data/nextcloud.log. At that you point a Fail2ban filter that matches on
remoteAddr, plus a jail following the pattern from the
Fail2ban tutorial. This way, after a few failed attempts, the
attacker IP goes straight into the firewall – before the request even reaches Nextcloud.
Step 7: Check caching & PHP – the performance foundation
Finally, we make sure the performance basis is in place. Much of this part 1 already set up
automatically via the REDIS_HOST variable – checking doesn’t hurt anyway, because this is
exactly where a Nextcloud gets sluggish or snappy.
Nextcloud uses three cache roles. Check all three:
docker exec -u www-data nc-app php occ config:system:get memcache.local
docker exec -u www-data nc-app php occ config:system:get memcache.distributed
docker exec -u www-data nc-app php occ config:system:get memcache.locking
Expected:
\OC\Memcache\APCu
\OC\Memcache\Redis
\OC\Memcache\Redis- Local cache (APCu): keeps frequently used data in the RAM of the PHP process – the most noticeable accelerator in everyday use.
- Distributed cache (Redis): shares cache data across processes, important once the app and cron containers interact.
- File locking (Redis): prevents two accesses from changing the same file simultaneously and corrupting it. The reason we built in Redis at all in part 1.
If the interplay fits, docker exec -u www-data nc-app php occ setupchecks reports the line
✓ Memcache: Configured. (Passed checks aren’t shown by the web overview – only warnings and
notices appear there, which is why you check this via CLI.)
OPcache – PHP’s bytecode cache – is already sensibly preconfigured in the official
nextcloud image (including opcache.interned_strings_buffer=32). So you don’t have to
adjust anything here; the formerly notorious OPcache warning no longer appears at all with
current images. You can check it if needed like this:
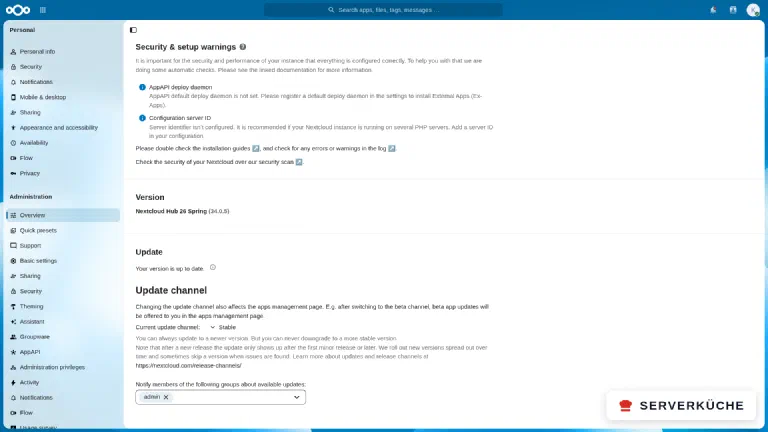
docker exec -u www-data nc-app php -i | grep opcache.interned_strings_bufferWith that, the overview is warning-free:
Generate previews proactively
occ cron job
generates thumbnails in advance instead of computing them slowly on the fly on first open. If
you add it, limit the maximum preview size via
occ config:system:set preview_max_x --value=2048 (and preview_max_y), otherwise the storage
demand grows quickly.When things go wrong
After the Traefik restart, the HSTS header doesn’t appear in the curl output. Usually
the middleware isn’t on the router. Check that the line traefik.http.routers.nc.middlewares
names both middlewares (nc-dav,nc-secure) and that the two nc-secure header labels
are in the nc-app block. Then docker compose up -d nc-app. Traefik only picks up changed
labels when recreating the container.
The email test fails (“There was a problem sending the email”). Almost always
port/encryption or authentication. Combine SSL/TLS with port 465 or STARTTLS with port
587 – not crosswise. If your provider uses 2FA, you need an app password (see step 4).
Details are in the Nextcloud log: docker exec -u www-data nc-app php occ log:tail 20.
You can’t get in yourself after enforcing 2FA. You hadn’t set up a second factor yet. Lift
the requirement via the command line, set up your factor calmly and arm it again afterwards:
docker exec -u www-data nc-app php occ twofactorauth:enforce --off.
In the brute-force box a 172.x.x.x address appears instead of your real IP.
TRUSTED_PROXIES doesn’t match the actual proxy subnets. Print both of them – the
network has an IPv6 and an IPv4 range – and enter them space-separated in the nc-app
environment (part 1, step 2):
docker network inspect proxy -f '{{ range .IPAM.Config }}{{ .Subnet }} {{ end }}'.
Otherwise the brute-force protection bans the proxy in an emergency and thus all users.
After a reboot, Nextcloud reports “Redis went away” or gets very slow. The app container
started before Redis. Make sure nc-redis is in depends_on (part 1) and runs with restart: unless-stopped – then Docker catches the start-order case itself.
Your problem is not listed? Search all error messages →
Maintenance & backups
- Check the overview after every update. New Nextcloud versions bring new checks. After
every upgrade take a look at Administration → Overview or run
occ setupchecks– this way you catch new warnings early. - Use the official security scan regularly. The Nextcloud Security Scan checks your domain from outside and assigns a grade. With HSTS and current versions, A/A+ is the realistic target; if the grade drops, an update is usually overdue.
- Keep an eye on second factors. Keep the backup codes separate from the phone. If a user
loses their device, you remove their factor with
occ twofactorauth:disable USER totp, after which they set it up anew. - Clean up app passwords. Every connected client (desktop, phone) gets its own app password. Under Personal settings → Security you see all devices and can specifically revoke individual ones on loss.
- The hardening replaces no backup. All of this protects against foreign access, not against data loss. The consistent backup of a database dump and data directory stays mandatory – see the maintenance section in part 1 of the Nextcloud series and backups with Restic. Honest about the effort: firmly plan the monthly update pass with a quick look at the overview – then your cloud stays green permanently.
Last updated: Oct 16, 2026
Send feedback: feedback@serverkueche.de
You might also like