listmonk: Your Own Newsletter Server – Privacy-Friendly
listmonk 6.2 with Postgres 18 behind Traefik: a double opt-in list, a first campaign, the privacy switches – and a dry run before real mail goes out.
Table of contents
Sending your own newsletter means the address list stays with you, not with a provider who mines it “to improve the service”. listmonk makes that surprisingly comfortable – the hard part is not the software but getting the mail delivered.
What are we building?
We run listmonk 6.2.0 with PostgreSQL 18.6 behind Traefik. At the end you have a recipient list with double opt-in, one campaign actually sent, and the privacy switches set so that subscribers can export and delete their own data.
In between comes a step most guides skip: we send the first campaign to a local catcher before a single mail goes out. A newsletter that lands in the spam folder on its first attempt costs you reputation you then have to win back the hard way.
The software is the easy part
Requirements
- Traefik as a reverse proxy with a working Let’s Encrypt resolver and a domain
- A mail server or SMTP account whose sender domain is covered by SPF, DKIM and DMARC
- Around 500 MB of memory for the application and database
VPS 1000 G12.5
4 vCores · 8 GB RAM · 128 GB SSD
from €14.50/month
listmonk is frugal – for a few thousand addresses the small VPS is plenty.
💶 1 month free:
Single use, valid for VPS 1000 G12.5. Redeem in the cart →
💶 €5.95 voucher for new netcup customers: always valid · not for domains or VPS Lite
Step by step
Step 1: The stack
mkdir -p /opt/listmonk/uploads && cd /opt/listmonkCredentials first. The administrator’s username and password are created from these variables on the very first start – after that listmonk ignores them:
umask 077
{
  echo "POSTGRES_PASSWORD=$(openssl rand -base64 24 | tr -d '=+/' | cut -c1-24)"
  echo "LISTMONK_ADMIN_USER=YOUR_USERNAME"
  echo "LISTMONK_ADMIN_PASSWORD=YOUR_STRONG_PASSWORD"
} > .env# /opt/listmonk/compose.yaml
services:
db:
image: postgres:18.6-alpine
container_name: listmonk-db
restart: unless-stopped
environment:
POSTGRES_USER: listmonk
POSTGRES_PASSWORD: ${POSTGRES_PASSWORD}
POSTGRES_DB: listmonk
volumes:
- pgdata:/var/lib/postgresql
networks: [listmonk-internal]
healthcheck:
test: ["CMD-SHELL", "pg_isready -U listmonk"]
interval: 10s
timeout: 5s
retries: 6
app:
image: listmonk/listmonk:v6.2.0
container_name: listmonk
restart: unless-stopped
depends_on:
db:
condition: service_healthy
command: ["sh", "-c", "./listmonk --install --idempotent --yes --config '' && ./listmonk --upgrade --yes --config '' && ./listmonk --config ''"]
environment:
LISTMONK_app__address: 0.0.0.0:9000
LISTMONK_db__host: db
LISTMONK_db__port: 5432
LISTMONK_db__user: listmonk
LISTMONK_db__password: ${POSTGRES_PASSWORD}
LISTMONK_db__database: listmonk
LISTMONK_db__ssl_mode: disable
LISTMONK_ADMIN_USER: ${LISTMONK_ADMIN_USER}
LISTMONK_ADMIN_PASSWORD: ${LISTMONK_ADMIN_PASSWORD}
TZ: Europe/Berlin
volumes:
- ./uploads:/listmonk/uploads:rw
networks: [listmonk-internal, proxy]
labels:
- traefik.enable=true
- traefik.http.routers.listmonk.rule=Host(`YOUR_DOMAIN`)
- traefik.http.routers.listmonk.entrypoints=websecure
- traefik.http.routers.listmonk.tls.certresolver=le
- traefik.http.services.listmonk.loadbalancer.server.port=9000
volumes:
pgdata:
networks:
listmonk-internal:
internal: true
proxy:
external: trueThe command line looks convoluted but does exactly three sensible things in order:
--install --idempotent creates the database schema if it is missing and does nothing otherwise;
--upgrade runs the pending migrations when a new image arrives; then the actual service starts.
The --config '' is not a typo but the instruction “use no configuration file, only the
environment variables”.
The database sits in its own network with internal: true – unreachable both from outside and from
other containers in the proxy network.
PostgreSQL 18: the mount has moved
/var/lib/postgresql/**data**. With PostgreSQL 18 the
container then refuses to start – even with an empty volume, because the check hangs on the mount
and not on the content. The mount belongs one level up, at /var/lib/postgresql.docker compose up -d
docker compose logs app | grep -E "superadmin|setup complete|upgrade|server started"install.go:93: creating superadmin user 'YOUR_USERNAME'
install.go:116: setup complete
main.go:165: running upgrade...
upgrade.go:74: no upgrades to run. Database is up to date.
⇨ http server started on [::]:9000The three stages from the command line are easy to spot: installation, upgrade check, service
start.
Step 2: Sign in, set the address, clear out the sample data
At https://YOUR_DOMAIN/admin you sign in with the credentials from the .env.
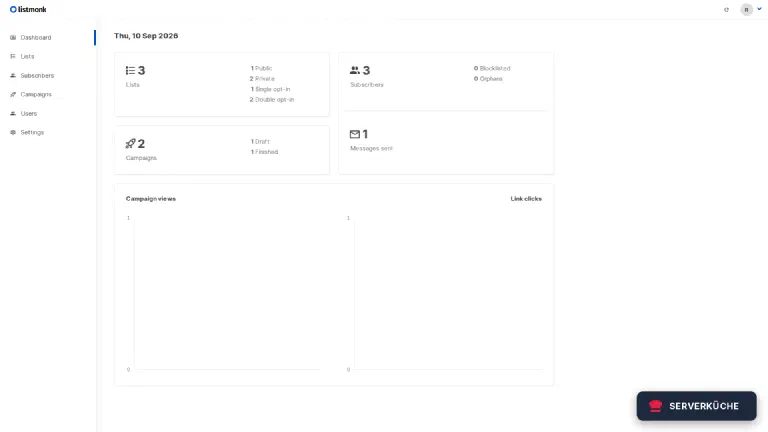
First go to Settings → General and fill in two things:
- Root URL –
https://YOUR_DOMAIN, without a trailing slash. Out of the box it sayshttp://localhost:9000, and listmonk builds every link in every mail from this value: the double opt-in confirmation link, the unsubscribe link, “View in browser”. If the default stays, your recipients get links that lead nowhere – and nobody can confirm their subscription. - Default
fromemail – the sender, for exampleKitchen Letter <newsletter@your-domain.com>. The address has to match the domain you set up SPF, DKIM and DMARC for.
Save; listmonk then reloads briefly.
On first start listmonk also creates sample data: two lists (“Default list” and “Opt-in
list”), two made-up subscribers (john@example.com, anon@example.com) and a campaign called
“Test campaign”. Clear that out before you enter real addresses – otherwise the sample addresses
will end up in your first real campaign at some point. Delete the sample subscribers under
Subscribers, the lists under Lists and the campaign under Campaigns.
Step 3: SMTP – catch first, send later
Under Settings → SMTP you enter the mail server. Before you put your real credentials there, an intermediate step pays off: a local catcher that accepts every mail and forwards none. That way you see what listmonk actually sends without burning reputation.
Add a container to the stack temporarily:
  mailpit:
    image: axllent/mailpit:v1.33.0
    container_name: listmonk-mailpit
    restart: unless-stopped
    networks: [listmonk-internal]
In the SMTP settings you then point at mailpit, port 1025, Auth protocol: None and
TLS: Off:
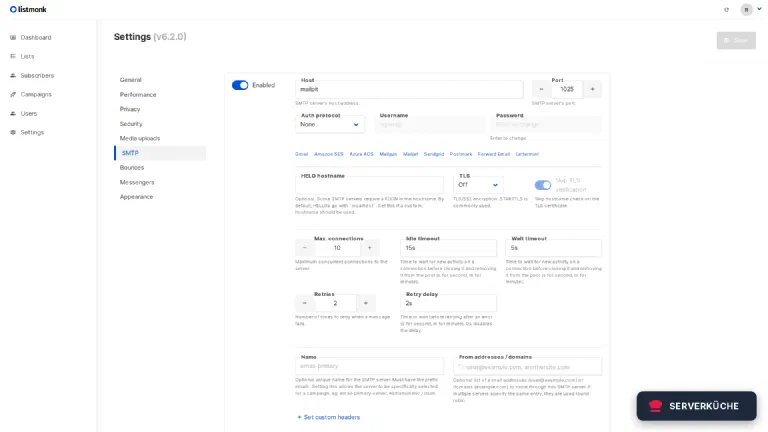
For real operation you then enter your mail server’s hostname, port 587, Auth protocol: PLAIN or LOGIN, your credentials and TLS: STARTTLS. The shortcuts above the fields (Gmail, Amazon SES, Mailgun …) pre-fill the values for well-known providers.
Skip TLS verification stays off
Step 4: A list with double opt-in
Under Lists → New you create the recipient list. Two settings decide the legal side:
- Type: Private – the list does not appear in public subscription forms unless you want it to. You need “Public” for a signup form on your own website.
- Opt-in: Double – after signing up a confirmation mail goes out, and only the click inside it turns the entry into a confirmed subscriber.
Double opt-in is effectively mandatory in Germany. It is also your evidence: listmonk records when someone confirmed. Without that record you have nothing to show when a complaint arrives.
Step 5: The first campaign
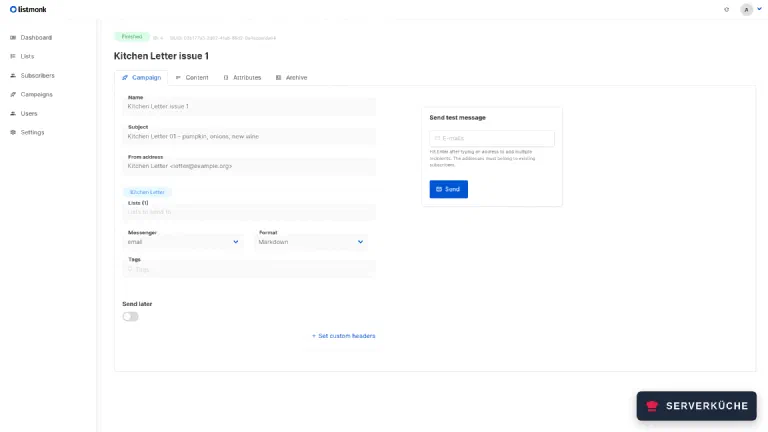
Under Campaigns → New you set name, subject, list and format. As a content type listmonk offers a rich-text editor and Markdown, among others – the latter is often the better choice for a plain text newsletter, because less HTML means less spam suspicion.
In the body you work with placeholders:
# Issue 1

Hello {{ .Subscriber.FirstName }},

this week: pumpkin soup, onion tart and a glass of new wine.
{{ .Subscriber.FirstName }} is replaced per recipient at send time – a subscriber named
“Leserin” receives “Hello Leserin,”.
You do not have to add an unsubscribe link here: the template listmonk wraps the text in (“Default
campaign template”, under Campaigns → Templates) puts “Unsubscribe” and “View in browser” in
the footer of every mail. The individual link behind it is {{ UnsubscribeURL }}, and it belongs
in every mail.
Do not rely on the software for that: if you build your own template and forget the link, listmonk
still saves and sends it without complaint. The List-Unsubscribe header from the privacy settings
does travel along, but it does not replace the visible unsubscribe link in the body. So write
{{ UnsubscribeURL }} into every template of your own, and you cannot forget it.
One click on Start sends the campaign. The overview then shows what happened:
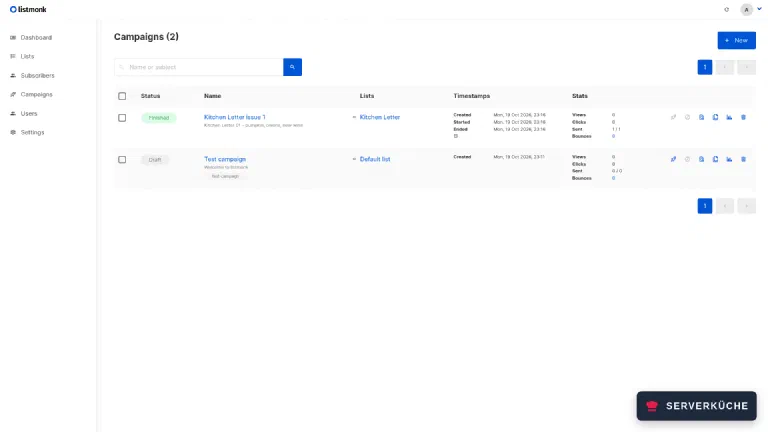
Now look into the catcher: are the sender, the subject including umlauts and the resolved
placeholder right? Do the footer links point to https://YOUR_DOMAIN/… and not to localhost?
Only once that is right do you switch SMTP to the real mail server. The mails sit in Mailpit, which
only hangs in the internal network; you fetch them through its API, for example the latest one:
docker compose exec app wget -qO- http://mailpit:8025/api/v1/message/latestAfterwards take the mailpit block out of the Compose file again and restart the stack with
docker compose up -d --remove-orphans.
Step 6: The privacy switches
Under Settings → Privacy sits what makes the difference between “self-hosted” and “privacy-friendly”. Every switch is a conscious decision:
- Disable tracking – turns off counting of opens and clicks entirely. A newsletter without a tracking pixel needs no consent for it and no paragraph in your privacy policy.
- Individual subscriber tracking – links opens and clicks to the individual person. It is off by default: listmonk then keeps counting, but only in aggregate. That is the usable middle ground if you want to know whether an issue landed.
- Include
List-Unsubscribeheader – leave this on. Mail clients then show an unsubscribe button directly, and large providers treat that as a positive signal. - Allow exporting and Allow wiping – subscribers can fetch the data stored about them and delete themselves completely. That covers the access and erasure rights without you having to answer an email. Both are on by default.
- Record opt-in IP address – additionally stores the IP address someone confirmed from. That strengthens your evidence but is one more piece of personal data; off by default.
My recommendation: per-person tracking off, List-Unsubscribe on, export and erasure on – which is
also the shipping state, so all you have to do is leave it alone. That
answers the most common requests before they are made.
When it doesn’t work
The container restarts in a loop and reports error loading flags: flag needs an argument: --config. While copying the command line the two single quotes after --config were lost – which happens easily when the command travels through several shell layers. Check what actually arrives with docker inspect listmonk --format '{{json .Config.Cmd}}': there has to be an empty argument after every --config. When in doubt, write the Compose file with an editor directly on the server instead of generating it through nested quoting.
listmonk no longer starts and reports error reading SMTP config: decoding failed. An invalid value is stored in the settings – a duration without a unit, for instance. The awkward part: the web interface is then unreachable, so you cannot fix it there. The settings live in the settings table; docker compose exec db psql -U listmonk -d listmonk gets you in and lets you UPDATE the smtp key back to a valid block. Then docker compose restart app.
The database container does not start and talks about pg_ctlcluster. That is the PostgreSQL 18 change: the mount must no longer point at /var/lib/postgresql/data but at /var/lib/postgresql. For an existing database, moving it is not enough – there you need pg_dump with the old major version and an import into the new one.
The campaign stays on running and nothing is sent. Then listmonk cannot reach the SMTP server. docker compose logs app | grep -i smtp shows why; often it is the wrong port (587 instead of 465 or the other way round), a wrong TLS setting, or a provider blocking outbound port 25. The local catcher from step 3 helps narrow it down: if sending there works, the problem is not listmonk.
The mails arrive but land in spam. That is not a listmonk problem. Check that SPF, DKIM and DMARC are right for the sender domain and that the sender address matches the domain you send through – how to do that is in email deliverability. Also avoid image-only HTML, and send to a small list first rather than writing to ten thousand addresses at once.
Your problem is not listed? Search all error messages →
Maintenance & backups
Updates are a tag change; the migration is handled automatically by the --upgrade stage in
command at startup:
cd /opt/listmonk
docker compose exec -T db pg_dump -U listmonk listmonk > before-update-$(date +%F).sql
sed -i 's/listmonk:v6.2.0/listmonk:vNEW_VERSION/' compose.yaml
docker compose pull && docker compose up -d
docker compose logs app | grep -i upgrade
The dump beforehand is mandatory: if a migration goes wrong, your entire recipient list is in it. And do not touch the PostgreSQL major version at the same time – that always needs a dump and an import.
Two things need backing up, plus the credentials:
pg_dump output             # subscribers, lists, campaigns, opt-in records
/opt/listmonk/uploads/     # images from the media section
/opt/listmonk/.env         # database password
The dump matters especially here because it holds the confirmation timestamps of your double opt-ins. Lose those and you have no evidence that someone consented. Daily via a systemd timer and off into your Restic backup.
Ongoing upkeep is minimal, but two habits pay off: after each campaign, look at the bounce count and remove hard bounces from the list – dead addresses cost reputation. And do not keep the list artificially alive: whoever unsubscribes gets deleted, not kept “for later”.
Realistic effort: setting it up costs an evening, running it a few minutes per issue. The part that really needs attention is deliverability – and that is decided before the first send, not after.
Send feedback: feedback@serverkueche.de
You might also like