Your own mail server with Mailcow: setup from scratch
Set up Mailcow (dockerized) on your own server: Postfix, Dovecot, Rspamd and SOGo webmail under your domain – a complete mail server stack with HTTPS.
Table of contents
Your email is the backbone of your digital identity – password resets, invoices, contracts all run through it. Yet for most people it sits at a corporation in the US. With Mailcow you bring the complete mail server onto your own server: Postfix, Dovecot, spam filter and webmail, neatly packed in Docker. This tutorial gets the stack running – the tricky deliverability (SPF, DKIM, DMARC, reverse DNS) we handle afterwards in the deliverability recipe.
Running your own mail server is work – be honest with yourself
What are we building?
By the end, a complete mail server stack runs on your server, reachable as webmail at https://mail.YOUR_DOMAIN with a valid Let’s Encrypt certificate. Included are:
- Postfix as the SMTP server (send/receive),
- Dovecot for IMAP/POP3 (retrieval by mail programs),
- Rspamd as a modern spam and signature filter,
- SOGo as webmail including calendar and contacts (CalDAV/CardDAV),
- an admin interface to create domains, mailboxes and aliases.
The whole thing comes as mailcow-dockerized – a ready-bundled Compose project of 18 containers that makes the notoriously complicated mail server setup manageable. We build on Debian 13 with Docker 29.6 and Compose v5.3; mailcow is a rolling release maintained through monthly tags (you update via update.sh, there’s no classic version number). We tested against the 2026-07b state with Postfix 3.10.12, Dovecot 2.3.21.1, Rspamd 4.1.4 and SOGo 5.12.10.
This recipe needs the server to itself
mailcow brings its own web server and, in the default configuration, occupies ports 80/443 itself, plus the mail ports 25, 465, 587, 143, 993 and more. Set up the way we do it here, mailcow therefore belongs on a server where nothing else needs those ports – not on the same host as your Traefik stack.
The combination isn’t impossible, though: mailcow documents running behind Traefik itself. You bind its nginx to a local port via HTTP_BIND/HTTPS_BIND, set SKIP_LETS_ENCRYPT=y and hand the certificate over from Traefik. It is more work, the page is marked community supported, and the memory appetite stays: below 6 GB of RAM it gets tight, and you need those on top of everything else.
Prerequisites
- A dedicated server with Debian 13 on which Docker is installed and that is only for mailcow (ports 80/443 and the mail ports free).
- At least 6 GB RAM – the spam filter (Rspamd) and the optional virus scanner (ClamAV) need room. With less it gets sluggish or ClamAV has to go.
- A domain whose DNS you control yourself. Without matching records (especially MX and reverse DNS), no other mail server accepts your mail.
- Outbound SMTP must be open. Many providers block it by default against spam. At netcup the default policy “netcup Mail block” (ports 25/465/587) does that – you simply take it off the server in the SCP, no support ticket required. How to do that is in netcup firewall setup. Without an open port 25 you can deliver no mail to other servers.
- A PTR/reverse-DNS entry for the server IP, which you set in the provider panel (at netcup in the SCP). It must point to
mail.YOUR_DOMAIN.
Mailcow is RAM-hungry, so we recommend at least the VPS 2000. What your specific need is, the server calculator estimates for you.
VPS 2000 G12.5
8 vCores · 16 GB RAM · 256 GB SSD
from €26.92/month
For mailcow including spam and virus filter it should be 8 GB RAM.
💶 1 month free:
Single use, valid for VPS 2000 G12.5. Redeem it in an empty cart – the code adds the server itself. Redeem in the cart →
💶 €5 voucher for new netcup customers: always valid · not for domains or VPS Lite
Step by step
Step 1: Create the DNS records
Before you install anything, set up the DNS entries – they need time to propagate, and mailcow fetches the TLS certificate for the hostname at startup. At your DNS provider (see connecting a domain to your server), create these entries. YOUR_DOMAIN is your mail domain (e.g. example.com), YOUR_SERVER_IPV4 the server’s IPv4 address:
mail.YOUR_DOMAIN.   A      YOUR_SERVER_IPV4
mail.YOUR_DOMAIN.   AAAA   YOUR_SERVER_IPV6      (if you use IPv6)
YOUR_DOMAIN.        MX     10 mail.YOUR_DOMAIN.
The MX record tells other mail servers: “Mail for @YOUR_DOMAIN is accepted by mail.YOUR_DOMAIN.” The hostname mail.YOUR_DOMAIN is the FQDN of the mail server – not to be confused with the mail domain itself. The further records for deliverability (SPF, DKIM, DMARC) and the PTR entry we cover in detail in the follow-up tutorial on deliverability; the PTR entry should be set already now, though, because many servers otherwise don’t accept at all.
Tip
Step 2: Install prerequisites on the server
Log in via SSH to the hardened server. Mailcow’s config generator needs git and jq besides Docker – the latter is easily forgotten, and the generator otherwise aborts with Cannot find command 'jq'. Install both:
sudo apt update && sudo apt install -y git jqCheck that Docker and the Compose plugin are running:
docker --version && docker compose versionYou should see two version lines – for us Docker version 29.6.1 and Docker Compose version v5.3.1. Mailcow requires at least Docker 24; below that the config generator aborts. If something’s missing, catch up on the Docker setup before continuing.
Step 3: Clone and configure Mailcow
Mailcow is delivered as a Git repository and not maintained via a single image tag. Clone it to /opt and change into it. The umask 0022 is important so the generated files get the right permissions:
sudo su
umask 0022
cd /opt
git clone https://github.com/mailcow/mailcow-dockerized
cd mailcow-dockerized
Now you generate the central configuration file mailcow.conf with the interactive generator:
./generate_config.shIt first checks whether your server’s IP is on the Spamhaus bad ASN list – a useful early warning, because hardly any mail server accepts post from some networks:
Detecting if your IP is listed on Spamhaus Bad ASN List...
Check completed! Your IP is clean
Then it asks you these questions in turn:
- Mail server hostname (FQDN): Enter
mail.YOUR_DOMAINhere – the server’s hostname, not your mail domain. The value must match the A record from step 1. - Timezone: usually already correctly pre-filled (e.g.
Europe/Berlin) – confirm with Enter. - Choose the Branch with it’s number [1/2/3]: Choose
1for themasterbranch – that’s the stable, recommended state.2isnightly(testing),3the deprecatedlegacybranch.
You only see the ClamAV question on small servers
SKIP_CLAMD=n, so ClamAV runs from the start. You can switch it off any time by setting SKIP_CLAMD=y in mailcow.conf and restarting the stack.IPv6 hosts: Docker gets restarted
If the generator finds a working IPv6 connection (default route plus a reachable peer), Docker has to speak IPv6 too – otherwise mailcow could become an open relay. If /etc/docker/daemon.json is missing, it therefore asks:
/etc/docker/daemon.json not found. Create it with IPv6 settings? [Y/n]Confirm with Enter and it creates the file itself (on Docker ≥ 28 {"ipv6": true} is enough) and restarts Docker right away. This is exactly why mailcow belongs on its own server: that restart takes every other container on the host down with it. Answer n and the generator aborts, leaving you to add the setting by hand. If you deliberately want to run without IPv6, set ENABLE_IPV6=false in mailcow.conf later.
Afterwards take a look at the generated mailcow.conf. The most important values are at the top:
grep -E "^(MAILCOW_HOSTNAME|TZ|HTTP_PORT|HTTPS_PORT|SKIP_CLAMD|ENABLE_IPV6)=" mailcow.confOn our test server it looked like this – SKIP_CLAMD=n means “ClamAV is running”:
MAILCOW_HOSTNAME=mail.YOUR_DOMAIN
HTTP_PORT=80
HTTPS_PORT=443
TZ=Europe/Berlin
SKIP_CLAMD=n
ENABLE_IPV6=true
The file also contains all port assignments. In the standard configuration mailcow claims these host ports:
25    SMTP     (server-to-server delivery)
465   SMTPS    (send with implicit TLS)
587   Submission (send by mail programs, STARTTLS)
143   IMAP  /  993 IMAPS   (retrieval by mail programs)
110   POP3  /  995 POP3S
4190  Sieve    (server-side filter rules)
80    HTTP  /  443 HTTPS   (webmail + admin + ACME)
These ports must be free on the host – hence the dedicated server for this recipe. If a reverse proxy already runs on 80/443 there, mailcow collides with it unless you rebind its nginx as described in the box above.
Step 4: Open the firewall
Your UFW firewall must let the mail and web ports through. Besides SSH, you allow:
sudo ufw allow 25/tcp
sudo ufw allow 80,443/tcp
sudo ufw allow 465,587/tcp
sudo ufw allow 143,993/tcp
sudo ufw allow 110,995/tcp
sudo ufw allow 4190/tcp
If you additionally use the netcup firewall in the SCP, allow the same ports there too – otherwise the perimeter firewall blocks the traffic before it reaches the server.
Step 5: Start the stack
Now you download the images and start the stack. Expect about 4.5 GB on disk – the stack consists of 18 services, the biggest being SOGo, Dovecot and Postfix:
docker compose pull
docker compose up -d
The first boot takes a few minutes – the database, search index and the individual services initialize. Watch the progress with:
docker compose psThe STATUS column shows Up … for every service; the containers with their own health check (such as unbound-mailcow and clamd-mailcow) additionally report (healthy). During this time, mailcow fetches the Let’s Encrypt certificate for mail.YOUR_DOMAIN in the background via its built-in ACME client. For that, the A record and port 80 must be reachable from outside – if that’s not the case, the acme-mailcow container stays in a retry loop and you see it in its logs (docker compose logs acme-mailcow).
Step 6: First login to the admin interface
Open https://mail.YOUR_DOMAIN in the browser. You land in the mailcow UI. Log in with the default credentials:
User:      admin
Password:  moohoo
If the form shows “Sign in as user”, click “Sign in as admin” at the bottom – the login form on the home page otherwise logs you in as a mailbox user, not as an administrator.
Change the default password immediately
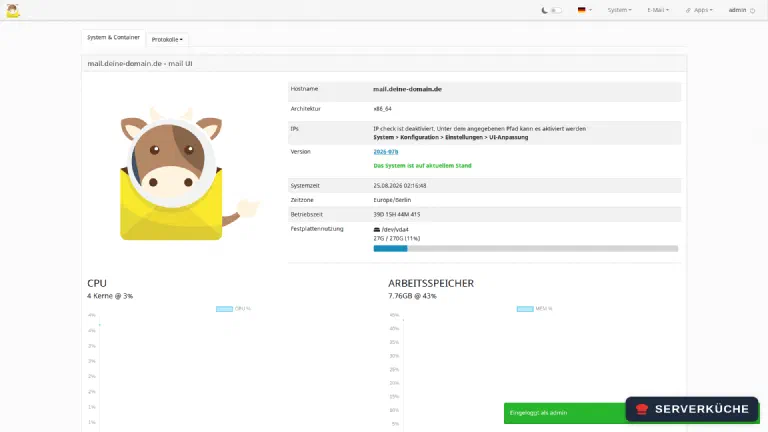
admin / moohoo is publicly known. Change the admin password immediately under System → Configuration → Access: in the Administrators table, click Edit next to the admin user. In the same tab, enable two-factor authentication (TOTP or WebAuthn) right away. As long as the default password applies, your mail server is wide open like a barn door.After logging in you land in the mailcow dashboard with the overview of your services:
Step 7: Create a mail domain and first mailbox
In mailcow you separate domain (e.g. example.com) and mailbox (e.g. contact@example.com).
Via E-Mail → Configuration in the top navigation bar you manage domains and mailboxes in separate tabs:
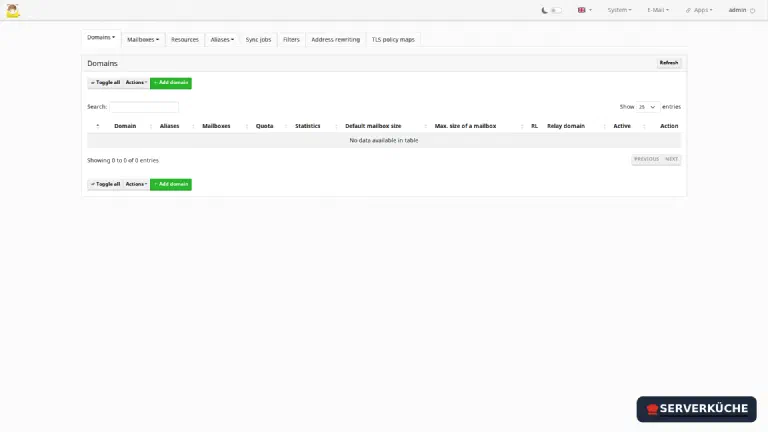
On the Domains tab, click Add domain and enter your domain
YOUR_DOMAIN. The default values (mailbox and alias quotas) are fine for the start. Save with “Add domain and restart SOGo” at the bottom – not with “Add domain only”. Why, see the box below.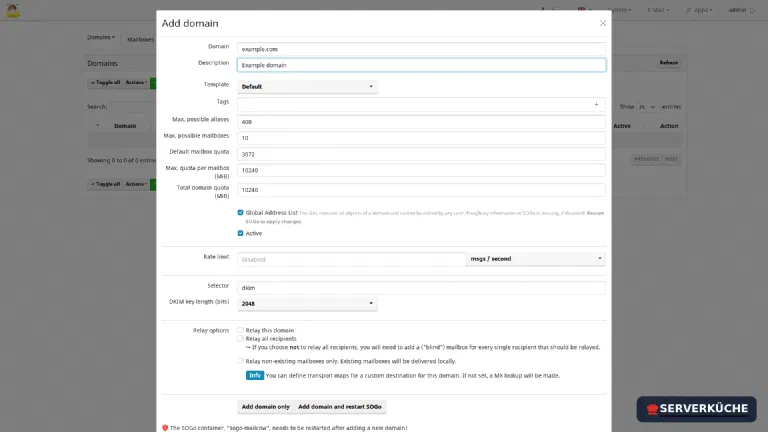
Create a new mail domain. Switch to the Mailboxes tab and click Add mailbox – username, domain, full name and a strong password (password manager!). This mailbox can then log in to the webmail and via IMAP/SMTP.
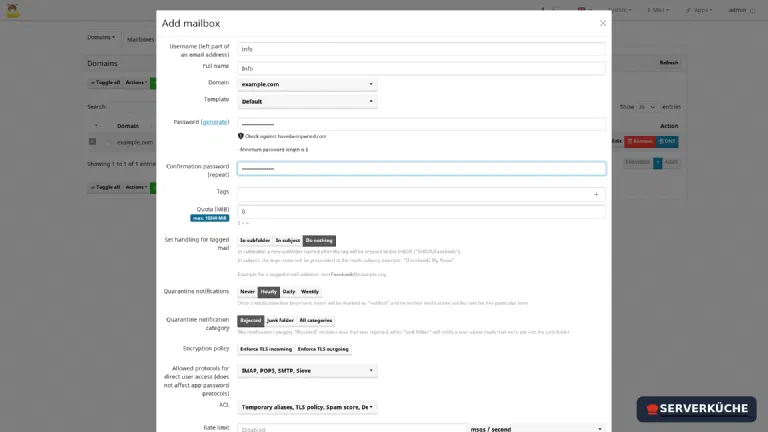
Create a new mailbox.
Without a SOGo restart the webmail stays shut
No authentication sources defined - nobody will be able to login, and every webmail login ends on a bare Unauthorized page – even though password and mailbox are correct. Hence the second button; after the fact you get there via E-Mail → Restart SOGo. If a failed login has already been cached, restarting memcached as well helps (see “When things go wrong”).After creating the domain, mailcow shows you the DKIM key and the recommended DNS records under the domain entry. You need those for deliverability – more on that shortly.
Step 8: Test the webmail
Open https://mail.YOUR_DOMAIN/SOGo/ (or click Apps → Webmail at the top right in the mailcow UI). If you aren’t signed in yet, you first land on the mailcow “User Login” mask – log in there with your full mail address and the mailbox password and you are passed straight through to the SOGo webmailer with inbox, calendar and contacts. A test mail from you to yourself should be in the inbox immediately – that proves that local delivery, IMAP and webmail work.
The real acid test, however, is sending to the outside and receiving from the outside – and that’s exactly where it’s decided whether your mails land in the recipient’s inbox or spam folder. That depends on SPF, DKIM, DMARC and the PTR entry and is substantial enough for its own recipe.
Note
When things go wrong
generate_config.sh aborts with Cannot find command 'jq'. the jq package is missing. sudo apt install -y jq and start the generator again.
The generator reports “User declined to create daemon.json” and aborts. On hosts with active
IPv6 you answered the question about the IPv6-capable Docker configuration with n – without it
mailcow won’t run there, and an open relay looms. Create /etc/docker/daemon.json containing
{"ipv6": true} (Docker 28 and newer), restart Docker with sudo systemctl restart docker and run
./generate_config.sh again – or simply confirm the question with Enter on the second attempt, then
the generator does both itself.
The webmail only answers Unauthorized. SOGo doesn’t know your mail domain: it reads the domain
list exclusively at startup and wasn’t restarted after the domain was created – its logs say No authentication sources defined - nobody will be able to login. Restart SOGo via E-Mail → Restart
SOGo. If that doesn’t help, a failed login is still stuck in the cache: docker compose restart memcached-mailcow sogo-mailcow.
No certificate, acme-mailcow keeps restarting. Let’s Encrypt can’t reach your server on port
80, or the A record of mail.YOUR_DOMAIN is wrong. check with docker compose logs acme-mailcow
whether the hostname and IP match, and that port 80 is open through UFW and the netcup firewall.
Mails to the outside aren’t delivered, logs show timeouts on port 25. Your provider blocks outbound SMTP traffic (common as spam protection). At netcup it’s the default policy “netcup Mail block” (ports 25/465/587): in the SCP under Firewall → Policies, take that netcup template off the server – no support ticket needed, details in netcup firewall setup. Without it you can’t send mail to other servers – receiving and local delivery still work.
Ports 80/443 can’t be bound (address already in use). A web server or reverse proxy (e.g.
Traefik) already runs on the host. For this recipe, mailcow belongs on its own server.
Alternatively, bind its nginx to a local port with HTTP_BIND/HTTPS_BIND and
HTTP_PORT/HTTPS_PORT and put mailcow behind the proxy – that’s what
mailcow’s Traefik guide
describes. The mail ports stay directly on the host either way.
Containers start slowly or are killed by the kernel (OOM). Too little RAM. go to at least 6–8 GB
or disable ClamAV in mailcow.conf (SKIP_CLAMD=y) – the virus scanner is the biggest memory
eater.
Your problem is not listed? Search all error messages →
Maintenance & backups
A mail server lives off maintenance – plan it firmly.
Updates. Mailcow brings its own update script. Run it regularly (about monthly); it updates the Compose file and all images to the latest state:
cd /opt/mailcow-dockerized
sudo ./update.sh
The script automatically makes a backup of the configuration before the update and restarts the stack. Read the release notes shown – on bigger jumps, manual steps are occasionally listed there.
Backups. Your mails, the database and the crypto keys (DKIM!) live in Docker volumes. Mailcow brings a ready-made backup script for this:
cd /opt/mailcow-dockerized/helper-scripts
sudo BACKUP_LOCATION=/opt/mailcow-backups ./backup_and_restore.sh backup all
Then back up the target directory away from the server – cleanest encrypted with Restic. Especially important are the DKIM keys: if they’re lost, your signatures break after a restore until you reset the DNS records. A backup you’ve never restored is just a hopeful guess – test the restoration once on a test system.
Keep an eye on reputation. Occasionally check whether your server IP has landed on a block list (e.g. via one of the common block-list checkers) and take a look at the Rspamd dashboard in the mailcow UI now and then. A hacked or misconfigured mailbox that sends spam quickly ruins the reputation of your entire domain.
Last updated: Oct 2, 2026
Send feedback: feedback@serverkueche.de
What's next?

You might also like