Automating netcup eos with eosctl and OpenTofu
netcup eos without clicking: client credentials with minimal rights, VMs via eosctl and a complete setup of network, ACL and VM in OpenTofu.
Table of contents
eos is built for people who don’t want to create servers by clicking. So in part two we drive
netcup’s new cloud from the command line – first with the eosctl tool, then with OpenTofu as
infrastructure as code. You only need the console for the access credentials themselves.
As in part one: this is the state of the preview, which netcup takes down on 13 November 2026. eos launches publicly in 2027. Before that, later in 2026, every netcup customer can use the platform free of charge in the friends & family launch, on production hardware and without a later reset. The CLI and the provider are still below version 1.0 and may change.
What are we building?
We create access for programs that may only manage networks and VMs. With eosctl we create a
VM, run a command inside it and delete it again. Then we describe a complete setup in an OpenTofu
file: its own network, a firewall rule, a Debian VM with cloud-init and a public IPv4. One
tofu apply builds everything in under a minute, one tofu destroy tears it down just as fast.
We use eosctl 0.16.0, OpenTofu 1.13.1 and the eos provider 0.10.1. OpenTofu is the open-source
fork of Terraform and understands the same configuration language.
Prerequisites
- Access to eos and a basic grasp of the console – organisation, realm, ACL and public IP are explained in netcup eos in preview.
- A machine running Debian 13 for the tools. That can be your laptop or a small server; we used an eos VM.
- An SSH key (
ssh-keygen -t ed25519), see Harden SSH. jqfor parsing JSON:sudo apt install jq.
Step by step
1. Client credentials with minimal rights
Programs don’t log in to eos with your account but with client credentials – a client ID and a secret. Create them in the console under Realms → your realm → Client Credentials → Create credential. The page describes them as “organization level”; they are still created for the realm you are in.
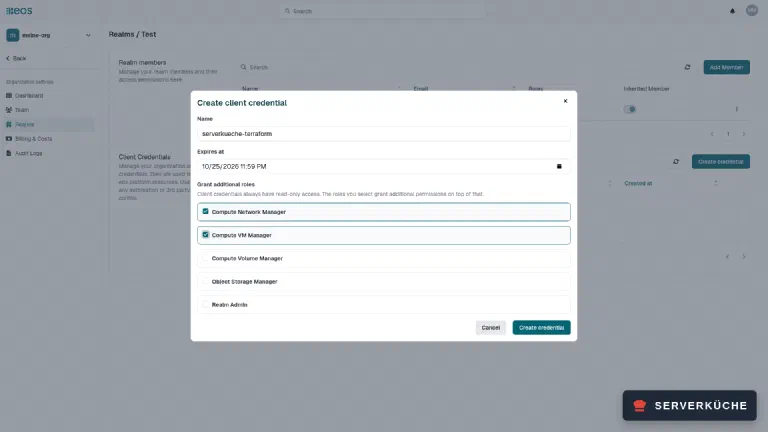
Every credential can read everything. Write access comes as roles: Compute Network Manager, VM Manager, Volume Manager, Object Storage Manager and Realm Admin. Two are enough for this tutorial:
compute:network-manager– networks, ACLs and public IPscompute:vm-manager– create, power and delete VMs
Also set an expiry date. Credentials for experiments don’t need a lifetime of a year, and a forgotten key then expires by itself.
After saving, eos shows the secret exactly once. Copy both values straight into a file only you can read:
umask 077
cat > ~/.eos.env <<'EOF'
export EOS_CLIENT_ID=YOUR_CLIENT_ID
export EOS_CLIENT_SECRET=YOUR_CLIENT_SECRET
EOF
umask 077 makes sure the file is created with mode 600. Both eosctl and the OpenTofu
provider read exactly these two variables – so the secret never has to appear in a
configuration file.
2. Install eosctl
netcup ships eosctl as a Debian package from its own repository. First fetch the signing key
so apt only accepts packages signed by netcup:
sudo apt-get install -y ca-certificates curl
curl -sSL https://dl.eoscloud.io/debian.gpg | sudo tee /usr/share/keyrings/eoscloud-public.gpg > /dev/null
Then add the package source and install the package:
sudo tee /etc/apt/sources.list.d/eos.sources > /dev/null <<'EOF'
Types: deb
URIs: https://dl.eoscloud.io/debian
Suites: trixie
Components: main
Signed-By: /usr/share/keyrings/eoscloud-public.gpg
EOF
sudo apt-get update && sudo apt-get install -y eosctl
Signed-By binds the key to this one source only – it doesn’t apply to Debian’s own packages.
Updates arrive with apt upgrade from now on. At the time, the eos documentation still named
version 0.12.1 while the repository already shipped 0.16.0.
3. Log in and tame the output
Load the credentials and log in:
source ~/.eos.env
eosctl loginClient credentials flow is configured. To logout, run: 'eosctl logout'
WARNING: storing token insecure in file.
Consider installing keyring software like gnome-keyring if possible.The warning appears on any server without a keyring: eosctl stores the access token as a file
in your home directory. On a machine only you use, that’s fine; on a shared system, log out with
eosctl logout when you’re done.
By default eosctl prints coloured tables. For scripts there are -o json, -o yaml and
-o template; NO_COLOR=1 turns the colours off. This lists the available images:
export NO_COLOR=1
eosctl compute vm image list -o json | jq -r '.[].name'Alpine Edge
Alpine Edge Cloud
Arch Linux
Arch Linux Cloud
Debian 13
Debian 13 Cloud
Ubuntu 26.04
Ubuntu 26.04 CloudThe products reveal what the console keeps quiet about:
eosctl compute product list -o json \
| jq -r '.[] | select(.kind=="vm") | [.name, .active, .product_data.cpu_count, .product_data.ram_size] | @tsv'vServer Mini true 1 2048
vServer Small true 2 4096
vServer Medium true 4 8192
vServer Large false 8 16384A fourth size with 8 cores and 16 GB already exists, it just isn’t enabled yet. Likewise, the API
knows a second block (at-preview1-db) next to the one in the console.
4. Create a VM with eosctl
A VM needs four IDs: block, product, image and network. Instead of copying them by hand, look
them up by name with jq:
block_id=$(eosctl compute block list -o json | jq -r '.[] | select(.name=="at-preview1-da") | .id')
product_id=$(eosctl compute product list -o json | jq -r '.[] | select(.name=="vServer Mini") | .id')
image_id=$(eosctl compute vm image list -o json | jq -r '.[] | select(.name=="Debian 13 Cloud") | .id')
network_id=$(eosctl compute network list -o json | jq -r '.[0].id')
.[0] takes the first network in the realm – if you have several, select it by name like the
others. As the cloud-init file, use the user-data.yaml from part one: it creates a user with
your key and installs the SSH server the cloud images lack.
vm_id=$(eosctl compute vm create \
  -B "$block_id" -P "$product_id" -I "$image_id" -N "$network_id" \
  -S 10000 --name cli-demo \
  -U "$(cat user-data.yaml)" \
  -o template -t '{{.id}}')
echo "$vm_id"
-S is the disk size in megabytes, so 10000 is 10 GB – the minimum. -U expects the file’s
content, not its path. With -o template -t '{{.id}}' the command prints only the new VM’s ID,
which you keep using.
Check whether it runs with the same template trick:
until [ "$(eosctl compute vm get "$vm_id" -o template -t '{{.power_state}}')" = "started" ]; do
  sleep 3
done
echo "running"
The VM was up after just over 20 seconds. But started only means it’s running. The next step
also needs the agent inside the VM to be ready, which takes about another half minute:
until [ "$(eosctl compute vm get "$vm_id" -o template -t '{{.agent_ready}}')" = "true" ]; do
  sleep 3
done
5. Run commands inside the VM
eosctl compute vm exec runs a command directly inside the VM – no SSH, no public IP, no ACL
rule. Wrap several commands in bash -c:
eosctl compute vm exec "$vm_id" "bash -c \"hostname; whoami\""cli-demo
rootThe inner quotes must be escaped double quotes (\"). With single quotes, only the first
command’s output came back.
The command runs as root. That’s the same back door as the web console from part one, just
scriptable – and the reason credentials with the vm-manager role need to be guarded like a root
password.
6. Deleting a VM: power off first
The obvious command does nothing on a running VM:
eosctl compute vm delete "$vm_id"No error message, and the VM simply keeps running. eos only deletes VMs that are powered off. The right order is power off, wait, delete:
eosctl compute vm power-off "$vm_id"
until [ "$(eosctl compute vm get "$vm_id" -o template -t '{{.power_state}}')" = "stopped" ]; do
  sleep 3
done
eosctl compute vm delete "$vm_id"
The root volume disappears with the VM. Check with eosctl compute vm list that it’s gone – in
scripts, silently doing nothing is more dangerous than an error.
7. Install OpenTofu
For anything beyond a single VM, a declarative description is more convenient: you write down
what should exist, and OpenTofu works out what to create, change or delete. OpenTofu is available
as a .deb on GitHub:
curl -sSLo /tmp/tofu.deb https://github.com/opentofu/opentofu/releases/download/v1.13.1/tofu_1.13.1_amd64.deb
sudo apt-get install -y /tmp/tofu.deb && rm /tmp/tofu.deb
tofu versionOpenTofu v1.13.1You don’t need to install the eos provider – OpenTofu fetches it itself in the next step.
8. The setup as code
Create a directory and copy the user-data.yaml from part one into it:
mkdir ~/eos-tf && cd ~/eos-tf
cp ~/user-data.yaml .
Then the file main.tf. We go through it in sections; together they form one file. First the
provider and the input:
terraform {
  required_providers {
    eoscloud = {
      source  = "dl.eoscloud.io/eos/eoscloud"
      version = "~> 0.10.0"
    }
  }
}

# Credentials come from EOS_CLIENT_ID / EOS_CLIENT_SECRET.
provider "eoscloud" {}

variable "my_ip" {
  description = "Public IPv4 allowed to connect via SSH"
  type        = string
}
The provider doesn’t come from the OpenTofu registry but straight from netcup’s server
dl.eoscloud.io. ~> 0.10.0 allows bug fixes within 0.10 but no jump to 0.11 – below version
1.0, every minor release may break things. The empty provider block is intentional: it reads
the credentials from the environment variables.
Instead of hard-coding IDs, the configuration looks up block, size and image by name:
data "eoscloud_blocks" "all" {}
data "eoscloud_products" "all" {}
data "eoscloud_vm_images" "all" {}

locals {
  block_id   = [for b in data.eoscloud_blocks.all.blocks : b.id if b.name == "at-preview1-da"][0]
  product_id = [for p in data.eoscloud_products.all.products : p.id if p.active && p.kind == "vm" && p.name == "vServer Mini"][0]
  image_id   = [for i in data.eoscloud_vm_images.all.vm_images : i.id if i.name == "Debian 13 Cloud"][0]
}
Now the firewall and the network. The ACL gets a single rule, SSH from your address; everything else stays blocked, as usual on eos:
resource "eoscloud_acl" "web" {
  block_id = local.block_id
  name     = "web-acl"
}

resource "eoscloud_acl_rule" "ssh" {
  acl_id            = eoscloud_acl.web.id
  action            = "allow"
  protocol          = "tcp"
  sources           = ["${var.my_ip}/32"]
  destination_ports = ["22"]
}

resource "eoscloud_network" "web" {
  block_id  = local.block_id
  name      = "web-net"
  v4_prefix = "10.10.0.0/24"
  acl_ids   = [eoscloud_acl.web.id]
}
Unlike in the console, the rule needs no destination here: it applies to the whole network the ACL is attached to. The network gets its own private address range.
Finally the VM, the public IP and the link between them:
resource "eoscloud_vm" "web" {
  block_id   = local.block_id
  product_id = local.product_id
  network_id = eoscloud_network.web.id
  image_id   = local.image_id
  name       = "web"
  disk_size  = 10000 # MB
  user_data  = file("${path.module}/user-data.yaml")
}

resource "eoscloud_public_ip" "web" {
  network_id = eoscloud_network.web.id
  ip_family  = 4
}

resource "eoscloud_public_ip_attachment" "web" {
  public_ip_id = eoscloud_public_ip.web.id
  vm_id        = eoscloud_vm.web.id
}

output "public_ip" {
  value = eoscloud_public_ip.web.ip
}
The IP and its attachment are two resources, just like the two steps in the console. That way you can keep an address while the VM behind it is replaced.
9. init, plan, apply
tofu init downloads the provider and verifies its signature:
source ~/.eos.env
tofu init- Installing dl.eoscloud.io/eos/eoscloud v0.10.1...
- Installed dl.eoscloud.io/eos/eoscloud v0.10.1 (signed, key ID 4650503580F8B221)
...
OpenTofu has been successfully initialized!This creates .terraform.lock.hcl with the exact version and its checksums. Commit this file to
your Git repository – that way everyone who rolls out the setup gets the same provider.
Pass your public IPv4 as a variable. tofu plan shows what would happen without creating
anything:
tofu plan -var my_ip=YOUR_IPPlan: 6 to add, 0 to change, 0 to destroy.If the plan looks right, build it:
tofu apply -var my_ip=YOUR_IPAfter the confirmation (yes), OpenTofu creates the resources in the right order:
eoscloud_acl.web: Creation complete after 6s
eoscloud_acl_rule.ssh: Creation complete after 5s
eoscloud_network.web: Creation complete after 5s
eoscloud_public_ip.web: Creation complete after 5s
eoscloud_vm.web: Creation complete after 20s
eoscloud_public_ip_attachment.web: Creation complete after 6s

Apply complete! Resources: 6 added, 0 changed, 0 destroyed.

Outputs:

public_ip = "203.0.113.20"
Around 40 seconds for a complete setup. Cloud-init then needs about another minute to install the SSH server – so the first connection attempts go nowhere. Then:
ssh koch@$(tofu output -raw public_ip)The VM has the address 10.10.0.2 from its own network, and sudo sshd -T confirms
passwordauthentication no and permitrootlogin no from the cloud-init file.
10. Change and tear down
A second tofu plan without changes must report No changes. – otherwise reality has drifted
from your file. Now a real change: port 80 should be open as well. In main.tf:
destination_ports = ["22", "80"]tofu apply -var my_ip=YOUR_IP # eoscloud_acl_rule.ssh will be updated in-place
...
Apply complete! Resources: 0 added, 1 changed, 0 destroyed.The rule is changed in place and the VM stays untouched – done after 6 seconds. user_data is a
different story: cloud-init only runs on first boot, so OpenTofu replaces the VM as soon as
you change the file. Look for must be replaced in the plan before you type yes.
To tear everything down:
tofu destroy -var my_ip=YOUR_IPDestroy complete! Resources: 6 destroyed.That took just under a minute, most of it for the VM. Unlike eosctl, the provider powers the VM
off by itself before deleting it.
When it doesn’t work
eosctl compute vm delete reports nothing and the VM keeps running. eos only deletes VMs that
are powered off and doesn’t say so. Run eosctl compute vm power-off first, wait until
power_state is stopped, then delete (step 6).
exec doesn’t work right after creation. started only means the VM is running. The agent
exec talks to needs another half minute – wait until agent_ready is true (step 4).
Only the first of several commands returns output. The inner quotes in bash -c are single
quotes. Use escaped double quotes as in step 5.
OpenTofu aborts with a permission error while creating resources. Every credential can read,
but writing needs a role. This setup needs compute:network-manager and compute:vm-manager.
Also check the client credentials list to see whether it has expired, and create a new one if
necessary.
tofu init can’t find the provider. The source must include the hostname:
dl.eoscloud.io/eos/eoscloud. Without it, OpenTofu searches its own registry, where the provider
doesn’t live.
Your problem is not listed? Search all error messages →
Maintenance & backups
- Protect the state.
terraform.tfstatecontains all IDs, the IP addresses and the content of your cloud-init file in plain text. It does not belong in a public repository. For a team, a remote backend such as an S3 bucket is worth it – eos has S3 built in; lock access to it down just like the credentials. If the state is lost, OpenTofu no longer knows what it created, and you clean up by hand. - Keep secrets out. Client ID and secret live in
~/.eos.env, never in.tffiles. A password inuser_dataends up in the state – so cloud-init files should only carry keys. - Rotate credentials. Give every client credential an expiry date and create a new one in time. One per purpose (CI, laptop, experiments) can be revoked individually.
- Update the provider deliberately.
tofu init -upgradefetches the newest allowed version. While the provider is below 1.0, read the changes before every jump to a new minor version and check withtofu planthat nothing is replaced unexpectedly. - Keep
eosctlcurrent with apt. It updates withapt upgrade. Since the documentation lags behind,eosctl <command> --helpis the more reliable source. - Don’t forget to clean up. Billing is per minute, and a public IP costs money even without a
VM.
tofu destroycatches everything in the file – resources created in the console or witheosctlyou delete yourself.
Our impression: this is where eos plays to its strengths. Everything we needed in the console
also works via eosctl and OpenTofu, the provider is signed and a complete setup stands in under
a minute. The rough edges are those of a preview – a silent delete, documentation lagging
behind the software. If you need servers for production today, take a netcup VPS or root server;
if you want to manage your infrastructure as code, eos will be a platform built for exactly that
from the friends & family launch onwards.
VPS 1000 G12.5
4 vCores · 8 GB RAM · 128 GB SSD
from €14.50/month
The safe choice for production today: the classic netcup VPS.
💶 1 month free:
Single use, valid for VPS 1000 G12.5. Redeem in the cart →
💶 €5.95 voucher for new netcup customers: always valid · not for domains or VPS Lite
Send feedback: feedback@serverkueche.de
You might also like