Setting up the netcup firewall in the SCP (with the stateless-UDP trick)
Set up the netcup firewall as network protection in front of the server: composable policy templates in the SCP – with the trick for stateless UDP (DNS & NTP).
Table of contents
netcup comes with a firewall in front of your server – in the Server Control Panel, before a packet even reaches the operating system. Set up correctly, it’s a strong shield. But there’s a stateless-UDP trick many people fail at: the netcup firewall is stateless for UDP. This tutorial walks you through a clean, reusable firewall – and why DNS and NTP otherwise suddenly get stuck.
What are we building?
In the netcup SCP we build a network firewall from composable policy templates: a base template (that every server needs), one for SSH, and one for web (HTTP/HTTPS). You assign these building blocks to your server as needed – a web server gets base + SSH + web, a server without a website only base + SSH. By the end, everything inbound is blocked except what you deliberately allow.
The netcup firewall works in the network in front of the server and does not replace the firewall on the server itself (UFW). Both together are “defense in depth”: if one layer fails or is misconfigured, the other kicks in. Feel free to set up both.
Prerequisites
- A netcup server, e.g. your first VPS.
- Your SCP credentials (customer number + SCP password from the netcup welcome email – different from your SSH login).
- Clarity about your SSH port: the default is
22, and it stays that way when hardening SSH. If you changed it elsewhere, use your real port – otherwise you lock yourself out when activating.
VPS 1000 G12.5
4 vCores · 8 GB RAM · 128 GB SSD
from €14.50/month
The firewall is included in the SCP with every netcup server.
💶 1 month free:
Single use, valid for VPS 1000 G12.5. Redeem in the cart →
💶 €5.95 voucher for new netcup customers: always valid · not for domains or VPS Lite
Step by step
Step 1: Open Firewall Policies in the SCP
Log into the Server Control Panel and open the Firewall Policies menu item at the top. Here you create reusable rule sets (“policies”) – independent of the individual server. You only assign them later.
Step 2: Build the base template
Click Create firewall policy, give it the name Serverküche Base and, via Add
rule, create these four rules – all INBOUND and ACCEPT:
| Description | Protocol | Source port (Src) | Destination port (Dst) |
|---|---|---|---|
| DNS replies (stateless) | UDP | 53 | any |
| NTP replies (stateless) | UDP | 123 | any |
| ICMP (ping/PMTU) | ICMP | – | – |
| ICMPv6 (Neighbor Discovery) | ICMPv6 | – | – |
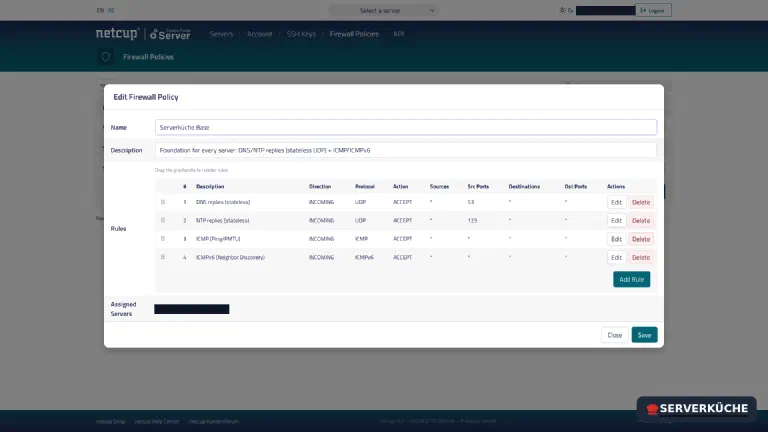
Two things that make the difference here:
- DNS/NTP via the
Src Port, not the destination port. Your server queries DNS/NTP (outbound); the reply comes back from port 53 or 123. Because UDP is stateless, you need this inbound rule – otherwise there’s no name resolution and no time synchronization, even though “everything else” seems to work. - Never forget ICMPv6. Without Neighbor Discovery, IPv6 breaks completely. ICMP (v4) on top is useful for ping and path MTU discovery. netcup’s default policy “Ping allow” does cover ICMP, but it’s in the base template anyway so your foundation stays complete without the netcup defaults.
As soon as one rule exists, netcup blocks the rest automatically
Does your server use DHCP?
netcup VPS are usually configured statically – then there’s nothing to do here. Check
for yourself before relying on it; the configuration isn’t in /etc/network/interfaces
itself but in the file included from there:
grep -rE "inet6? (static|dhcp)" /etc/network/interfaces /etc/network/interfaces.d//etc/network/interfaces.d/50-cloud-init.cfg:iface eth0 inet static
/etc/network/interfaces.d/50-cloud-init.cfg:iface eth0 inet6 staticIf it says static, you’re done. netcup’s network does run a DHCP server, but because UDP
is stateless, the DHCP reply (source port 67) is discarded by the whitelist. If
dhcp shows up instead, add INBOUND · UDP · ACCEPT · Src 67 to the base template (for
DHCPv6 additionally Src 547) – otherwise it loses its IP at the next lease renewal.
Step 3: Small building blocks for SSH and web
Instead of one big rule monolith, you create atomic templates that you freely combine. Create two more policies following the same pattern:
Serverküche SSH– one rule: INBOUND, TCP, ACCEPT, destination port 22.Serverküche Web– two rules: INBOUND, TCP, ACCEPT, destination port 80 and 443.
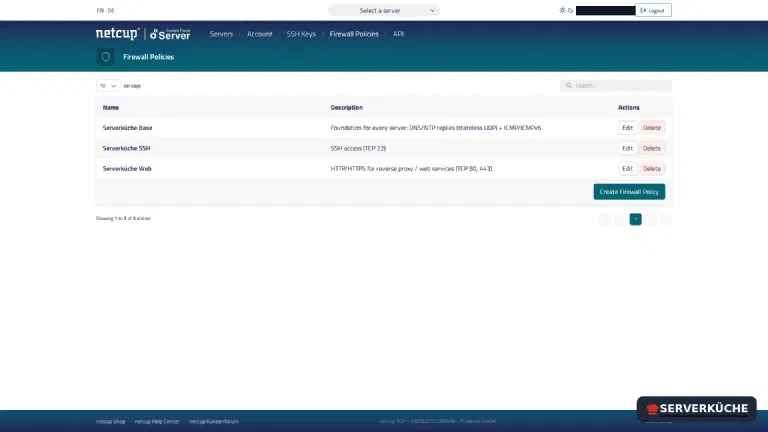
The gain: the base rules appear only once, not duplicated in every policy. If a service is added later (e.g. a mail server or WireGuard), you build another small template for it and plug it in – without touching the existing ones.
Step 4: Assign templates to the server
Switch to Server → your server → “Firewall” tab and click Edit firewall policies.
Move the appropriate ones from Available firewall policies to Selected: for a web
server Serverküche Base + Serverküche SSH + Serverküche Web.
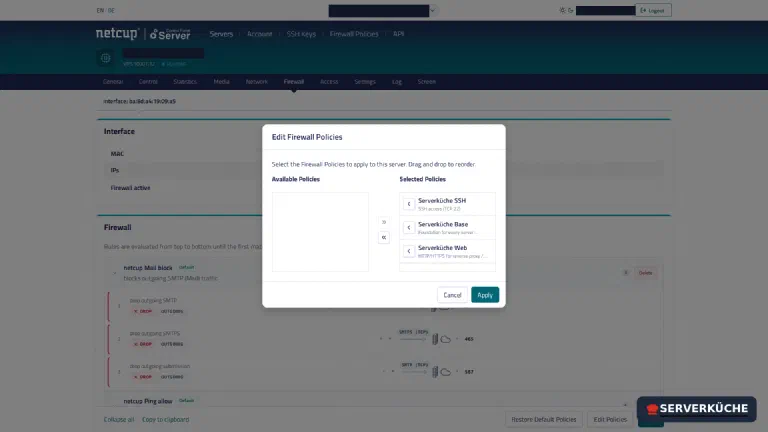
Confirm with Apply and then Save. Check that the “Firewall active” switch is turned on. The assigned rules now appear in the list – together with netcup’s default policies (see maintenance).
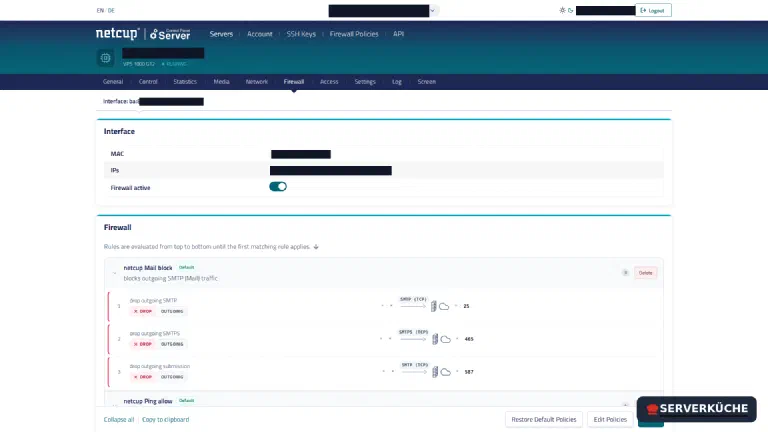
Don't lock yourself out
Step 5: Ready-made templates for common services
Exactly following the pattern from step 3, here are ready-made templates for the most
common self-hosting services. Each is its own small template, all rules are INBOUND
and ACCEPT. Build only the ones you really need and plug them, as in step 4, into
Serverküche Base + Serverküche SSH.
For UDP services you offer yourself (VPN, TURN, your own DNS server), the port is in the destination port (Dst), because here clients connect to your server. That’s the opposite of the DNS/NTP rules from the base template, where your server is the querying client and the port therefore sits in the source port. Both directions coexist without problems. TCP replies aren’t affected by this (the firewall state only matters for UDP); outbound is allowed anyway.
Mail server (mailcow & co.)
| Description | Protocol | Source port (Src) | Destination port (Dst) |
|---|---|---|---|
| SMTP (mail acceptance from others) | TCP | – | 25 |
| Submission (STARTTLS) | TCP | – | 587 |
| Submission (implicit TLS) | TCP | – | 465 |
| IMAP (STARTTLS) | TCP | – | 143 |
| IMAPS | TCP | – | 993 |
| POP3 (STARTTLS) | TCP | – | 110 |
| POP3S | TCP | – | 995 |
| ManageSieve (filter rules) | TCP | – | 4190 |
Two more things belong to a mail server:
- Web UI and certificates: mailcow needs
80/443for the web interface and the Let’s Encrypt retrieval – just assign theServerküche Webtemplate along with it. - Outbound SMTP: is blocked at netcup out of the box. How to change that is covered in the next section.
Unblock port 25: remove “netcup Mail block”
A mail server must be able to deliver on port 25 outbound. netcup blocks outbound SMTP – ports 25, 465 and 587 – as spam protection with the default policy “netcup Mail block”. You get no error message: connections to other mail servers simply run into a timeout. IMAP (993) and every other outbound port are not affected.
You take the block off the server yourself: deactivate the netcup template “netcup Mail block” in the assignment from step 4. No support ticket needed. If you only want to check whether your mail gets delivered, you can assign the template again afterwards.
An open port 25 alone is not enough for clean delivery. Without a correct PTR/reverse-DNS entry your mails land in spam – everything else that belongs to it is in email deliverability.
WireGuard VPN
Fits set up a WireGuard VPN.
| Description | Protocol | Source port (Src) | Destination port (Dst) |
|---|---|---|---|
| WireGuard | UDP | – | 51820 |
51820 is the usual default – use the value from your ListenPort. Only this one inbound
rule is needed; the replies to the clients go out outbound.
Headscale (your own Tailscale coordination server)
Goes with Headscale: Your Own Tailscale Network.
| Description | Protocol | Source port (Src) | Destination port (Dst) |
|---|---|---|---|
| STUN (built-in DERP server) | UDP | – | 3478 |
The UI, the API and the DERP channel itself run through the reverse proxy and therefore
over 443 (Serverküche Web). The only directly published port is UDP 3478: over it
the built-in DERP server helps your devices punch through NAT. A missing rule shows up
late – signing in to the coordination server works over 443, only the direct connections
between the devices never come up.
OpenVPN
| Description | Protocol | Source port (Src) | Destination port (Dst) |
|---|---|---|---|
| OpenVPN (UDP, default) | UDP | – | 1194 |
| OpenVPN (TCP fallback) | TCP | – | 1194 |
The default is UDP 1194. The TCP rule only if you deliberately run OpenVPN over TCP
(some additionally put it on TCP 443 to get through restrictive foreign networks) –
otherwise leave it out.
Zabbix monitoring
Here it depends on the server’s role:
| Role | Description | Protocol | Destination port (Dst) |
|---|---|---|---|
| Monitored host (Zabbix agent) | passive checks from the server | TCP | 10050 |
| Zabbix server | trapper (active agents/proxies) | TCP | 10051 |
The Zabbix server additionally needs 80/443 for the web frontend (Serverküche Web). If
you run active checks, the agent connects outbound to the server on 10051 – for that,
no inbound rule is needed on the agent host.
Checkmk
| Role | Description | Protocol | Destination port (Dst) |
|---|---|---|---|
| Monitored host (agent) | agent controller, pull mode | TCP | 6556 |
| Checkmk server (optional) | agent receiver (push/registration) | TCP | 8000 |
| Checkmk server (optional) | Livestatus (distributed monitoring) | TCP | 6557 |
In the default pull mode, the Checkmk server connects outbound to 6556 of the agents – so
inbound, only the monitored host needs that port. The Checkmk server itself gets by with
80/443 (Serverküche Web); 8000 and 6557 only if you use push mode or distributed
monitoring. 8000 applies to the first site on the server – a second site uses 8001, a
third 8002, and so on.
Coturn / TURN server (Nextcloud Talk, Matrix)
| Description | Protocol | Source port (Src) | Destination port (Dst) |
|---|---|---|---|
| STUN/TURN | TCP | – | 3478 |
| STUN/TURN | UDP | – | 3478 |
| STUN/TURN over TLS | TCP | – | 5349 |
| STUN/TURN over TLS | UDP | – | 5349 |
| Media relay (audio/video) | UDP | – | 49152–65535 |
The large UDP relay range is the default – the actual audio/video streams run over it. You
can narrow it in the coturn configuration (min-port/max-port) and then set the firewall
rule to the same, smaller range.
Jitsi Meet (video conferencing)
Goes with Jitsi Meet: your own video conferences (Tutorial expected in November).
| Description | Protocol | Source port (Src) | Destination port (Dst) |
|---|---|---|---|
| Media (video bridge) | UDP | – | 10000 |
This is the policy people forget most often, because without it Jitsi looks entirely normal:
the web interface arrives over 443 (Serverküche Web), the participant list fills up, and
only once somebody speaks do you notice that nothing arrives. Audio and video do not go
through the reverse proxy but straight to UDP 10000 – a fixed port, unlike coturn with its
large relay range.
Git server over SSH (Forgejo)
Goes with Forgejo: your own Git server behind Traefik.
| Description | Protocol | Source port (Src) | Destination port (Dst) |
|---|---|---|---|
| Git over SSH | TCP | – | 2222 |
The web interface arrives over 443 (Serverküche Web). Forgejo’s built-in SSH server
deliberately does not sit on 22 – the server’s own SSH daemon is already there – but
on 2222. Use the value you set for SSH_LISTEN_PORT. Without this rule everything looks
healthy: signing in, creating repositories and cloning over HTTPS all work, only
git clone ssh://git@YOUR_DOMAIN:2222/… runs into a timeout.
Syncthing
Goes with Syncthing: sync files between devices.
| Description | Protocol | Source port (Src) | Destination port (Dst) |
|---|---|---|---|
| Sync protocol | TCP | – | 22000 |
| Sync protocol over QUIC | UDP | – | 22000 |
The sync traffic does not run through the reverse proxy but straight to 22000 – only the
web interface comes over 443. Both lines belong here: Syncthing accepts TCP and QUIC
(UDP) on the same port. You don’t need the third port 21027/UDP – that’s device
discovery on the local network, which doesn’t carry over the internet anyway.
Your own DNS server (AdGuard Home, Pi-hole, Unbound)
You only need this template if your DNS server is meant to be reachable publicly. The Serverküche way with AdGuard Home deliberately isn’t: there AdGuard listens on the WireGuard address only, so it’s reachable through the VPN alone – for that, no rule here is needed.
| Description | Protocol | Source port (Src) | Destination port (Dst) |
|---|---|---|---|
| DNS queries | UDP | – | 53 |
| DNS queries (large replies/TCP) | TCP | – | 53 |
| DNS-over-TLS (DoT) | TCP | – | 853 |
Here Dst 53 allows the queries of foreign clients to your DNS server – the opposite
direction to Src 53 in the base template.
No open resolver
53 “just quickly” for the whole
world.Remote database access (emergency only)
| Description | Protocol | Source port (Src) | Destination port (Dst) |
|---|---|---|---|
| PostgreSQL | TCP | – | 5432 |
| MySQL / MariaDB | TCP | – | 3306 |
Databases don't belong on the open internet
ssh -L 5432:localhost:5432 …). If you must open the port anyway, then only
with a source address restricted to your fixed admin IP in the netcup rule – never for
everyone.When things go wrong
After activating, name resolution stops working (apt update hangs, ping domain.de
fails, but ping 1.1.1.1 works). The DNS replies are being blocked. Check the rule in
the base template INBOUND UDP ACCEPT, Src port 53 – source port, not destination port.
The clock drifts, or TLS certificates are rejected due to the wrong time. The NTP replies are missing. Add INBOUND UDP ACCEPT, Src port 123.
IPv6 no longer works (v4 does). The ICMPv6 rule is missing. Without Neighbor Discovery, the server can’t even find its neighbor (router) over IPv6.
After activating, you can no longer get in via SSH. The SSH rule is missing or names the wrong port. Via the VNC console (SCP → Display) you can still reach the server; correct the policy and save again.
The server can’t send emails (outbound port 25 doesn’t work). Not an error in your policy, but netcup’s default policy “netcup Mail block” – how to take it off is described with the mail server template.
The server initially runs normally and is suddenly offline after one or two weeks. If
the server uses DHCP, the lease renewal is blocked by the whitelist. Add INBOUND · UDP · ACCEPT · Src 67 to the base template (see the DHCP tip in step 2).
Your problem is not listed? Search all error messages →
Maintenance & backups
- Test access after every change – with a second session open, as in step 4.
- New services = new template. If you later need another port, create a small template of your own and assign it additionally.
- Mind the order. netcup evaluates the rules top to bottom; the first matching rule wins. For pure ACCEPT rules that doesn’t matter – but as soon as you use your own DROP rules, watch the order relative to the ACCEPTs.
- Know netcup’s default policies. “netcup Mail block” (outbound SMTP blocked) and “netcup Ping allow” are predefined. Via Restore default policies you can, in an emergency, get back to a known, working baseline if you locked yourself out with your own rules – together with the VNC console, your second safety net.
Last updated: Oct 20, 2026
Send feedback: feedback@serverkueche.de
You might also like