netcup Server Control Panel: snapshots, console & rescue
Create, restore and download netcup snapshots (.zst) in the Server Control Panel – plus the VNC console and rescue system for when SSH locks you out.
Table of contents
Before you do something risky on the server – a big update, a delicate config change – you want a point you can return to in minutes. That’s exactly what netcup snapshots are for. This tutorial shows you the Server Control Panel (SCP) and how to use snapshots properly – and where their limit lies.
What are we building?
You get to know the netcup Server Control Panel (SCP) – the web interface to your server – and create a snapshot there: a complete image of your server disk, to which you return in a few minutes if a mishap happens. By the end you know when a snapshot is your rescue – and why it’s still no substitute for a real backup.
Prerequisites
- A netcup server, e.g. your first VPS.
- Your SCP credentials – they are in the netcup welcome email and are different from your SSH login.
VPS 1000 G12.5
4 vCores · 8 GB RAM · 128 GB SSD
from €14.50/month
All netcup servers include the SCP with its snapshot function.
💶 1 month free:
Single use, valid for VPS 1000 G12.5. Redeem in the cart →
💶 €5.95 voucher for new netcup customers: always valid · not for domains or VPS Lite
Step by step
Step 1: Log into the SCP and find the server
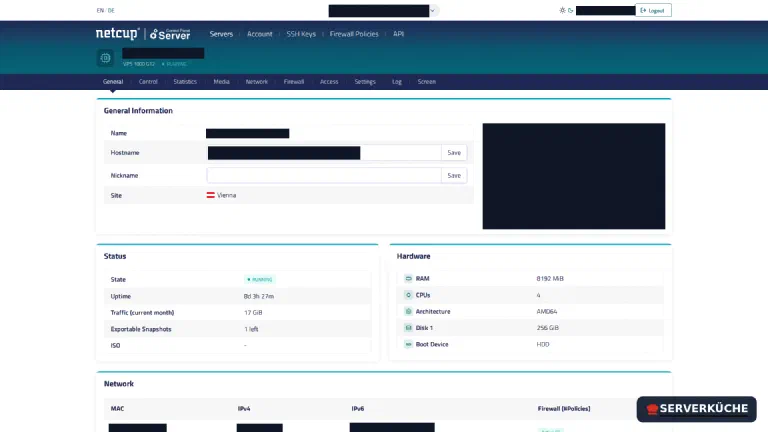
Open servercontrolpanel.de and log in with your SCP credentials. You land in the server list; a click on your server opens the overview with product, status and hardware. At the top you see the tabs through which you control everything – snapshots are under Media.
Different login than SSH
Step 2: Create a snapshot
Go to Media → Snapshots. Under Create snapshot you fill in:
- Name: name it after the purpose, not the date alone – e.g.
before-update-2026-08. That way you later know what it was for. - Description: one sentence of context (optional, but helpful).
- Disk: usually
vda(your system disk). - Type: here lies the most important decision – see below.

Offline or online snapshot?
- Offline snapshot (netcup’s recommendation): the server is briefly shut down for the capture. This guarantees a consistent state – the right choice when databases are running, and when you can afford the brief downtime. Only offline snapshots can be exported later (step 4) and imported into another netcup server – whose disk has to be at least as large as the backed-up partition.
- Online snapshot: capture while running, without downtime; it also preserves the server’s running state. In exchange: it cannot be exported, the server may become unresponsive for a few minutes during the capture, and file changes mid-capture can, per netcup, lead to irreparable data loss. With Local Block Storage it isn’t available at all right now.
A click on Create starts the process; depending on the amount of data it takes a few minutes. It runs in the background – the creation date and type then appear in the list above once it’s done. Best schedule the brief downtime of an offline snapshot for a quiet time; after that your return point is set and you can tackle the planned change.
How many snapshots can you have?
Step 3: Restore a snapshot
If something went wrong, you find the snapshot in the list under Snapshots; the Actions column holds Revert, Export and Delete. Revert plus OK resets the server to the selected state. Delete plus OK removes the snapshot – that can’t be undone either.
Restoring overwrites everything
Step 4: Export an offline snapshot (optional)
An offline snapshot doesn’t have to stay at netcup: Export unlocks the Download button in the same row, and through it you pull the image onto your own machine. Exactly one export is free per server – how many you have left is shown in the server overview from step 1. Further ones you book in the customer account (CCP) under Products → magnifying glass in front of the product → Snapshot.
The download is zstd-compressed and has to be decompressed before you can reuse it:
zstd -d snapshot.raw.zst -o snapshot.rawAfterwards the raw image (snapshot.raw) sits there at the same size as the server
partition – plan for the disk space. If you want to unpack while downloading, that works
in one go too; replace YOUR_DOWNLOAD_URL with the link from the SCP:
curl --progress-bar -L "YOUR_DOWNLOAD_URL" | zstd -do snapshot.rawThe single free export is a nice emergency exit when you leave the server – it is not a backup strategy, because you can’t repeat it regularly.
Step 5: The other safety lines in the SCP
The SCP has more than snapshots – good to know for an emergency:
- Screen (VNC console): direct screen access to the server, even when SSH refuses – the safety line from the SSH tutorial.
- Media → Rescue System: boots the server into an emergency Linux to repair a broken installation.
- Media → Images / DVD drive: install a different operating system.
- Firewall: a packet filter layer in front of the server, independent of the operating system – how to build it is shown in setting up the netcup firewall in the SCP.
What each area can do in detail is described in the netcup documentation on “Media”.
When things go wrong
“Create” won’t make a snapshot while a DVD is inserted. If an .iso image is attached
in the virtual drive under Media → DVD Drive, the SCP refuses new snapshots. Eject the
image there – the ISO row in the server overview has to show - again – and start the
snapshot once more.
The snapshot can’t be created because there isn’t enough disk space. A snapshot needs
room next to your live data. Clean up on the server, hand the freed blocks back to the
host with fstrim -av, and delete snapshots you no longer need. If that doesn’t help,
trigger the Storage Optimization in the SCP under Media → Disks – plan for
downtime: netcup shuts the server down for it, optimizes the disk and boots it again.
After an online snapshot restore, the database is corrupted. An online snapshot may catch a running write mid-way. For servers with a database, take an offline snapshot or create a database dump beforehand.
You can’t get into the SCP. The SCP uses its own credentials (not SSH). They are in the welcome email; a forgotten SCP password you reset in the netcup customer account (CCP).
Your problem is not listed? Search all error messages →
Maintenance & backups
- Snapshot ≠ backup – the most important point. A snapshot lives at netcup, on the same storage as your server and under your account. If the account, the data center or your access fails, it’s gone too. It’s a quick safety net, not an off-site backup – and the one free export from step 4 doesn’t change that, because you can’t repeat it regularly.
- Snapshot before every risky action. Before big updates, migrations or delicate config changes: snapshot first, then start. Once the action is through and everything runs, you can delete it and create a fresh one next time.
- Snapshots age. A months-old snapshot brings you back to a long-outdated state – when in doubt, worse than no snapshot. Renew it specifically before every larger action; a fresh return point is worth more than an old one.
- For real safety you need both. Complement the snapshot with encrypted off-site backups – how that works is shown in the tutorial on backups with Restic. Rule of thumb: snapshot for the quick return, Restic for “my server is gone”.
Last updated: Oct 2, 2026
Send feedback: feedback@serverkueche.de
What's next?
You might also like