ntfy: push notifications from your own server to your phone
Self-host ntfy with Docker & Traefik: push messages to your phone via a simple curl – ideal for backup reports, monitoring alerts and scripts.
Table of contents
“Backup failed”, “Disk almost full”, “new SSH login” – you want messages like these on your phone immediately, without handing them to a third-party push service. With ntfy you build your own push server in a few minutes: a message is just a curl call away.
What are we building?
By the end, ntfy 2.28 runs in Docker behind your Traefik reverse proxy, reachable under your own (sub)domain with HTTPS. You can then send a push message from any script, cron job or monitoring tool – with a simple HTTP request – and get it displayed instantly in the ntfy app on your phone or in the browser, including title, priority, emojis and optional actions.
The clever part: ntfy is extremely lightweight (runs easily on the smallest VPS) and the data stays with you. We set the server up private right away – only with credentials may someone send or read messages.
Why ntfy and not a ready-made service like Pushover or a Telegram bot? Because here you need no account with third parties, hand no message contents to foreign servers, and the interface is as simple as it gets: anything that can fire an HTTP request – a shell script, a cron job, a monitoring tool – can notify you, without any SDK or API library. Exactly this reduction to “POST to a URL” makes ntfy so easy to connect to a self-hosted setup.
Prerequisites
- A hardened server with Debian 13 and Docker
- A running Traefik reverse proxy with the external network
proxyand the resolverle - A (sub)domain whose A/AAAA record points to your server, e.g.
ntfy.YOUR_DOMAIN - Optional but recommended: the ntfy app (Android/F-Droid/iOS) to really get push on your phone
ntfy is so frugal that it runs without problems alongside many other services on a VPS 1000 – the server calculator shows you how little it needs.
VPS 1000 G12.5
4 vCores · 8 GB RAM · 128 GB SSD
from €14.50/month
More than enough for ntfy – the service needs hardly any resources.
💶 1 month free:
Single use, valid for VPS 1000 G12.5. Redeem it in an empty cart – the code adds the server itself. Redeem in the cart →
💶 €5 voucher for new netcup customers: always valid · not for domains or VPS Lite
Step by step
Step 1: Write the compose.yaml
Create the project folder:
mkdir -p /opt/ntfy && cd /opt/ntfyCreate /opt/ntfy/compose.yaml. Replace ntfy.YOUR_DOMAIN with your real (sub)domain – it appears both in the NTFY_BASE_URL and in the Traefik label:
services:
  ntfy:
    image: binwiederhier/ntfy:v2.28.0
    container_name: ntfy
    command: serve
    environment:
      NTFY_BASE_URL: https://ntfy.YOUR_DOMAIN
      NTFY_LISTEN_HTTP: ":80"
      NTFY_BEHIND_PROXY: "true"
      NTFY_ENABLE_LOGIN: "true"
      NTFY_REQUIRE_LOGIN: "true"
      NTFY_CACHE_FILE: /var/lib/ntfy/cache.db
      NTFY_AUTH_FILE: /var/lib/ntfy/auth.db
      NTFY_AUTH_DEFAULT_ACCESS: "deny-all"
      NTFY_ATTACHMENT_CACHE_DIR: /var/lib/ntfy/attachments
    volumes:
      - data:/var/lib/ntfy
    networks: [proxy]
    restart: unless-stopped
    labels:
      - "traefik.enable=true"
      - "traefik.http.routers.ntfy.rule=Host(`ntfy.YOUR_DOMAIN`)"
      - "traefik.http.routers.ntfy.entrypoints=websecure"
      - "traefik.http.routers.ntfy.tls.certresolver=le"
      - "traefik.http.services.ntfy.loadbalancer.server.port=80"

networks:
  proxy:
    external: true

volumes:
  data:
The most important lines:
NTFY_BASE_URLmust be exactly your public HTTPS address – otherwise the app and the web client refuse the connection.NTFY_BEHIND_PROXY: "true"tells ntfy it runs behind Traefik, so it reads the real visitor IP from the proxy headers (important for rate limiting).NTFY_AUTH_DEFAULT_ACCESS: "deny-all"is the security screw: by default nobody may read or write. Access is only granted to whoever we explicitly create in a moment. Without this line your server would be an open push relay for the whole world.NTFY_ENABLE_LOGIN/NTFY_REQUIRE_LOGINenable the login in the web client and make it mandatory. WithNTFY_REQUIRE_LOGIN, an unauthenticated visitor gets a login screen directly instead of an empty interface.
Step 2: Start the server
docker compose up -dCheck that the container is running:
docker compose psNAME IMAGE COMMAND SERVICE STATUS
ntfy binwiederhier/ntfy:v2.28.0 "ntfy serve" ntfy Up 4 seconds(For readability, the columns CREATED and PORTS are hidden here.)
Traefik fetches a certificate automatically. Check the health endpoint from your machine:
curl -s https://ntfy.YOUR_DOMAIN/v1/health{"healthy":true}If the server responds with {"healthy":true}, the chain of DNS, Traefik, TLS and ntfy is in place.
Step 3: Create a user
Because we set deny-all, you need at least one user. Create an administrator (they may write to and read all topics):
docker exec -it ntfy ntfy user add --role=admin adminntfy asks twice for a password and then confirms:
user admin added with role adminCheck the result:
docker exec ntfy ntfy user listuser admin (role: admin, tier: none)
- read-write access to all topics (admin role)Tip
--role=user) and grant rights specifically. Create the user first (docker exec -it ntfy ntfy user add --role=user phone) and then assign it the right, e.g. docker exec ntfy ntfy access phone "serverkueche-alerts" read-only. This way the phone may read along but not send.Step 4: Subscribe to a topic
In ntfy everything runs via topics – freely chosen names under which messages run. Open https://ntfy.YOUR_DOMAIN in the browser. Thanks to NTFY_REQUIRE_LOGIN, the web client greets you directly with a login screen – log in there with your created admin account (without login, deny-all blocks every read and subscribe attempt with HTTP 403). Then click Subscribe to topic on the left and choose a hard-to-guess name (e.g. serverkueche-alerts):
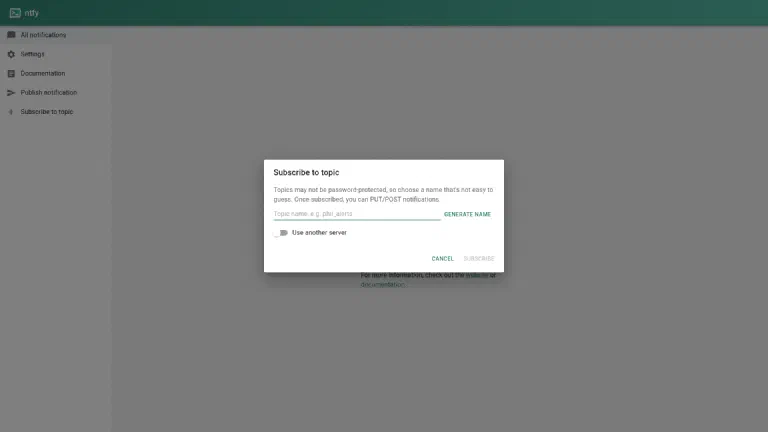
On the phone you set up your own server once in the ntfy app: open Settings → Default server and enter https://ntfy.YOUR_DOMAIN. Then store your credentials for this server under User management. Now you can add a topic just like in the browser – the app no longer asks about the big ntfy.sh server, but uses yours. From now on every message to this topic lands as a real push notification on the device, even with the app closed. On iOS the reception runs via Apple’s push service; the app explains at first launch what’s needed once for that.
Allow browser notifications
Step 5: Send a message
Now the actual purpose – send a message via curl. Because the server is private, you supply your credentials (-u USER:PASSWORD):
curl -u admin:YOUR_PASSWORD -d "Backup completed successfully" https://ntfy.YOUR_DOMAIN/serverkueche-alertsThat’s it – the message is instantly on all subscribed devices. With a few additional headers it becomes more meaningful: title, priority (1–5) and tags (which also appear as emojis):
curl -u admin:YOUR_PASSWORD \
  -H "Title: Monitoring warning" \
  -H "Priority: 4" \
  -H "Tags: warning" \
  -d "High CPU load on the VPS" \
  https://ntfy.YOUR_DOMAIN/serverkueche-alerts
The priority controls how intrusive the message arrives: 5 (max) makes the phone ring and vibrate, 4 (high) reports clearly, 3 is the default, 2 and 1 (low/min) land quietly in the list. For “server unreachable” you use 5, for “backup ok” rather 2 – this way you don’t become numb to the important alarms.
Tags turn into emojis if they match a known name: warning → ⚠️, white_check_mark → ✅, rotating_light → 🚨. Multiple tags you give comma-separated (-H "Tags: rotating_light,skull"). And with the Click header, a tap on the message opens a URL directly – handy to jump straight from the alarm into the dashboard:
curl -u admin:YOUR_PASSWORD \
  -H "Title: Uptime Kuma: service down" \
  -H "Priority: 5" \
  -H "Tags: rotating_light" \
  -H "Click: https://status.YOUR_DOMAIN" \
  -d "Nextcloud is not responding" \
  https://ntfy.YOUR_DOMAIN/serverkueche-alerts
It gets really powerful with action buttons: via the Actions header you show buttons right in the notification that open a URL or trigger an HTTP request – so you acknowledge an alarm with a fingertip, without even opening the app:
curl -u admin:YOUR_PASSWORD \
  -H "Title: Restart server?" \
  -H "Actions: view, Open status, https://status.YOUR_DOMAIN" \
  -d "A service is stuck – check the status board." \
  https://ntfy.YOUR_DOMAIN/serverkueche-alerts
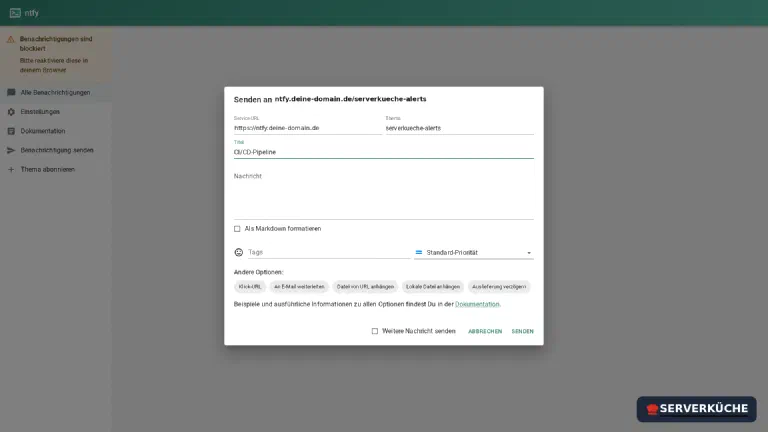
You can also comfortably click the same message together via the web client – handy for trying out all the options:
Step 6: Messages arrive
In the web client (provided you’re logged in there with your admin account as in step 4) and in parallel in the app, the messages appear immediately – with title, timestamp and color-highlighted priority:
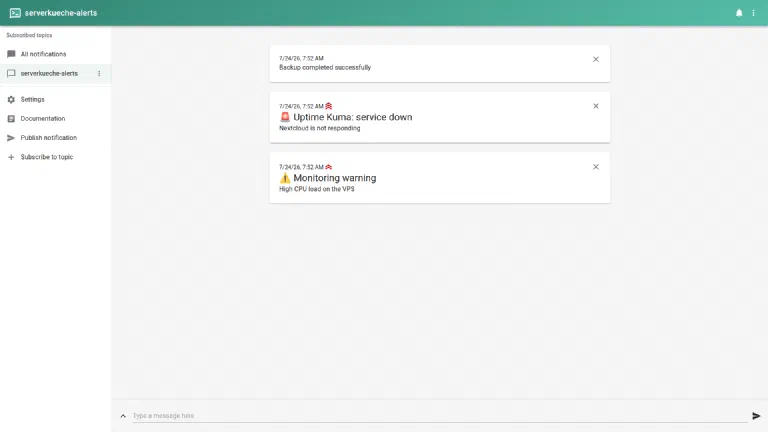
By the way, you can install the web client in Chrome or Edge as an app (PWA): then you also get push notifications on the desktop without having to keep a tab open – handy when the computer is running anyway and you want to see alarms directly on screen.
Step 7: Access tokens for scripts instead of a password
Storing a password in every cron job and backup script is ugly. Better is an access token that you can revoke individually at any time:
docker exec ntfy ntfy token add adminntfy returns a token that starts with tk_. You then use it instead of -u as a bearer token:
curl -H "Authorization: Bearer tk_YOUR_TOKEN" \
  -H "Title: Nightly backup" \
  -d "Restic backup ran without errors" \
  https://ntfy.YOUR_DOMAIN/serverkueche-alerts
This way you can cleanly build ntfy into your Restic backups (a message at the end of the backup script) or have Uptime Kuma use it as a notification channel – Uptime Kuma knows ntfy as a built-in notification type.
Step 8: Practical example – a backup script that reports in
ntfy becomes most useful when a script automatically reports in. The following pattern wraps an arbitrary command and sends, depending on the outcome, a quiet success or a loud failure message. Save it as /opt/scripts/backup-notify.sh and adjust the domain, token and the actual backup command:
#!/usr/bin/env bash
set -uo pipefail

NTFY_URL="https://ntfy.YOUR_DOMAIN/serverkueche-alerts"
NTFY_TOKEN="tk_YOUR_TOKEN"

# Your actual backup command goes here – the exit code decides the message:
if restic backup /opt --tag nightly; then
  curl -s -H "Authorization: Bearer $NTFY_TOKEN" \
    -H "Title: Backup ok" -H "Tags: white_check_mark" -H "Priority: 2" \
    -d "Nightly backup ran without errors." "$NTFY_URL"
else
  curl -s -H "Authorization: Bearer $NTFY_TOKEN" \
    -H "Title: BACKUP FAILED" -H "Tags: rotating_light" -H "Priority: 5" \
    -d "The backup aborted with an error – please check immediately." "$NTFY_URL"
fi
Make it executable and test it once by hand:
chmod +x /opt/scripts/backup-notify.sh
/opt/scripts/backup-notify.sh
If it runs cleanly, you hang it in a cron job – this way you get a short confirmation every night and are woken with full priority on an error:
crontab -e30 3 * * * /opt/scripts/backup-notify.shThe principle transfers to anything: a certificate expires, a disk fills up (check df in the script), a deployment is done. Always the same one-liner – a curl to your topic. Exactly this makes ntfy so practical: you don’t have to integrate anything, and anything that can do HTTP can notify you.
When things go wrong
The app reports “Cannot connect” or the web client stays empty. The NTFY_BASE_URL doesn’t
match the called address. it must be exactly your public HTTPS URL (https://ntfy.YOUR_DOMAIN,
without a trailing slash). After a change, run docker compose up -d again.
curl returns HTTP 401 or 403. With deny-all, missing or wrong credentials are the most
common error. check the user/password (docker exec ntfy ntfy user list) and, when sending, supply
-u USER:PASSWORD or the bearer token. A 403 means the user exists but has no rights to this
topic – then grant rights with ntfy access.
Messages arrive in the browser but not as push on the phone when the tab is closed. browser push needs granted notification rights and an active service worker; that’s unreliable once the tab is closed. for real “on the go” push, use the ntfy app – it keeps the connection in the background.
502 Bad Gateway from Traefik. the container isn’t ready yet or listens on the wrong port.
check docker compose logs ntfy and that the label loadbalancer.server.port=80 is set – ntfy
listens on port 80 in the container (NTFY_LISTEN_HTTP=":80").
429 Too Many Requests with many messages in quick succession. ntfy limits the rate per sender
by default to prevent abuse. On a private server with your own scripts you rarely hit this – but a
loop script without a pause does. bundle messages instead of firing them every second, or raise the
limits specifically via the NTFY_VISITOR_* environment variables (described in the ntfy docs under
“Rate limiting”). NTFY_BEHIND_PROXY: "true" is a prerequisite so the limit applies per real IP
instead of per Traefik container.
Your problem is not listed? Search all error messages →
Maintenance & backups
Updates you pull within the pinned version like this:
cd /opt/ntfy && docker compose pull && docker compose up -dFor a jump to a new major version, read the release notes first and raise the image tag.
Backups: ntfy stores users, access rights and the message cache in its SQLite files in the volume (cache.db, auth.db). Back up the contents regularly by packing the volume into an archive …
docker run --rm -v ntfy_data:/data -v /opt/backups:/backup alpine:3 \
  tar czf /backup/ntfy-data.tar.gz -C /data .
… and include this archive in your encrypted off-site backup with Restic. The message cache is dispensable (push messages are ephemeral), but you don’t want to rebuild the user and rights database after a failure.
In everyday use ntfy is nearly maintenance-free. Occasionally check with docker exec ntfy ntfy user list who has access, and revoke no-longer-used tokens with ntfy token remove USER TOKEN-ID (the IDs are shown by ntfy token list USER) – this way your push server stays your own.
Last updated: Sep 27, 2026
Send feedback: feedback@serverkueche.de
You might also like