HitKeep: self-host privacy-friendly web analytics
Set up HitKeep with Docker and Traefik: cookieless, GDPR-friendly website statistics on your own server – with tracking code and backups.
Table of contents
Everyone knows Google Analytics – and that’s exactly the problem: it sends your visitors’ data to Google, requires a cookie banner and makes you accountable to explain it. HitKeep turns that around: cookieless statistics on your server, under your domain, without a single byte ever going to third parties.
What are we building?
By the end, HitKeep 2.13.18 runs as a single container behind your Traefik, reachable at
https://YOUR_DOMAIN. You get a dashboard with page views, visitors, time on page, referrers
and devices – fed by a tiny JavaScript snippet you embed in your website. HitKeep works
cookieless (no consent banner needed) and stores everything locally in an embedded DuckDB
database. The image is a distroless image (about 68 MB to download, a good 230 MB unpacked on
disk) that gets by entirely without an external database – ideal for a small VPS.
Note
Prerequisites
- A server with Debian 13 and running Docker (tested on a netcup VPS).
- A reverse proxy with Traefik that fetches TLS
certificates via Let’s Encrypt. HitKeep brings no own HTTPS server – Traefik handles the
encryption. This tutorial assumes the
proxynetwork and the resolverledescribed there. - A (sub)domain that points to your server (A/AAAA record). In the example we use
YOUR_DOMAIN. - The website you want to measure – HitKeep measures every page into which you embed the snippet.
VPS 1000 G12.5
4 vCores · 8 GB RAM · 128 GB SSD
from €14.50/month
A single container with an embedded DuckDB – the smallest vServer is easily enough for that.
💶 1 month free:
Single use, valid for VPS 1000 G12.5. Redeem it in an empty cart – the code adds the server itself. Redeem in the cart →
💶 €5 voucher for new netcup customers: always valid · not for domains or VPS Lite
Step by step
Step 1: Generate a JWT secret
HitKeep signs the login sessions with a secret key. Generate a random 32-byte value – don’t make one up, generate it:
openssl rand -hex 32You get a 64-character hex string. Copy it – it goes into the configuration shortly. If this secret changes later, all open logins become invalid; so keep it stable and secret.
Step 2: Create the Compose file
Create a folder for the stack and change into it:
mkdir -p /opt/hitkeep && cd /opt/hitkeepCreate the file compose.yaml. Replace YOUR_DOMAIN with your real domain and
YOUR_JWT_SECRET with the value from step 1:
services:
  hitkeep:
    image: pascalebeier/hitkeep:2.13.18
    container_name: hitkeep
    restart: unless-stopped
    environment:
      HITKEEP_PUBLIC_URL: https://YOUR_DOMAIN
      HITKEEP_JWT_SECRET: YOUR_JWT_SECRET
      HITKEEP_TRUSTED_PROXIES: 172.16.0.0/12
      HITKEEP_DB_PATH: /var/lib/hitkeep/data/hitkeep.db
      HITKEEP_DATA_PATH: /var/lib/hitkeep/data
      HITKEEP_ARCHIVE_PATH: /var/lib/hitkeep/data/archive
      HITKEEP_BACKUP_PATH: /var/lib/hitkeep/data/backups
    volumes:
      - hitkeep_data:/var/lib/hitkeep/data
    labels:
      - "traefik.enable=true"
      - "traefik.http.routers.hitkeep.rule=Host(`YOUR_DOMAIN`)"
      - "traefik.http.routers.hitkeep.entrypoints=websecure"
      - "traefik.http.routers.hitkeep.tls.certresolver=le"
      - "traefik.http.services.hitkeep.loadbalancer.server.port=8080"
    networks: [proxy]
volumes:
  hitkeep_data: {}
networks:
  proxy:
    external: true
The most important points in detail:
HITKEEP_PUBLIC_URLis the public address under which HitKeep is reachable. The interface later builds the tracking snippet and the links from it. It must match exactly the URL under which you call HitKeep – otherwise you end up in a login loop.HITKEEP_TRUSTED_PROXIESis the crux behind a reverse proxy: by default (*) HitKeep trusts theX-Forwarded-Forheader from any sender – so every visitor could claim someone else’s IP.172.16.0.0/12narrows that down to the Docker networks (theproxynetwork sits inside it,172.19.0.0/16in our test), so only Traefik gets to set the visitor IP. Important: the range really has to contain your proxy’s IP – if it doesn’t, HitKeep only ever sees Traefik’s container IP.loadbalancer.server.port=8080tells Traefik that HitKeep listens internally on port 8080. The container itself publishes no ports to the outside – access runs exclusively via Traefik.- The four
_PATHvariables store the database, data, archive and backups all below/var/lib/hitkeep/data– deliberately in one volume. The container runs as a non-root user (UID 65532), and that single directory is the only one the image ships with matching ownership. If you attach extra volumes for archive and backups on their own paths, Docker creates them owned by root, and HitKeep answers in the log withInitial backup run failedandpermission_denied.
Step 3: Start the stack and wait for TLS
Start the container:
docker compose up -dCheck the status after a few seconds:
docker compose psYou should see the container as healthy – HitKeep brings its own healthcheck:
NAME      IMAGE                          COMMAND     SERVICE   CREATED          STATUS                    PORTS
hitkeep   pascalebeier/hitkeep:2.13.18   "hitkeep"   hitkeep   40 seconds ago   Up 40 seconds (healthy)   7946/tcp, 8080/tcp
Traefik now fetches the Let’s Encrypt certificate for your domain in the background. Check from your own machine that the tracking script is served:
curl -sI https://YOUR_DOMAIN/hk.jsExpected output (shortened) – status 200 and a text/javascript type, aggressively cached:
HTTP/2 200
content-type: text/javascript; charset=utf-8
cache-control: public, max-age=31536000, immutableWarning
404 from Traefik or a certificate warning here, wait a minute (Let’s Encrypt
needs a moment) and check that the A/AAAA record of your domain really points to the server.
As long as the certificate isn’t in place, the snippet won’t load in the browser either.Step 4: Create the admin account
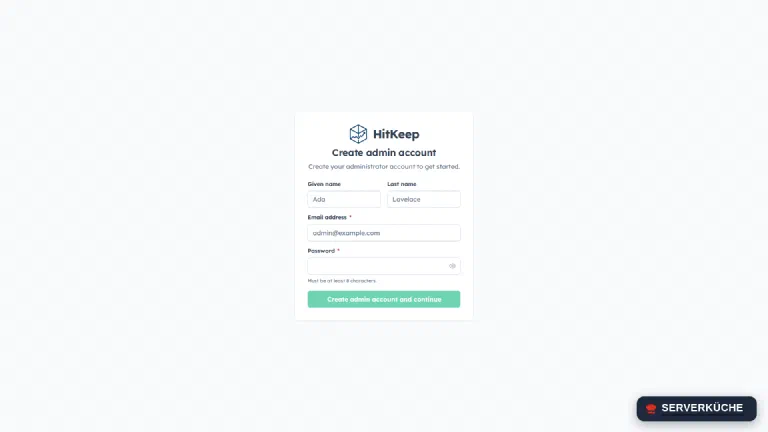
Open https://YOUR_DOMAIN in the browser. On the very first start, HitKeep greets you with the
initial setup. Create your administrator account here – name, email address and a password. Take
a long passphrase or a random password generated by a password manager; this account sees all
statistics and must not hang on a weak password:
Tip
Step 5: Create a website and get the tracking code
After logging in, click the plus next to Sites at the top left and create your website – as
the domain, enter the domain of the site you want to measure (e.g. YOUR_WEBSITE).
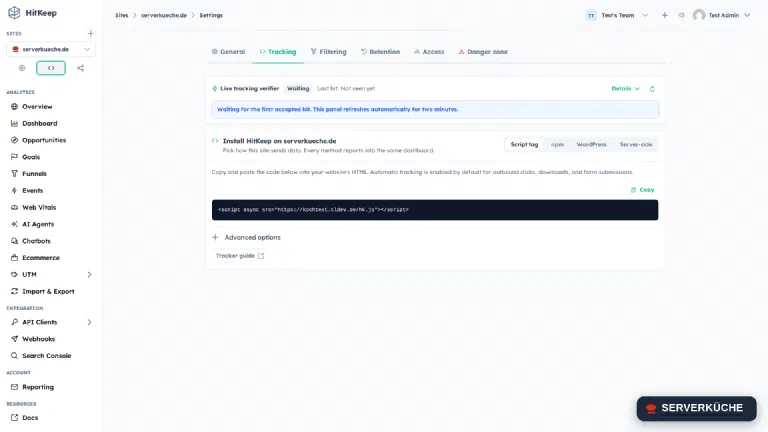
Then use the </> icon below the site name to open the site settings on the Tracking tab. At
the top you find the live tracking verifier waiting for the first hit, and below it, under
Install HitKeep on …, the installation methods: Script tag, npm (a typed tracker for
React/Vue/Angular/Astro), WordPress and Server-side. All of them report into the same
dashboard; we take the script tag:
The code to embed consists of a single line. HitKeep needs no site ID in the snippet – the assignment happens automatically via the domain of the page on which the script runs:
<script async src="https://YOUR_DOMAIN/hk.js"></script>Note
hk.js is
loaded from your HitKeep domain (YOUR_DOMAIN), but the hit is assigned to the domain of the
visited page (YOUR_WEBSITE). Both may be different – the site created in HitKeep only has to
match the hostname of the visited page.Automatic event tracking (outbound clicks, downloads, form submissions) is active by default.
Under Advanced options you can adjust the snippet – for example enable “Web Vitals” to also
measure load times (LCP, INP, CLS, FCP, TTFB), or “Collect DNT” if you also want to count
visitors with “Do Not Track”. From a privacy perspective the default (respect DNT) is the cleaner
one. Important: these switches are not stored in HitKeep, they only write additional data-
attributes into the snippet, which you then have to copy again:
<script async src="https://YOUR_DOMAIN/hk.js" data-enable-web-vitals="true"></script>Step 6: Embed the tracking code in the website
Add the snippet line from step 5 into the <head> of your website – for a static page directly
into the HTML template, for a CMS into the header area or a “Custom HTML” field. Thanks to the
async attribute, the script doesn’t block the page build.
Then open a page of your website in the browser. The live tracking verifier from step 5
should jump from “Waiting” to a first hit within a few seconds – that’s the confirmation that
the chain website → hk.js → HitKeep is in place.
Step 7: Check the dashboard
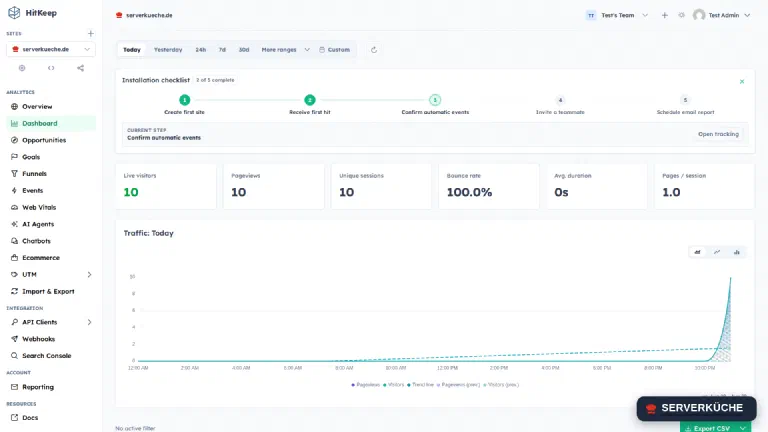
As soon as hits trickle in, the dashboard fills up. Under Dashboard you see your website’s key figures – live visitors, page views, unique sessions, bounce rate, time on page and the traffic trend:
Further down, Latest Hits lists the individual calls with path, time, referrer and device – here you see at a glance which search engines and referrals your visitors come from:
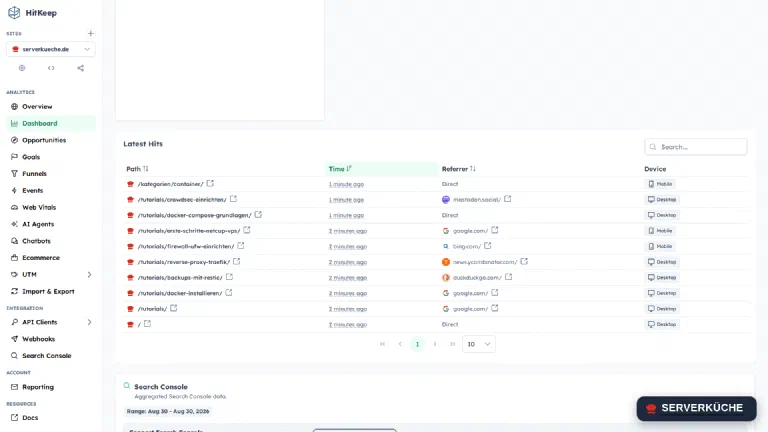
With that your self-hosted statistics are in place: every call to your website lands directly in your own database, without a detour via third parties.
Step 8: More than just page views
For the start, page views and referrers are enough – but HitKeep can do considerably more, and you find the building blocks in the left navigation. A few that are worth it for most sites:
- Goals: define an event as a goal – e.g. the submission of a contact form or a click on “Buy”. This way you measure not only how many come, but how many do what you want.
- Funnels: chain several steps (home page → product page → cart) and see at which point visitors drop off.
- Events: besides the automatically captured events (outbound clicks, downloads, forms), you can send your own events from your frontend.
- Web Vitals: if you enable them on the tracking tab, you see real load times of your visitors (LCP, INP, CLS) instead of synthetic lab values.
- UTM: campaign parameters (
utm_source,utm_medium,utm_campaign) are evaluated – handy to tell newsletter from social reach. - Reporting: have a summary sent to you regularly by email instead of having to look into
the dashboard yourself (this needs the
HITKEEP_MAIL_*variables with your mail server’s credentials).
A single HitKeep instance also manages any number of websites: via the plus next to Sites you create more, each with its own snippet and its own dashboard. So you don’t need a second container if you want to measure several projects.
When things go wrong
The live verifier stays on “Waiting” / no hits in the dashboard.
Check in the browser (dev tools → Network) whether hk.js is loaded at all and the send request
afterwards comes back with status 2xx. Most common causes: the snippet isn’t in the HTML, the
site domain created in HitKeep doesn’t match the hostname of the visited page, or an ad/tracking
blocker filters the call. Since you host under your own domain (first-party), most blockers
don’t apply – but some lists know the path hk.js.
All visitors seemingly come from a single IP, country and provider show “(Unknown)”.
Then HITKEEP_TRUSTED_PROXIES isn’t taking effect: the range you gave doesn’t contain your
proxy’s IP, and HitKeep only evaluates Traefik’s container IP. Check which subnet the proxy sits
in with docker network inspect proxy – 172.16.0.0/12 covers the usual Docker networks – and
restart the stack (docker compose up -d). After that the real client IP from the
X-Forwarded-For header counts again.
Traefik returns 404 or 502.
A 404 usually means the router rule isn’t matching – check that Host(...) contains your real
domain and the container is on the proxy network. A 502 indicates the wrong port: HitKeep
listens internally on 8080, so loadbalancer.server.port=8080 must be set.
After login you land on the login page again (login loop).
That’s almost always a mismatch in HITKEEP_PUBLIC_URL: the value must match exactly the address
through which you call HitKeep (including https://, without a trailing slash). Correct the
variable and restart the container.
The container won’t start or isn’t healthy.
Look at the logs: docker compose logs -f hitkeep. A missing or empty HITKEEP_JWT_SECRET is a
typical start blocker – generate one as in step 1 and enter it.
Your problem is not listed? Search all error messages →
Maintenance & backups
Updates: HitKeep moves along briskly in the 2.x series – less than seven weeks passed between
2.12.0 and 2.13.18. So check the
releases about monthly. For an update, set
the new tag in the compose.yaml (replace 2.13.18 with the new version) and pull it:
docker compose pull && docker compose up -dBecause the data lives in volumes, your statistics are preserved. Deliberately pin the version
to a fixed tag instead of latest, so a restart doesn’t slip you an unplanned new major version.
Backups: Your entire statistics live in an embedded DuckDB file (hitkeep.db plus the
write-ahead log hitkeep.db.wal) under /var/lib/hitkeep/data. So don’t back up a single file,
but the complete hitkeep_data volume regularly – cleanest with
Restic. HitKeep itself drops an hourly snapshot into backups/
inside that volume and keeps the last 24; in the log you see it as Database backup completed.
Because the live files are written during operation, you back them up most consistently either
from those finished snapshots or from the volume while the container is briefly stopped
(docker compose stop). A backup you’ve never restored is just a glimmer of hope: test the
restoration once on a test system.
Cleanup: The database grows with the traffic. Keep an eye on the size of the volumes
(docker system df -v) and plan for enough storage with a lot of traffic.
Last updated: Sep 9, 2026
Send feedback: feedback@serverkueche.de
You might also like