Self-hosting Matomo cookieless: analytics without a consent banner
Set up Matomo 5.13 with Docker & Traefik: privacy-friendly web analytics with IP anonymization, entirely without Google and without a cookie banner.
Table of contents
Google Analytics knows every one of your visitors better than you do yourself – and sends the data to the US. With Matomo you bring web analytics back onto your own server: GDPR-compliant, IP-anonymized and, in many cases, entirely without a cookie banner.
What are we building?
By the end, Matomo 5.13 runs in Docker behind your Traefik reverse proxy, reachable under your own (sub)domain with a valid HTTPS certificate. As the database, MariaDB 11.4 comes along – both in one compose.yaml. You get a full-featured analytics dashboard that evaluates visitor numbers, origin, devices and popular pages – the data lives exclusively on your server.
The real gain over Google Analytics is privacy: we take control of IP anonymization and configure Matomo so it works without cookies. That’s the technical basis for being able, in many cases, to do without an annoying consent banner. Matomo is the full package – if all you want to know is which pages get how many hits, the much leaner HitKeep will do as well.
Note
Prerequisites
- A hardened server with Debian 13 and a sudo user
- Docker & Docker Compose installed
- A running Traefik reverse proxy with the external network
proxyand the certificate resolverle– Matomo hooks in there - A (sub)domain whose A/AAAA record points to your server, e.g.
stats.YOUR_DOMAIN - A working backup strategy with Restic – analytics data accumulates over years, you don’t want to lose it
Matomo is frugal: for a small to medium website, the VPS 1000 is plenty. Only with very high traffic or when many other services run alongside is it worth looking at more RAM – our server calculator helps with the assessment.
VPS 1000 G12.5
4 vCores · 8 GB RAM · 128 GB SSD
from €14.50/month
Enough for Matomo alongside a few other small services.
💶 1 month free:
Single use, valid for VPS 1000 G12.5. Redeem it in an empty cart – the code adds the server itself. Redeem in the cart →
💶 €5 voucher for new netcup customers: always valid · not for domains or VPS Lite
Step by step
Step 1: Create the project folder and check the network
We create a dedicated folder for Matomo under /opt – this keeps every service cleanly separated:
mkdir -p /opt/matomo && cd /opt/matomoMatomo has to go into the same Docker network as Traefik so the proxy can reach the container. Check that the proxy network from the Traefik tutorial exists:
docker network ls | grep proxyYou should see a line with proxy. If not, set up Traefik first – without the proxy, Matomo won’t get a certificate.
Step 2: Move passwords into a .env
The database passwords do not belong in the compose.yaml, but in a separate .env. We have openssl generate them randomly:
{
  echo "DB_PASSWORD=$(openssl rand -hex 16)"
  echo "DB_ROOT_PASSWORD=$(openssl rand -hex 16)"
} > .env
chmod 600 .env
chmod 600 ensures only root can read the file. Take a look inside once so you know the values:
cat .envDB_PASSWORD=b51024e3f9a7c8d1e2f3a4b5c6d7e8f9
DB_ROOT_PASSWORD=1a2b3c4d5e6f70819a0b1c2d3e4f5061Step 3: Write the compose.yaml
Create the file /opt/matomo/compose.yaml with the following content. In the Traefik label, replace stats.YOUR_DOMAIN with your real (sub)domain:
services:
  db:
    image: mariadb:11.4
    container_name: matomo-db
    command: --max-allowed-packet=64MB
    environment:
      MARIADB_DATABASE: matomo
      MARIADB_USER: matomo
      MARIADB_PASSWORD: ${DB_PASSWORD}
      MARIADB_ROOT_PASSWORD: ${DB_ROOT_PASSWORD}
    volumes:
      - db:/var/lib/mysql
    networks: [intern]
    restart: unless-stopped

  app:
    image: matomo:5.13-apache
    container_name: matomo
    environment:
      MATOMO_DATABASE_HOST: db
      MATOMO_DATABASE_ADAPTER: mysql
      MATOMO_DATABASE_SCHEMA: Mariadb
      MATOMO_DATABASE_USERNAME: matomo
      MATOMO_DATABASE_PASSWORD: ${DB_PASSWORD}
      MATOMO_DATABASE_DBNAME: matomo
    volumes:
      - app:/var/www/html
    depends_on: [db]
    networks: [proxy, intern]
    restart: unless-stopped
    labels:
      - "traefik.enable=true"
      - "traefik.http.routers.matomo.rule=Host(`stats.YOUR_DOMAIN`)"
      - "traefik.http.routers.matomo.entrypoints=websecure"
      - "traefik.http.routers.matomo.tls.certresolver=le"
      - "traefik.http.services.matomo.loadbalancer.server.port=80"

networks:
  proxy:
    external: true
  intern:
    external: false

volumes:
  db:
  app:
The most important things about this file:
- Two networks, deliberately separated. Only the
appcontainer is on theproxynetwork and thus reachable from outside. The database is on the internalinternnetwork and is not addressable via Traefik – exactly right. - The
MATOMO_DATABASE_*variables pre-fill the web installer in the next step automatically. So you don’t have to type the DB data again by hand. MATOMO_DATABASE_SCHEMA: Mariadbis the least conspicuous but important entry: otherwise the installer stays onMysql, and Matomo later complains in the system check under Database abilities that you should set[database] schema = Mariadb“to ensure all database features work as expected”.max-allowed-packet=64MBis recommended by Matomo for the database, otherwise the import of large reports can abort.- No port to the outside. Neither Matomo nor the DB publishes a host port. The only way in leads via Traefik and thus via HTTPS.
Step 4: Start the stack
docker compose up -dOn the first start, Docker downloads the images (about 300 MB of downloads, a good 1.3 GB unpacked) and creates the volumes. Then check the status:
docker compose psNAME IMAGE COMMAND SERVICE CREATED STATUS PORTS
matomo matomo:5.13-apache "/entrypoint.sh apac…" app 20 seconds ago Up 20 seconds 80/tcp
matomo-db mariadb:11.4 "docker-entrypoint.s…" db 21 seconds ago Up 20 seconds 3306/tcpBoth containers should be Up. Traefik detects the new container automatically via the labels and fetches a Let’s Encrypt certificate for your domain in the background. That usually takes only a few seconds. Check from your own machine whether Matomo responds:
curl -sI https://stats.YOUR_DOMAIN | head -1HTTP/2 200An HTTP/2 200 means: the certificate is in place, Traefik routes, Matomo runs. If a certificate error comes instead, give Traefik a few more seconds – see “When things go wrong”.
Finish the installer immediately
Step 5: Click through the web installer
Open https://stats.YOUR_DOMAIN in the browser. Matomo greets you with an eight-step setup wizard.
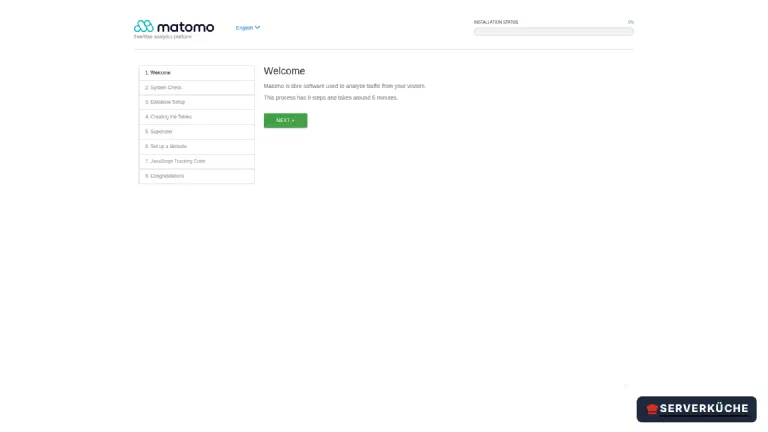
Click through the first steps:
- Welcome → Next.
- System check: Matomo checks the PHP version, extensions and write permissions. Thanks to the official image, the list stays free of errors. You’ll still see one yellow warning: Forced SSL Connection. It’s normal here and no reason to stop: at this point Matomo has no configuration of its own yet and therefore doesn’t evaluate Traefik’s
X-Forwarded-Protoheader – it considers your HTTPS call unencrypted. Delivery is HTTPS-only anyway. After the installation, that same row checks something else, namely Matomo’sforce_ssloption; we set it in step 7. → Next. - Database Setup: the fields are already filled in (the
MATOMO_DATABASE_*variables from thecompose.yamldo that). Briefly verify that the server isdband the Database Engine isMariaDB, and click Next. - Create tables: Matomo creates its database schema. → Next.
Now you create your main administrator. Choose a username, a strong password and a real email address (security and update notices come through it).
Then you set up the first website you want to track. Besides name and URL, the website timezone is a required field: leave it on the placeholder and the form sends you back with Website timezone is not valid. It decides when a new day starts for your reports.
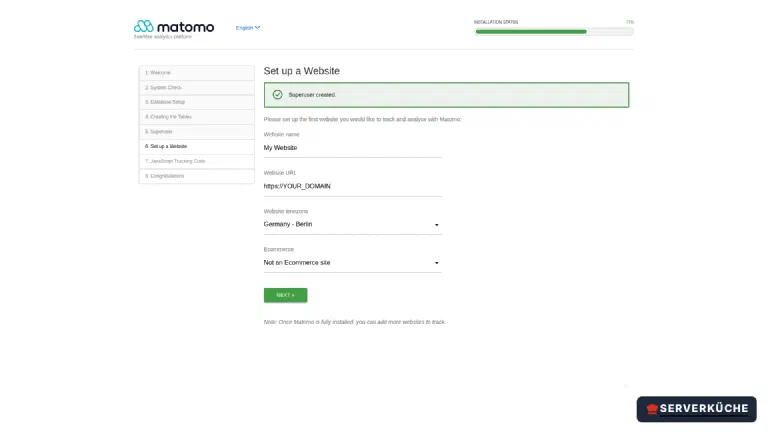
Step 6: Add the tracking code
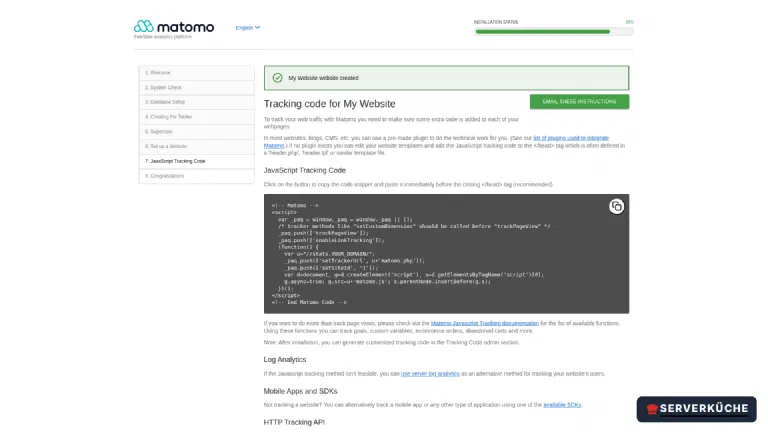
In the second-to-last step, Matomo shows you the JavaScript tracking code. That’s the small snippet that belongs on every page of your website – ideally right before </head>:
<!-- Matomo -->
<script>
  var _paq = window._paq = window._paq || [];
  _paq.push(['disableCookies']);
  _paq.push(['trackPageView']);
  _paq.push(['enableLinkTracking']);
  (function() {
    var u="//stats.YOUR_DOMAIN/";
    _paq.push(['setTrackerUrl', u+'matomo.php']);
    _paq.push(['setSiteId', '1']);
    var d=document, g=d.createElement('script'), s=d.getElementsByTagName('script')[0];
    g.async=true; g.src=u+'matomo.js'; s.parentNode.insertBefore(g,s);
  })();
</script>
<!-- End Matomo Code -->
We deliberately added the line _paq.push(['disableCookies']); (not included in the original snippet): with it, Matomo does entirely without cookies – an important building block for operation without a consent banner. If you run your website with a CMS like WordPress, there are ready-made plugins (“Matomo for WordPress”, “Connect Matomo”) that embed the snippet automatically. The last installation step is called “Congratulations”; Continue to Matomo takes you to the login form, where you sign in with the account you just created. As long as not a single hit has been tracked, Matomo greets you with the Choose your tracking method onboarding page instead of the dashboard – that’s not an error. As soon as the first hit has reached matomo.php, the dashboard is there.
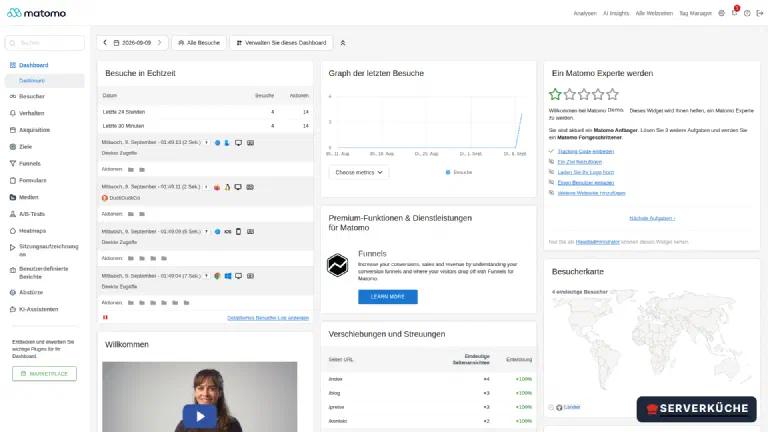
The dashboard bundles the most important reports: Visits in real-time, Visits Over Time, the Visits Overview, a Visitor Map and, under Channel Types, the origin of visitors (search engine, direct, referral). Via the menu on the left you go deeper – Visitors (devices, browsers, location), Behaviour (pages, entries and exits) and Acquisition (which channels bring visitors). Exactly the questions Google Analytics answers – only on your server.
Secure the admin account
Step 7: Check the privacy settings (the important part)
Matomo 5.13 starts out more privacy-friendly than many expect: IP anonymization is on by default. Still, walk through the page once – first, to have seen it with your own eyes, second, because there is a switch on it that really secures your cookieless tracking. Open Administration (gear) at the top right → Privacy → Anonymize data in the menu on the left.
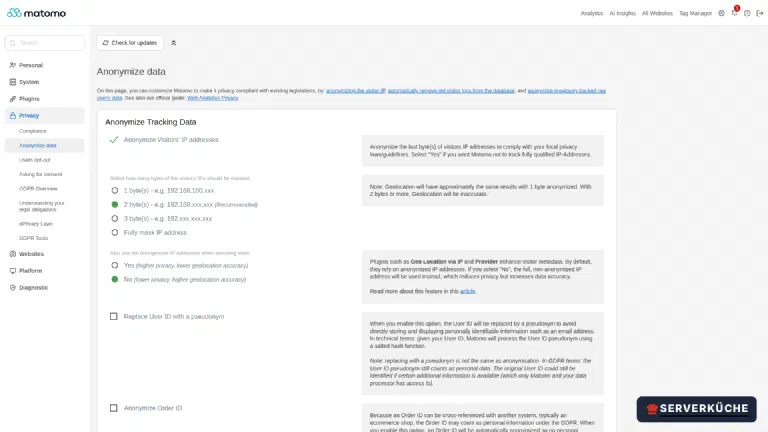
Three knobs are decisive:
- Anonymize Visitors’ IP addresses: already set to Yes, and 2 byte(s) are masked by default –
203.0.113.45therefore becomes203.0.xxx.xxx(Matomo itself marks this level as Recommended). Just check that it stayed that way; with it the individual visitor is no longer identifiable. - Force tracking without cookies: turn it on. Matomo then extends
matomo.jswith the matching code server-side and ignores tracking cookies on receipt as well. That still works if the original snippet withoutdisableCookiesends up somewhere – a safety net for the very thing your consent-banner-free operation hangs on. - “Do Not Track”: lives under Privacy → Users opt-out. Matomo now classifies the support as deprecated itself – because browsers send the signal unasked or have dropped support entirely, “we no longer recommend enabling this option”. So don’t rely on it. The dependable route is on the same page: the opt-out building block (iframe or your own form) that you embed in your privacy policy.
Tip
That leaves the switch the system check from step 5 complained about: force_ssl. It makes Matomo itself reject unencrypted access instead of relying on Traefik alone. There is no setting for it in the interface; it lives in Matomo’s config/config.ini.php inside the volume:
cd /opt/matomo
docker compose exec -u www-data app sed -i '/^\[General\]/a force_ssl = 1' config/config.ini.php
sed appends the line force_ssl = 1 right below the [General] section; -u www-data makes sure the file keeps its previous owner so Matomo can still write to it. Reload the dashboard afterwards – under Administration → Diagnostic → System Check the Forced SSL Connection warning is gone.
Step 8: Archive reports via cron
By default, Matomo computes its reports “on the fly” as soon as someone opens the dashboard. That gets slow with more traffic and is officially not recommended. Better: a cron job computes the reports regularly in the background.
For that, on the host, enter a cron job that runs the archiving command in the container every 15 minutes:
crontab -eAdd this line (adjust the domain):
*/15 * * * * cd /opt/matomo && docker compose exec -T -u www-data app ./console core:archive --url=https://stats.YOUR_DOMAIN >> /opt/matomo/archive.log 2>&1The log deliberately lands in /opt/matomo/archive.log and not under /var/log: if your cron runs as a sudo user (not as root), a write to /var/log fails silently. In /opt/matomo you have write permissions, and you find the log right by the project.
Then switch off the old mode: Administration → General settings → Archiving settings, set “Archive reports when viewed from the browser” to No and save. This keeps the dashboard fast even with a lot of traffic – and the system check stops reporting that browser and cron archiving run side by side.
When things go wrong
The browser shows a certificate error or 404 page not found. Traefik hasn’t fetched the Let’s
Encrypt certificate yet, or the DNS record doesn’t point to the server. Check with dig stats.YOUR_DOMAIN that the IP is correct, and look at the Traefik logs. You find the exact
container name from your Traefik setup with docker ps | grep traefik, then docker logs <container-name> (for us e.g. docker logs traefik-traefik-1). The HTTP challenge fails if port 80
isn’t reachable from outside – check your firewall and the
netcup firewall.
The installer reports SQLSTATE... Connection refused or hangs at the database. MariaDB wasn’t
ready on the first start. Give the DB a moment and reload the page. Check with docker compose logs db whether it says ready for connections. If an access error appears instead, the DB_PASSWORD
in the .env and the already-created DB no longer match – then a clean restart with docker compose down -v (careful: deletes the data) and docker compose up -d helps.
Warning “It looks like the trusted_hosts setting is not correct”. Matomo checks, for security
reasons, under which hostname it’s called. The warning appears when you change the domain. Confirm
the correct hostname via the button in the message – Matomo then enters it in
config/config.ini.php.
No visits appear in the dashboard. The tracking code is missing, incorrectly embedded, or you’re
visiting your own site (Matomo ignores you if your IP is excluded). Open your website in a private
window and check in the network tab whether a request to matomo.php goes out. In Matomo,
Administration → Diagnostic → Tracking failures helps.
The dashboard loads very slowly. The on-the-fly archiving computes on every call. Set up the archiving cron from step 8 and switch report generation to cron.
Your problem is not listed? Search all error messages →
Maintenance & backups
Updates are uncritical with Matomo but due regularly – a new version appears about monthly. Because we pinned the image tag to 5.13, you pull security patches within the 5.13 series like this:
cd /opt/matomo && docker compose pull && docker compose up -dOn the first call after an update, Matomo checks whether a database upgrade is needed and performs it after a click.
Before a major upgrade: backup and release notes
compose.yaml. A major upgrade often entails more extensive database migrations that can’t easily be rolled back. So read the release notes first and definitely pull a backup (see below) before you start the new image.Backups comprise two things: the database (all visit data) and the app volume (your configuration in config/config.ini.php). Create a database dump regularly …
docker compose exec -T db sh -c 'exec mariadb-dump -u matomo -p"$MARIADB_PASSWORD" matomo' > /opt/matomo/dump.sql… and include this dump together with the /opt/matomo folder in your Restic off-site backups. A netcup snapshot of the whole server is a good complement, but no substitute for a real off-site backup – if both are at the same provider, both are gone in a total failure.
Ongoing operation: keep an eye on disk space – with a lot of traffic the database grows. The automatic deletion of old raw data (step 7) and the archiving cron (step 8) keep Matomo lean and fast permanently. So you notice when Matomo is ever unreachable, add the instance to your Uptime Kuma monitoring – a simple HTTP check on your stats domain is enough.
And the most important operational note to finish: Matomo lives off its privacy promise. Whoever has set the service up once should not soften the anonymization and deletion settings from step 7 again – they are the reason you can do without a consent banner in the first place. After every larger update, briefly check that they’re still in place.
Last updated: Sep 27, 2026
Send feedback: feedback@serverkueche.de
You might also like