Self-hosting Paperless-ngx: the paperless office with OCR
Set up Paperless-ngx with Docker behind Traefik: archive documents searchably via OCR – with full-text search, tags and automatic import.
Table of contents
Invoices, contracts, official mail – the paper pile grows and grows, and in the end you never find anything anyway. Paperless-ngx turns it into a searchable digital archive: you throw a document in, it’s recognized via OCR, tagged, and back in seconds via the full-text search. In this recipe we set it up behind Traefik.
What are we building?
By the end, Paperless-ngx 3.3 runs behind your Traefik proxy, reachable at
https://paperless.YOUR_DOMAIN with HTTPS. Paperless is a document management system: you
feed it scans or PDFs, it reads out the text via OCR (even from pure image scans),
recognizes date and content, and stores everything searchably. Via tags, correspondents and
document types you bring order into it; the full-text search later finds every document.
The clever part is the consume folder: everything you place there (e.g. from a network scanner) is imported and processed automatically. Paperless consists of five containers – the web server, a PostgreSQL database, a Redis broker for background processing, plus Gotenberg and Tika, which convert office documents into PDF. The official template provides the complete team.
The gain over a folder full of PDFs on the disk: Paperless makes every document searchable (even scanned paper), keeps the original and archive version cleanly separated, and can be automated via rules. Your documents stay on your server – no cloud service reads along, and you’re not tied to a proprietary format.
Prerequisites
- A running Traefik reverse proxy with the
proxynetwork and the resolverle– see reverse proxy with Traefik. - A subdomain
paperless.YOUR_DOMAINwith a DNS record to your server IP – see connecting a domain to your server. - A backup. Your most important documents land in Paperless – first set up backups with Restic.
How big does the server need to be?
Not sure which server size is enough? The server calculator calculates the RAM and CPU needs for your services.
VPS 1000 G12.5
4 vCores · 8 GB RAM · 128 GB SSD
from €14.50/month
The VPS 1000 handles Paperless including OCR with ease.
💶 1 month free:
Single use, valid for VPS 1000 G12.5. Redeem in the cart →
💶 €5.95 voucher for new netcup customers: always valid · not for domains or VPS Lite
Step by step
Step 1: Create the DNS record
Create paperless.YOUR_DOMAIN (A/AAAA to your server IP) and check:
dig +short paperless.YOUR_DOMAINYour server IP must come back – otherwise Traefik won’t fetch a certificate later.
Step 2: Generate a secret key
Paperless encrypts sessions with a secret key. The default is publicly known – a real risk for an instance on the internet. Generate your own:
head -c 50 /dev/urandom | base64Copy the output – it goes into the configuration as PAPERLESS_SECRET_KEY shortly.
Step 3: Create the compose.yaml
Create the project – including the two bind-mount folders:
mkdir -p ~/paperless/{consume,export} && cd ~/paperlessYou deliberately create the subfolders consume and export now, as a normal user: if
the Docker daemon created them at startup, they would belong to root – then neither you
(cp into the consume folder) nor Paperless itself (runs via USERMAP_UID as UID 1000)
could write into them.
Create compose.yaml. Replace paperless.YOUR_DOMAIN, the passwords and the
PAPERLESS_SECRET_KEY:
name: paperless
services:
  broker:
    image: docker.io/library/redis:8
    volumes:
      - redisdata:/data
    networks: [default]
    restart: unless-stopped

  db:
    image: docker.io/library/postgres:18
    environment:
      POSTGRES_DB: paperless
      POSTGRES_USER: paperless
      POSTGRES_PASSWORD: A_STRONG_DB_PASSWORD
    volumes:
      - pgdata:/var/lib/postgresql
    networks: [default]
    restart: unless-stopped

  gotenberg:
    image: docker.io/gotenberg/gotenberg:8.38.1
    command:
      - "gotenberg"
      - "--chromium-disable-javascript=true"
      - "--chromium-allow-list=^file:///tmp/.*"
    networks: [default]
    restart: unless-stopped

  tika:
    image: docker.io/apache/tika:3.3.1.0
    networks: [default]
    restart: unless-stopped

  webserver:
    image: ghcr.io/paperless-ngx/paperless-ngx:3.3.2
    depends_on: [db, broker, gotenberg, tika]
    environment:
      PAPERLESS_REDIS: redis://broker:6379
      PAPERLESS_DBHOST: db
      PAPERLESS_DBENGINE: postgresql
      PAPERLESS_DBUSER: paperless
      PAPERLESS_DBPASS: A_STRONG_DB_PASSWORD
      PAPERLESS_TIKA_ENABLED: 1
      PAPERLESS_TIKA_GOTENBERG_ENDPOINT: http://gotenberg:3000
      PAPERLESS_TIKA_ENDPOINT: http://tika:9998
      PAPERLESS_URL: https://paperless.YOUR_DOMAIN
      PAPERLESS_SECRET_KEY: YOUR_LONG_SECRET_KEY
      PAPERLESS_OCR_LANGUAGE: eng
      PAPERLESS_TIME_ZONE: Europe/Berlin
      PAPERLESS_ADMIN_USER: admin
      PAPERLESS_ADMIN_PASSWORD: A_STRONG_ADMIN_PASSWORD
      USERMAP_UID: "1000"
      USERMAP_GID: "1000"
    volumes:
      - data:/usr/src/paperless/data
      - media:/usr/src/paperless/media
      - ./export:/usr/src/paperless/export
      - ./consume:/usr/src/paperless/consume
    labels:
      - "traefik.enable=true"
      - "traefik.http.routers.ppl.rule=Host(`paperless.YOUR_DOMAIN`)"
      - "traefik.http.routers.ppl.entrypoints=websecure"
      - "traefik.http.routers.ppl.tls.certresolver=le"
      - "traefik.http.services.ppl.loadbalancer.server.port=8000"
    networks: [default, proxy]
    restart: unless-stopped

volumes:
  data:
  media:
  pgdata:
  redisdata:

networks:
  default:
  proxy:
    external: true
The most important points:
- Only
webserveris on theproxynetwork and carries Traefik labels (port 8000). The four helper services (db, broker, gotenberg, tika) stay internal. PAPERLESS_DBENGINE: postgresqlnames the database engine explicitly. Paperless 3 reworked the database settings; the official template has since set the value explicitly instead of inferring it fromPAPERLESS_DBHOST.PAPERLESS_URLis mandatory behind a proxy. Without it, Paperless rejects the login with a CSRF/“403 Forbidden” error. It simultaneously sets the allowed hosts and the trusted origins.PAPERLESS_OCR_LANGUAGE: engsets text recognition to English. English, German and a few other languages are already included in the image – no additional package needed.PAPERLESS_ADMIN_USER/_PASSWORDcreate the superuser automatically on the first start, so you can log in directly.USERMAP_UID/GIDshould match your server user’s ID (determine viaid -uorid -g, usually1000). Otherwise there’s “Permission denied” in the consume folder.exportandconsumeare deliberately folders in the project directory (bind mounts):consumeis the inbox,exportthe target for backups.
Paperless uses four storage areas in total, which you should keep apart: media contains
your processed documents (the heart!), data the search index and helper data, consume
is the inbox and export the backup target. For the backup, media and data plus the
database count – exactly what the document_exporter further below takes off your hands.
Step 4: Start and log in
Pull the images (several GB) and start:
docker compose up -d
docker compose logs -f webserver
On the first start, Paperless sets up the database (migrations) – that takes a moment. Check that all five containers are running:
docker compose psIn the STATUS column, webserver, db, broker, gotenberg and tika then read Up …;
for the webserver, (healthy) is added after a short while. Once the worker is ready
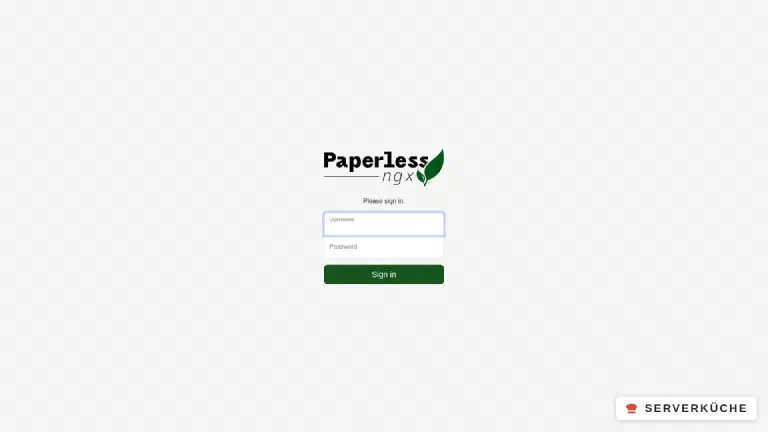
(celery@… ready in the log), open https://paperless.YOUR_DOMAIN. The login page appears:
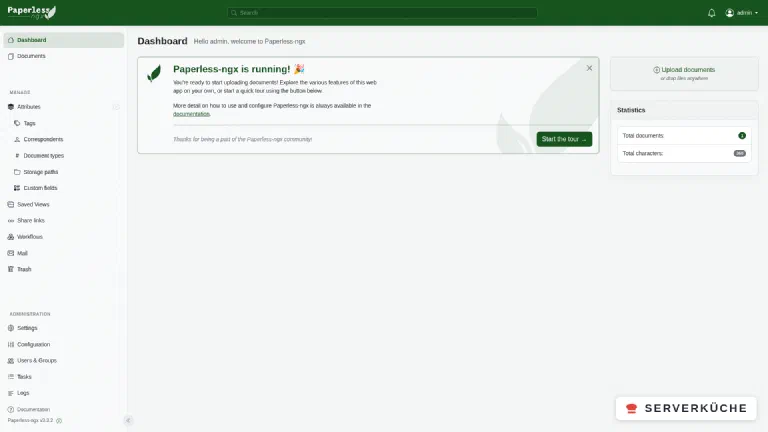
Log in with admin and your password. You land on the Dashboard with a short welcome
message and initial statistics. At the bottom left you see the running version – handy to
know the starting point before an update. You can change the language under Settings if
needed; by default Paperless follows your browser’s language:
Step 5: Import the first document
Now the core. There are three ways to get a document in:
- Via the web interface: click Upload documents at the top right and choose a PDF or image file.
- Via the consume folder: place a file in
~/paperless/consume– Paperless detects it automatically, processes it and then deletes it from the folder. Ideal for a network scanner that scans directly there. - From a mailbox: under Mail, Paperless can fetch an IMAP account and import attachments automatically – handy for invoices that come to you by mail anyway.
cp ~/an-invoice.pdf ~/paperless/consume/Paperless accepts PDFs, images (JPG/PNG/TIFF) and – thanks to Gotenberg and Tika – office files like Word or Excel. For a pure image scan, the OCR reads out the text and places it as a searchable layer over the document; for a PDF with an existing text layer, Paperless skips the recognition and is correspondingly faster. The original is preserved untouched – Paperless additionally creates a searchable archive version.
After a few seconds (OCR takes some time), the document appears under Documents – with a preview and the recognized title:
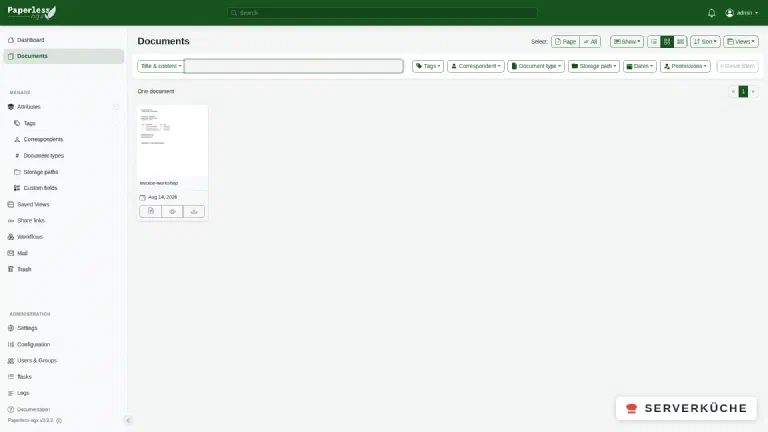
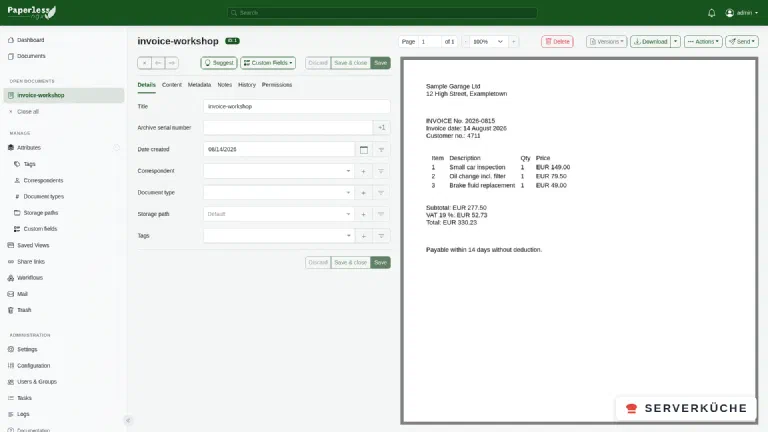
A click opens the detail view: on the left the metadata (title, date, correspondent, tags) and the tabs for content, metadata and history, on the right the document with a zoomable preview. Paperless has already recognized the date from the scan and suggests it for confirmation – exactly what the OCR does for you in the background:
Step 6: Order with tags, correspondents & document types
So that the search works later, you assign tags (e.g. Tax, Insurance), assign a
correspondent (the sender) and a document type (invoice, contract …). You can do that
by hand – or automate it via workflows: rules that automatically tag incoming documents
based on their content. This way your archive sorts itself over time.
The full-text search at the top then searches not only titles and tags, but the complete
recognized text – a search for invoice amount or a customer name finds the matching
document in seconds. Combined with the filters (correspondent, period, document type), the
paper pile finally becomes a searchable archive.
A simple example of a workflow: if a new document contains the word “electricity bill”,
automatically assign the tag Energy, set the correspondent to your electricity provider and
the document type to Invoice. You create such rules under Manage → Workflows;
they take effect for every incoming document. At the start it pays to sort a few documents by
hand – from that you quickly see which rules repeat and can be automated. After a few weeks,
the majority of your mail lands in the right place without your involvement.
Scanner directly into the consume folder
~/paperless/consume, and configure your scanner to scan there.
From then on: insert sheet, press button – a few seconds later the document is recognized,
tagged and searchable in the archive. For on the go there are also community apps (e.g.
“Paperless Mobile”) that connect to your instance.Your documents are on the internet
paperless.YOUR_DOMAIN, the login page is open on the net. So set
a long, unique password, and enable two-factor authentication – it isn’t under
Settings but in the user menu at the top right under My Profile. Be careful with share
links too (in the detail view under Send): anyone who has the link can download the
document without signing in. The interface suggests 7 days of validity, but “Never” is an
option; you see and delete all open links under Share links in the sidebar. Whoever wants
maximum security makes Paperless reachable only via a VPN – for a purely private archive that
only you use, that’s worth considering.When things go wrong
On login, “Forbidden (403)” or “CSRF verification failed” appears. PAPERLESS_URL is not
set or set wrong. It must exactly match your HTTPS address (https://paperless.YOUR_DOMAIN,
without a trailing slash). After the correction, docker compose up -d.
Files in the consume folder aren’t processed, “permission denied”. Most common cause: the
folders weren’t created beforehand (step 3), but generated by the Docker daemon on the first
start – then they belong to root. With sudo chown -R $(id -u):$(id -g) ~/paperless/consume ~/paperless/export they belong to you again. Otherwise: USERMAP_UID/USERMAP_GID don’t
match the folder’s owner – determine your ID with id -u and id -g, enter the values and
restart.
Uploaded documents get stuck “in processing”. The background processing runs via Redis.
Check that the broker container is running, and look under Tasks for the error
message of the failed task.
Text recognition returns gibberish or recognizes nothing. Wrong OCR language. Set
PAPERLESS_OCR_LANGUAGE=eng (or eng+deu for mixed documents). Only installed languages
work.
Office documents (Word, Excel) aren’t accepted or end in a timeout. Gotenberg and Tika
are responsible for those. Check that both containers are running and
PAPERLESS_TIKA_ENABLED=1 plus the two endpoint variables are set.
During bulk import the server gets very slow, the CPU is constantly maxed out. OCR is
compute-intensive, and Paperless uses all cores by default. On small servers you can throttle
the load by limiting the number of workers or threads (PAPERLESS_TASK_WORKERS,
PAPERLESS_THREADS_PER_WORKER). Then the import takes longer, but the interface stays
usable.
Your problem is not listed? Search all error messages →
Maintenance & backups
The clean backup is done by the
document_exporter. It writes all documents, thumbnails, metadata and the database content into theexportfolder – portable and re-importable:Terminaldocker compose exec -T webserver document_exporter ../exportThen back up the
exportfolder encrypted and off-site with Restic. Alternatively you back up the volumesmedia,dataand the database directly – but the exporter is the recommended, migration-safe way.Use the same version when restoring. An export contains an image matching the database schema; only import it into a Paperless instance of the same version (
document_importer ../export).Updates. Take a backup before updating, then raise the image tag (e.g.
3.3.2→ next version),docker compose pullanddocker compose up -d. Database migrations run automatically on start. Before jumping to a new major version, read the release notes: moving from 2.x to 3.x, for example, switched full-text search from Whoosh to tantivy (the index is rebuilt on first start – that takes a while on large archives), removed encryption of documents and thumbnails, and the pre-/post-consume scripts now get their values only through environment variables instead of positional arguments.Automate the backup. Best put the
document_exporterin a daily cron job (e.g. at night) that afterwards backs up theexportfolder via Restic. That way you have a fresh, restorable state every morning – without having to think about it.Honest about the effort: Paperless runs very low-maintenance after that. The actual effort is filing new documents – but with a bit of set-up automation, the software increasingly takes that off your hands too. Plan the rough tag structure once, then the archive largely maintains itself.
Last updated: Oct 17, 2026
Send feedback: feedback@serverkueche.de
You might also like