Stalwart: the lightweight mail server in a single container
Set up Stalwart Mail Server with Docker: SMTP, IMAP, JMAP and spam filter in a single, lean container – the modern alternative to Mailcow.
Table of contents
Your own mail server doesn’t have to consist of two dozen containers. Stalwart packs the complete mail server – SMTP, IMAP, JMAP, spam filter and storage – into a single container written in Rust. That makes it lean, fast and low-maintenance: the modern, lightweight alternative to heavyweights like Mailcow.
Mail servers stay demanding – no matter how lean
What are we building?
By the end, Stalwart 0.16.21 runs as a single Docker container on your server and provides everything a full-featured mail server needs:
- SMTP: accepting mail from other servers on port 25, sending from your clients over port 465,
- IMAP (993) and the modern JMAP for fast, efficient clients,
- ManageSieve (4190) for server-side filter rules,
- a built-in spam and phishing filter (no separate Rspamd/ClamAV needed),
- integrated storage (RocksDB) – no external database,
- a modern web interface to manage domains, accounts and settings.
The big difference from Mailcow: it’s one process, one container, a few hundred megabytes of image. That significantly reduces RAM demand, attack surface and maintenance effort. Tested with Docker 29 on Debian 13.
Why is the lean approach worth it? A classic mail server stack consists of a good dozen services – Postfix, Dovecot, Rspamd, a database server, a virus scanner, Redis, a web server – all of which run individually and have to be updated and tuned to each other. Each of them is a potential source of error and a piece of attack surface. Stalwart bundles the same functionality into a single application written in Rust. Rust also brings memory safety out of the box – for software that accepts unfiltered data from the entire internet, that’s a real security argument.
Prerequisites
- A server with Debian 13 and Docker installed, on which the mail ports 25, 465, 993 and 4190 are free. This recipe also takes port 443, because Stalwart fetches its own certificate. It still doesn’t need a server of its own: if your reverse proxy already holds 443, Stalwart moves in next to it – see the box in step 4.
- A domain whose DNS you control yourself – for the mail server’s A record and the MX record.
- Outbound SMTP must be open. Many providers block it against spam. At netcup the default policy “netcup Mail block” (ports 25/465/587) does it – you take it off the server yourself in the SCP, no support ticket needed; see netcup firewall setup. Without an open port 25 you can’t deliver mail to other servers.
- A PTR/reverse-DNS entry for the server IP (in the netcup SCP) that points to your mail hostname.
Stalwart is frugal – one of the smaller netcup plans is enough to start. How much your setup needs in total is estimated by the server calculator.
VPS 1000 G12.5
4 vCores · 8 GB RAM · 128 GB SSD
from €14.50/month
Stalwart is lean – the VPS 1000 is quite enough to start.
💶 1 month free:
Single use, valid for VPS 1000 G12.5. Redeem it in an empty cart – the code adds the server itself. Redeem in the cart →
💶 €5 voucher for new netcup customers: always valid · not for domains or VPS Lite
Step by step
Step 1: Create the DNS records
First set up the DNS entries – they need time to propagate. YOUR_DOMAIN is your mail domain, YOUR_SERVER_IP the server’s IPv4 address:
mail.YOUR_DOMAIN.             A      YOUR_SERVER_IP
YOUR_DOMAIN.                  MX     10 mail.YOUR_DOMAIN.
autoconfig.YOUR_DOMAIN.       CNAME  mail.YOUR_DOMAIN.
autodiscover.YOUR_DOMAIN.     CNAME  mail.YOUR_DOMAIN.
mta-sts.YOUR_DOMAIN.          CNAME  mail.YOUR_DOMAIN.
ua-auto-config.YOUR_DOMAIN.   CNAME  mail.YOUR_DOMAIN.
The MX record refers other mail servers to mail.YOUR_DOMAIN. This hostname is your server’s identity. SPF, DKIM and DMARC are added by the email deliverability tutorial – Stalwart generates the DKIM keys itself during setup.
The four CNAMEs are not optional, even though they look like it: Stalwart requests a single Let’s Encrypt certificate covering all five hostnames at once. If one of them is missing from DNS, the entire certificate order fails – including for mail.YOUR_DOMAIN. As a bonus, those are exactly the names mail programs later use to find their settings automatically (autoconfig/autodiscover). If your DNS provider doesn’t allow CNAMEs at this level, four A records pointing at YOUR_SERVER_IP do the job just as well.
Step 2: Write the compose.yaml
Create a folder and change into it:
mkdir -p /opt/stalwart && cd /opt/stalwartCreate the file compose.yaml:
services:
  stalwart:
    image: stalwartlabs/stalwart:v0.16.21
    container_name: stalwart
    restart: unless-stopped
    ports:
      - "25:25"       # SMTP (accepting mail from other servers)
      - "465:465"     # SMTPS/submission (sending, implicit TLS)
      - "993:993"     # IMAPS
      - "4190:4190"   # ManageSieve
      - "8080:8080"   # web interface & JMAP (initial setup)
      - "443:443"     # HTTPS (console & JMAP after setup)
    volumes:
      - stalwart_config:/etc/stalwart
      - stalwart_data:/var/lib/stalwart
volumes:
  stalwart_config:
  stalwart_data:
The most important thing: one service and two volumes that together make up the complete server. /etc/stalwart holds nothing but a tiny config.json pointing at the data store – /var/lib/stalwart holds the actual content: settings, accounts, messages and the DKIM keys. Mounting a volume at any other path inside the container has no effect – the image only ever writes into these two directories. (The /opt/stalwart folder on the host from above is unrelated: it only holds your compose.yaml.)
Stalwart fetches its TLS certificate later itself via Let’s Encrypt – you don’t need a separate reverse proxy for that. Make sure port 443 is free on the host (Stalwart also uses it for the certificate retrieval, see step 4).
Why no port 587 and 143?
587 (submission with STARTTLS) and 143 (IMAP without TLS). Stalwart doesn’t create a listener for those two ports out of the box – so a mapping would point at nothing. By default exactly seven services listen: smtp (25), submissions (465), imaps (993), pop3s (995), sieve (4190), http (8080) and https (443). If you really need 587 or 143, create the listener in the console under Settings → Network → Listeners and add the port mapping.Step 3: Start the container and get the startup password
Start Stalwart:
docker compose up -dOn the very first start, Stalwart runs in bootstrap mode: there’s no configuration yet, and port 8080 is open for the initial setup. In the process it generates a one-time administrator password that you read from the logs:
docker compose logs | grep -A4 "temporary administrator"stalwart | 🔑 Stalwart bootstrap mode - temporary administrator account
stalwart |
stalwart | username: admin
stalwart | password: <ONE-TIME-PASSWORD>Username and password sit two and three lines below the heading – that’s why it’s -A4 and not less. Note this password down; it’s shown only once. (If you’d rather set a fixed password, you can store a STALWART_RECOVERY_ADMIN=admin:YOUR_PASSWORD under environment: in the compose.yaml.)
Step 4: Log in and run through the setup wizard
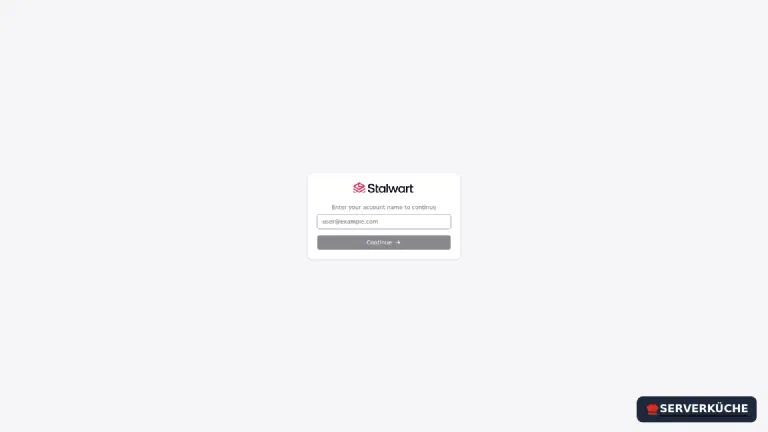
Open the web interface in the browser: http://YOUR_SERVER_IP:8080/admin. You land on the login. Log in as user admin with the one-time password from step 3 – the input is done in two steps (first username, then password):
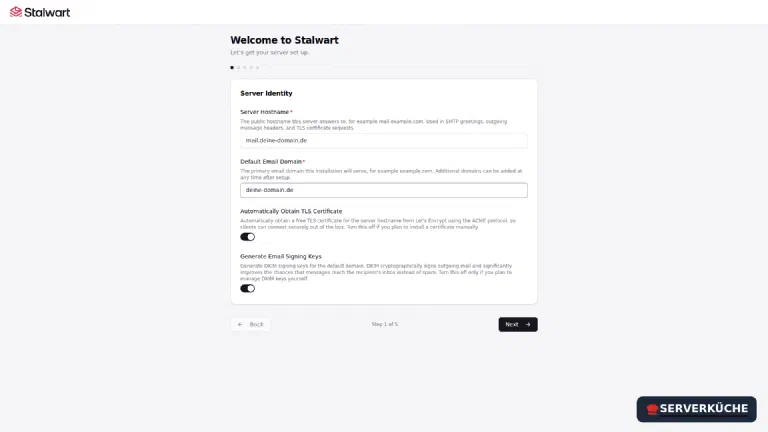
After logging in, the setup wizard greets you. In the first step you set the server identity:
- Server Hostname:
mail.YOUR_DOMAIN– the FQDN from your A record. - Default Email Domain:
YOUR_DOMAIN– your mail domain. - Automatically Obtain TLS Certificate – leave enabled; Stalwart fetches the Let’s Encrypt certificate itself. For that, port 443 must be reachable from outside: Stalwart uses the TLS-ALPN-01 challenge over 443 by default, it doesn’t need port 80 for it.
- Generate Email Signing Keys – leave enabled; that generates your DKIM keys right away.
Click through the further steps of the wizard:
- Storage: the default RocksDB is an embedded key-value store and perfect for single-server setups – no external database server needed. Only for large, clustered installations do you reach for PostgreSQL or similar.
- Directory: the internal directory manages accounts and passwords directly in Stalwart. Whoever already runs a central LDAP/Active Directory can connect it here instead – for getting started you stay with the internal directory.
- Logging: switch Log Destination to
Console. The default Log file writes into a file inside the container that nobody ever gets to see in a Docker setup – after that,docker compose logswould stay empty forever. WithConsoleeverything lands where you expect it. For the logging level,Infois a good compromise in everyday use; on problems you briefly turn up toDebug. - DNS: for the start, manual management is enough – Stalwart shows you the records to create later under the respective domain.
At the end, Stalwart generates your permanent administrator account and shows the address and password a single time – write both down immediately. The username from now on is the full address admin@YOUR_DOMAIN, no longer the short admin from bootstrap mode.
The wizard’s last message is easy to miss and still decisive: Stalwart has to restart for the freshly written configuration to take effect.
docker compose restartAfter that the bootstrap mode is over and the console additionally answers via HTTPS on port 443. The HTTP listener on 8080 stays in place – handy behind a reverse proxy, but one more reason not to hang it on the internet unprotected.
Already using a reverse proxy?
Unlike classic mail servers, Stalwart can run its web interface behind an existing Traefik without problems – then simply route the HTTP port 8080 there. The mail ports (25, 465, 993, 4190) must still be directly at the server, because they don’t speak HTTP and can’t be routed through an HTTP proxy.
If the proxy already occupies port 443, Stalwart can no longer fetch its certificate itself via TLS-ALPN-01. You still don’t have to install anything by hand: let Traefik obtain the certificate as before and hand it over to Stalwart. A traefik-certs-dumper container writes the certificate and key from acme.json into a shared volume, Stalwart mounts it read-only and reads both as files (Settings → TLS → Certificates, pointing at /data/certs/mail.YOUR_DOMAIN/cert.pem and key.pem). Give the dumper OVERRIDE_UID: 2000 and OVERRIDE_GID: 2000 – Stalwart runs as uid 2000 inside the container and cannot read the key otherwise. Stalwart or Mailcow? walks through it step by step; we rebuilt it, and Stalwart then serves the very same Let’s Encrypt certificate on 993 and 465 that Traefik uses for the web interface.
Step 5: Create a domain and first mailbox
After the restart, log in as admin@YOUR_DOMAIN – you land right in the management console. Further domains go under Domains → Domains in the left navigation, the mailboxes under Directory → Accounts:
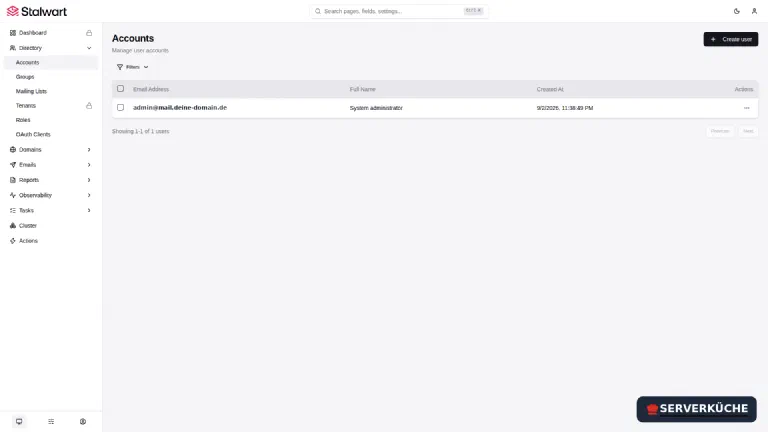
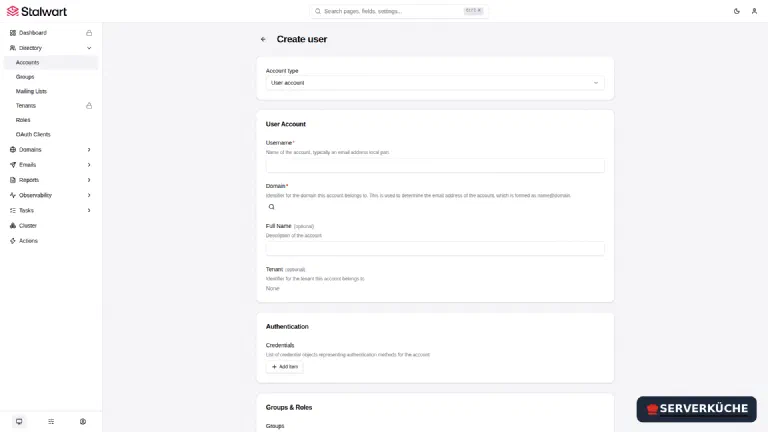
Via Create user you create a mailbox – username (the local part before the @), domain, display name and, under Authentication, a strong password (password manager!). This account can then log in via IMAP/JMAP and SMTP:
Step 6: Set it up in a mail program
Enter the new account in your mail program. Stalwart supports autodiscovery, so usually the email address and password are enough. Manually you use:
IMAP:        mail.YOUR_DOMAIN, port 993, SSL/TLS
SMTP:        mail.YOUR_DOMAIN, port 465, SSL/TLS
User:        the full email address
Both ports use implicit TLS: the connection is encrypted from the very first second. If your mail program stubbornly suggests port 587 with STARTTLS, switch it to 465 by hand – Stalwart doesn’t ship the submission listener on 587 (see step 2).
Besides the tried-and-true IMAP, Stalwart also speaks JMAP – a modern, JSON-based protocol designed for today’s networks. JMAP transfers only real changes instead of re-syncing whole folders, gets by with a single connection and is thus noticeably more sparing with battery and data – especially on the phone. If your mail client supports JMAP (e.g. the Thunderbird family in newer versions), you benefit directly; otherwise you stay with IMAP, which works just the same.
A mail from you to yourself should land in the inbox immediately – that proves that local delivery, IMAP and SMTP are in place. The acid test, though, is sending to the outside and receiving from the outside, and there deliverability decides.
Note
Step 7: Spam filter and Sieve rules
A big advantage of Stalwart: the spam and phishing filter is already built in and active – you don’t have to run and maintain a separate Rspamd container. It rates incoming mails based on numerous features (reputation, SPF/DKIM/DMARC result, content heuristics) and marks or blocks suspicious ones. Its settings live in a separate area of the console: the gear icon at the bottom left switches from Management to Settings, where you find Spam Filter. There you adjust the sensitivity and put senders on allow or block lists.
For your own rules on incoming and outgoing mail, Stalwart supports Sieve – the standardized filter language. With it you sort e.g. newsletters automatically into a folder or forward certain senders. You manage Sieve scripts server-side (via ManageSieve on port 4190) or directly in the web interface, so the rules take effect independent of the mail program – even when your computer is off.
Tip
When things go wrong
The web interface on port 8080 doesn’t respond. The container is still booting or port 8080 is
occupied/blocked. Check docker compose ps, read docker compose logs and make sure the
firewall lets port 8080 (and later 443) through. If the log
output stays completely empty after the setup, the log destination is still set to Log file –
switch it to Console in the console under Settings → Telemetry → Tracers and restart.
I missed the bootstrap password. It’s only logged once. Set a
STALWART_RECOVERY_ADMIN=admin:YOUR_PASSWORD under environment: in the compose.yaml and restart
with docker compose up -d – that gives you a fixed recovery-admin account.
No TLS certificate, the HTTPS address shows a warning. Either Let’s Encrypt can’t reach your
server on port 443 (Stalwart uses the TLS-ALPN-01 challenge over 443), or one of the five hostnames
from step 1 is missing in DNS. The log names the culprit:
ACME authentication error … NXDOMAIN looking up A for autoconfig.YOUR_DOMAIN. Add the missing
records, open port 443 in the firewall – Stalwart retries the certificate request automatically
afterwards.
Mails to the outside stay stuck, logs show timeouts on port 25. Your provider blocks outbound SMTP traffic. At netcup the default policy “netcup Mail block” (ports 25/465/587) is to blame: in the SCP under Firewall → Policies, take that netcup template off the server – no ticket needed, see netcup firewall setup. Without it, no delivery to other servers is possible.
Other servers don’t accept your mails or they land in spam. Missing or wrong PTR entry, no SPF/DKIM/DMARC. That’s not a Stalwart error but a matter of DNS/reputation configuration – see the email deliverability tutorial.
Your problem is not listed? Search all error messages →
Maintenance & backups
Updates. Stalwart is a single container – an update is correspondingly simple:
cd /opt/stalwart
docker compose pull && docker compose up -d
Before bigger jumps, read the release notes on GitHub; stay on a specific version tag (like v0.16.21 here) instead of latest so updates remain reproducible. Stalwart releases roughly weekly – you don’t have to take every patch, but you shouldn’t sit still for months either.
Backups. All data – messages, accounts, settings and the DKIM keys – lives in the stalwart_data volume (/var/lib/stalwart); stalwart_config only holds the small config.json. Back up both volumes regularly away from the server, cleanest encrypted with Restic. Because Stalwart writes the data during operation, you back up most consistently by briefly stopping the container (docker compose stop), backing up the volumes and starting again. The DKIM keys are especially important: if they’re lost, your signatures break after a restore until you reset the DNS records. A backup you’ve never restored is just a hopeful guess – test the restoration once on a test system.
Keep an eye on reputation. Occasionally check whether your server IP has landed on a block list, and take a look at the Stalwart console under Observability. A compromised mailbox that sends spam quickly ruins the reputation of your entire domain.
Last updated: Oct 2, 2026
Send feedback: feedback@serverkueche.de
What's next?
You might also like