Vaultwarden: your own password manager behind Traefik
Self-host Vaultwarden: a lean, Bitwarden-compatible password manager behind Traefik with HTTPS, an admin panel and an encrypted backup.
Table of contents
Passwords belong in a password manager – but do they have to live in the cloud of some third-party provider? With Vaultwarden you host your own, encrypted and under your control. It speaks the Bitwarden language, so you use the familiar Bitwarden apps and browser extensions – they just point at your server.
What are we building?
By the end, Vaultwarden 1.37 runs in a container behind your Traefik proxy, reachable
at https://vault.YOUR_DOMAIN with a valid HTTPS certificate. Vaultwarden is a lean
reimplementation of the Bitwarden server written in Rust: API-compatible, but frugal
enough to run on a small VPS. You connect the official Bitwarden clients (browser
extension, phone app, desktop) with your server, store your credentials – end-to-end
encrypted – and manage the service via a secured admin panel.
Your passwords thus live on your server, in your country, under your backup – and you pay no subscription fee for features like 2FA or attachments.
Vaultwarden ≠ Bitwarden
Prerequisites
- A running Traefik reverse proxy with the shared
proxynetwork and the Let’s Encrypt resolverle– exactly the setup from the tutorial reverse proxy with Traefik. Without Traefik this recipe doesn’t work: Vaultwarden requires HTTPS. - A subdomain, e.g.
vault.YOUR_DOMAIN, whose DNS record (A/AAAA) points to your server IP – see connecting a domain to your server. - A working backup of your server. A password manager is the place where data loss hurts most – if you haven’t yet, first set up backups with Restic.
If you want to combine several services later, the server calculator helps with the right server size.
VPS 1000 G12.5
4 vCores · 8 GB RAM · 128 GB SSD
from €14.50/month
Vaultwarden is so frugal that even the smallest VPS is easily enough.
💶 1 month free:
Single use, valid for VPS 1000 G12.5. Redeem in the cart →
💶 €5.95 voucher for new netcup customers: always valid · not for domains or VPS Lite
Step by step
Step 1: Generate the ADMIN_TOKEN
Vaultwarden has an admin panel at /admin. Access to it is protected by an ADMIN_TOKEN.
You should not store it in plaintext, but as a hash – then your panel password appears
nowhere readable in the Compose file.
Vaultwarden brings its own command for this. We run it briefly in a throwaway container:
docker run --rm -it vaultwarden/server:1.37.4 /vaultwarden hash --preset owaspThe command asks you twice for a password (input stays invisible) and then outputs an Argon2id hash – a long string that starts like this:
Generate an Argon2id PHC string using the 'owasp' preset:

Password:
Confirm Password:

ADMIN_TOKEN='$argon2id$v=19$m=19456,t=2,p=1$FkxFEQ64Wy4zlQOWMI1fJ...$TxULe6MSND3By6GPVPKB1...'

Generation of the Argon2id PHC string took: 21.709159ms
Copy out the complete string between the quotes (including the $argon2id$… parts) – you
need it in a moment. The password you entered here is your admin panel password; store
it in your password manager (in the old one, for now).
Why the detour via the hash?
ADMIN_TOKEN as a plaintext password. The hash is safer, though:
even someone who gets hold of your compose.yaml can’t compute your panel password back
from it. --preset owasp chooses Argon2 parameters per the current OWASP recommendation.Step 2: Create the compose.yaml
Create a dedicated folder and change into it:
mkdir -p ~/vaultwarden && cd ~/vaultwardenCreate the compose.yaml. Replace vault.YOUR_DOMAIN with your real subdomain and the
ADMIN_TOKEN with the hash from step 1:
services:
  vaultwarden:
    image: vaultwarden/server:1.37.4
    volumes:
      - ./vw-data:/data
    environment:
      DOMAIN: "https://vault.YOUR_DOMAIN"
      SIGNUPS_ALLOWED: "true"
      ADMIN_TOKEN: "$$argon2id$$v=19$$m=19456,t=2,p=1$$FkxFE...$$TxULe..."
    labels:
      - "traefik.enable=true"
      - "traefik.http.routers.vaultwarden.rule=Host(`vault.YOUR_DOMAIN`)"
      - "traefik.http.routers.vaultwarden.entrypoints=websecure"
      - "traefik.http.routers.vaultwarden.tls.certresolver=le"
      - "traefik.http.services.vaultwarden.loadbalancer.server.port=80"
    networks:
      - proxy
    restart: unless-stopped

networks:
  proxy:
    external: true
The most important lines in detail:
image: vaultwarden/server:1.37.4– we deliberately pin the version instead of takinglatest. That way you update in a controlled manner (see “Maintenance”). For an even smaller image there’s also:1.37.4-alpine.volumes: ./vw-data:/data– this is where your database (db.sqlite3), the encryption keys and the attachments live. This volume is mandatory. Without a volume Vaultwarden deliberately refuses to start, so you don’t lose your data in an ephemeral container.DOMAIN– the full HTTPS URL. Vaultwarden needs it for WebAuthn/2FA and invitation links, among other things. Must match your router rule exactly.SIGNUPS_ALLOWED: "true"– allows registration for now so you can create your first account. We turn that off again shortly.ADMIN_TOKEN– your hash from step 1. Important: in a Compose file every dollar sign must be doubled ($→$$), otherwise Compose tries to interpret it as a variable. So$argon2id$…becomes$$argon2id$$….loadbalancer.server.port=80– Vaultwarden listens on port 80 in the container. This line tells Traefik explicitly where to forward internally, instead of guessing the target port from the image – the same pattern as with every app behind Traefik.- No
ports:– as with every app behind Traefik, Vaultwarden is only reachable via the proxy, never directly from outside.
Step 3: Start it and the first call
Start the container:
docker compose up -dOn the first start, Vaultwarden creates the data directory and initializes the database. Take a look at the log:
docker compose logs -f vaultwardenAt the end you should see this line – it confirms the service is running:
[2026-08-01 23:35:51.515][start][INFO] Rocket has launched from http://0.0.0.0:80With Ctrl+C you leave the log view again (the container keeps running).
The Vaultwarden image ships its own healthcheck, and Traefik only forwards to containers
that count as healthy. Right after the start your domain therefore answers with a bare
404 page not found from Traefik for up to a minute – that’s normal, not a configuration
error. Just check the status in the meantime:
docker compose psAs long as it still says (health: starting), Traefik is waiting. After the first
successful healthcheck (it runs on a 60-second interval) the line looks like this:
NAME                        IMAGE                       COMMAND       SERVICE       CREATED         STATUS                   PORTS
vaultwarden-vaultwarden-1   vaultwarden/server:1.37.4   "/start.sh"   vaultwarden   2 minutes ago   Up 2 minutes (healthy)   80/tcp
Now open https://vault.YOUR_DOMAIN in the browser. On the first access Traefik fetches
the Let’s Encrypt certificate – that can take a few more seconds. After that the Bitwarden
web interface appears.
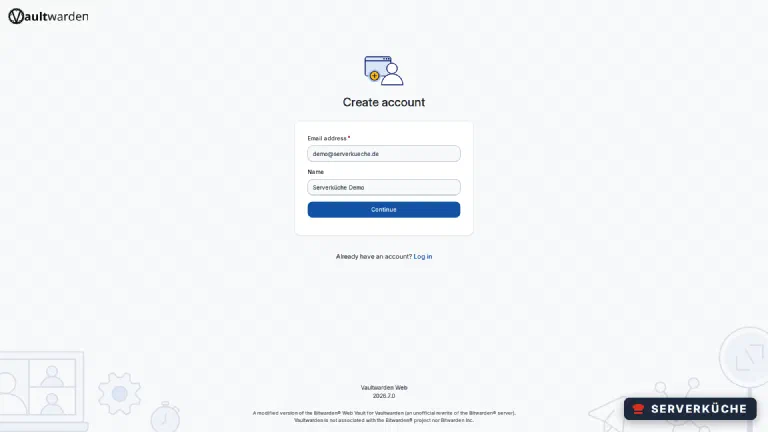
Click Create account and create your first account – with your email address and a name:
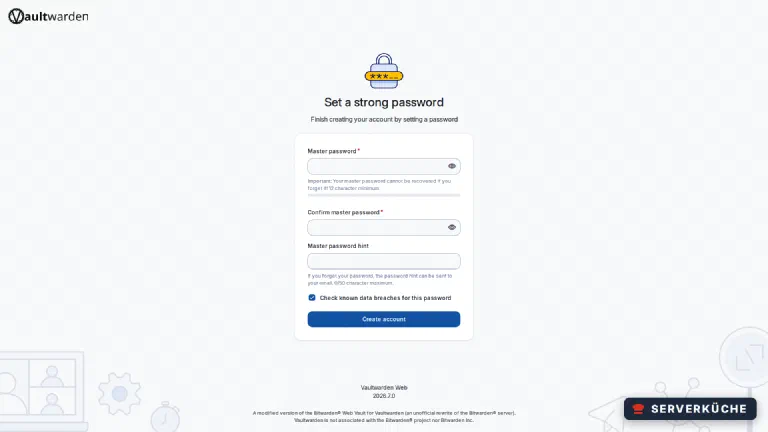
In the next step you set your master password. That’s the one key that unlocks your entire vault:
The master password is not recoverable
Step 4: Close registration again
Once your account is set up, you want to prevent strangers from registering too – your
Vaultwarden is, after all, open on the internet. Set SIGNUPS_ALLOWED to false in the
compose.yaml:
    environment:
      DOMAIN: "https://vault.YOUR_DOMAIN"
      SIGNUPS_ALLOWED: "false"
      ADMIN_TOKEN: "$$argon2id$$..."
And apply the change:
docker compose up -dCompose detects the changed environment variable and recreates the container
(Container vaultwarden-vaultwarden-1 Recreated). As with the first start it then takes up
to a minute until the healthcheck passes and Traefik picks up the new container – before
that you see the 404 page not found again. From now on the login page rejects new
registrations with Registration not allowed or user already exists. Further users (e.g.
for the family) you invite specifically via the admin panel when needed – more on that
shortly.
Don't forget
SIGNUPS_ALLOWED: "true" is the most common misconfiguration with self-hosted
Vaultwarden. Anyone who knows your domain could otherwise create an account. This step is
mandatory, not an extra.Step 5: The admin panel
Open https://vault.YOUR_DOMAIN/admin and log in with the password you entered in
step 1 when generating the hash (not with the hash itself). You land in the management
interface:
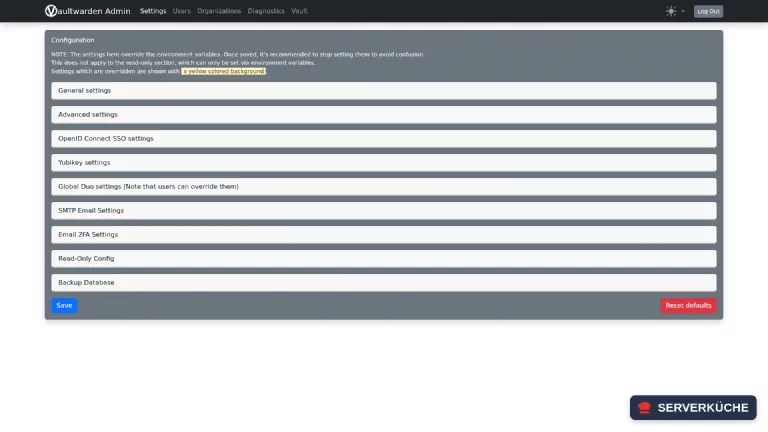
Here you control the service centrally:
- Users – view existing users, invite new ones (even with
SIGNUPS_ALLOWED=false), deactivate accounts. - Settings → SMTP Email Settings – enter your mail server’s credentials here so Vaultwarden can send invitations and 2FA codes by email. Without SMTP, invitation by link works too, but email-based 2FA doesn’t.
- Diagnostics – shows you whether your
DOMAINis set correctly and whether Vaultwarden is reachable from outside – handy for troubleshooting.
Settings in the panel vs. environment variables
vw-data/config.json and overrides the
environment variables from the compose.yaml. Decide per setting on one way to avoid
confusion. For the basic configuration (domain, token, signups) we deliberately stick with
the Compose file – it’s versionable and reproducible.Step 6: Connect the clients
Now comes the real benefit. Install the official Bitwarden app or browser extension (from the respective app or add-on store). Before you log in, you switch the server:
- In the app/extension, before logging in, open the settings for the self-hosted environment (gear icon or “Region: Self-hosted”).
- Enter
https://vault.YOUR_DOMAINas the server URL and save. - Now log in with your email and your master password – the app talks to your server from now on.
The nice part: it’s the same mature clients as with commercial Bitwarden. Autofill, password generator, secure notes, attachments and 2FA storage work the same way – only the data lives on your server.
Import existing passwords: if you’re switching from another manager (or the browser’s
password store), you don’t have to retype everything. Export your entries there as CSV or
JSON and import them via the web interface under Tools → Import. Vaultwarden
understands the export formats of the common managers (KeePass, LastPass, 1Password,
Chrome/Firefox, etc.) directly.
Securely delete export files afterwards
Enable two-factor authentication
When things go wrong
The container exits again immediately, the log says No persistent volume!. The
volumes: mapping is missing. Vaultwarden then aborts with the box “It looks like you did
not configure a persistent volume!” and exits with code 1, so your passwords don’t end up
in an ephemeral container. Add ./vw-data:/data as in step 2 and restart.
The web interface shows “You need to enable HTTPS!” or the login fails with crypto
errors. Vaultwarden uses the browser’s Web Crypto API, which is only available in a
secure context (real HTTPS). You opened the page over http:// or with an invalid
certificate. Make sure Traefik fetched a valid Let’s Encrypt certificate (check the Traefik
log) and that you reach the page over https://. The DOMAIN variable must also start with
https://.
The admin panel rejects your password, even though it’s correct. Probably the dollar
signs in the ADMIN_TOKEN aren’t doubled. In the compose.yaml every $ must become $$.
Check with docker compose exec vaultwarden printenv ADMIN_TOKEN how the token really
arrives inside the container – there it has to be a single $ again. (docker compose config won’t help: it shows the file with the doubled $$.) Also remember: at login you
enter the password, not the hash.
The phone app can’t find the server or reports “Server URL invalid”. The server URL must
be the full https:// address without a trailing path (https://vault.YOUR_DOMAIN). Also
check whether the domain is reachable from outside via a browser and the certificate is
valid – apps are stricter about certificate errors than browsers.
Despite SIGNUPS_ALLOWED=false, someone was able to register. The setting was probably
set in the admin panel and overrides the environment variable, or the container wasn’t
restarted after the change. Check the value under Settings → General settings in the
panel and restart with docker compose up -d.
Your problem is not listed? Search all error messages →
Maintenance & backups
Backups are non-negotiable for a password manager. Your entire vault is in the
vw-data/directory (SQLite database, keys, attachments). Back it up encrypted and off-site with Restic – add the folder~/vaultwarden/vw-datato your backup sources. For a consistent database state, briefly rundocker compose stopbefore the backup, or use the “Backup Database” function in the admin panel. A mere file copy while the container is running can catch an inconsistent state (SQLite writes into WAL files) – with a password manager that’s not a risk worth taking.Apply updates in a controlled way. Because we pinned the version, you update deliberately: before the switch read the release notes, then raise the tag in the
compose.yaml(e.g. to the next1.x) and pull anew:Terminaldocker compose pull && docker compose up -dAfterwards check the
Rocket has launchedline in the log again and test a login.Keep registration closed. Occasionally check that
SIGNUPS_ALLOWEDis stillfalse– always invite new users specifically via the admin panel.Rotate the ADMIN_TOKEN if it might be compromised: generate a new hash with the
hashcommand from step 1, replace it in thecompose.yaml, restart.Never lose the master password. There is no recovery. In a team/family setup, an emergency access can make sense – you set that up per vault in the account settings.
Last updated: Oct 16, 2026
Send feedback: feedback@serverkueche.de
You might also like